5. Manage Content
The power of L7|ESP depends on the strength of content developed by L7 Informatics and its customers. This section describes best practices for developing robust, easy-to-use content.
5.1. Auto-Generated Sequence IDs
You can create and customize your own auto-generated sequence IDs for Entities and Experiments through the lab7.conf file as described in this section.
Go to the L7|ESP installation directory and locate the lab7.conf file. Find the lims section and note that "ESP SEQUENCE" is the default sequence ID used to automatically generate sequence IDs for Entities.
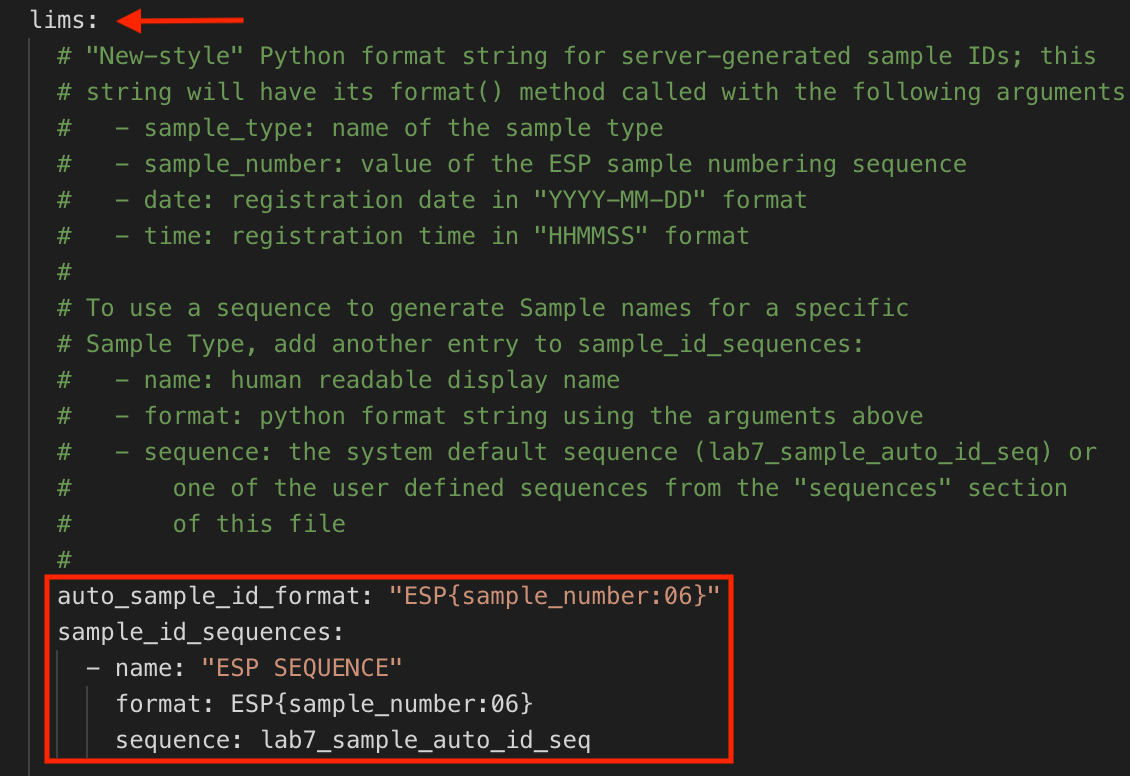
The "ESP SEQUENCE" generates unique sequence Entity IDs in the following format: ESP000001, ESP000002, ESP000003, etc.

5.1.1. Create Auto-Generated Sequence IDs for Entities
In the
limssection of thelab7.conffile, add your new sequence ID below"ESP SEQUENCE"as follows:
name, which is what the sequence ID is referred to as in L7|ESP.
format, which is a Python format string that defines how the sequence ID is formatted using one or more of the following arguments:
{sample_type}, which includes the associated Entity Type.
{sample_number}, which includes the value of the numbering sequence.
{date}, which includes the date that the Entity was created in a "YYYY-MM-DD" format.
{time}, which includes the time that the Entity was created in a "HHMMSS" format.
{datetime}, which includes the date that the Entity was created in a "YYYY-MM-DD" format and the time that the Entity was created in a "HHMMSS" format.
sequence, which is the name of the sequence (corresponds to thesequencessection).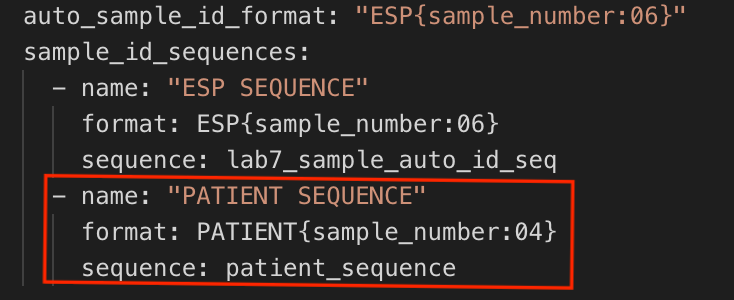
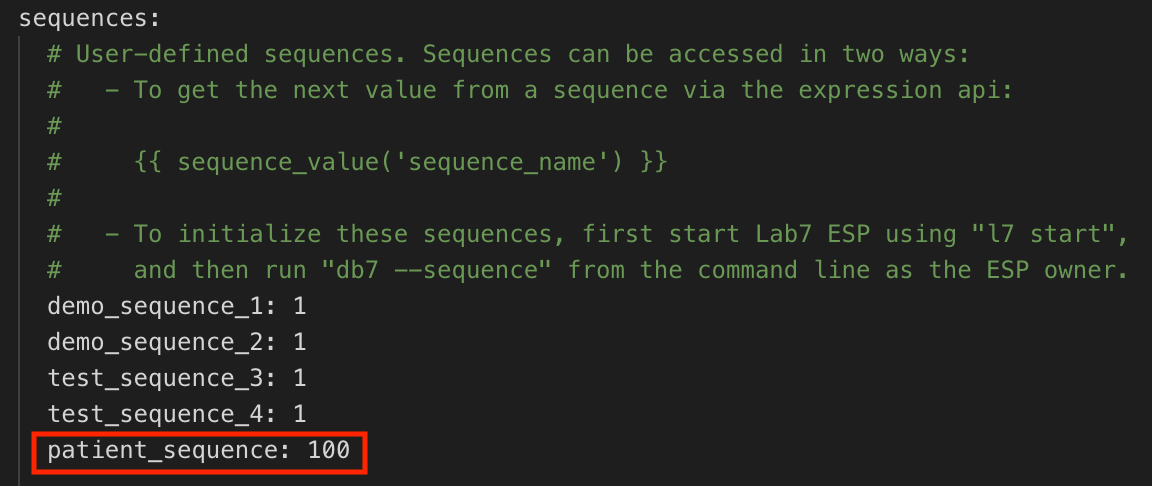
In the
sequencessection, add thesequencefrom Step 1 (e.g.,patient_sequence) followed by the number to start with (e.g.100).
The
"PATIENT SEQUENCE"example generates unique Entity IDs in the following format:PATIENT0100,PATIENT0101,PATIENT0102, etc.
Restart L7|ESP using the command
l7 stop && l7 start. To begin using the new Entity ID sequence, create a new Entity Type or update an existing Entity Type (refer to Manage Entity Classes).
5.1.2. Create Auto-Generated Sequence Names for Experiments
In the
id_sequencessection of thelab7.conffile, add your new sequence belowexperimentas follows:
name, which is what the sequence ID is referred to as in L7|ESP.
format, which is a Python format string that defines how the sequence ID is formatted using one or more of the following arguments:
{workflow}, which includes the associated Workflow.
{experiment_number}, which includes the value of the numbering sequence.
{date}, which includes the date that the Entity was created in aYYYY-MM-DDformat.
{time}, which includes the time that the Entity was created in aHHMMSSformat.
{datetime}, which includes the date that the Entity was created in aYYYY-MM-DDformat and the time that the Entity was created in aHHMMSSformat.
sequence, which is the name of the sequence (corresponds to thesequencessection).
In the
sequencessection, add thesequencename from Step 1 (e.g.,test_sequence) followed by the number to start with (e.g.,01).
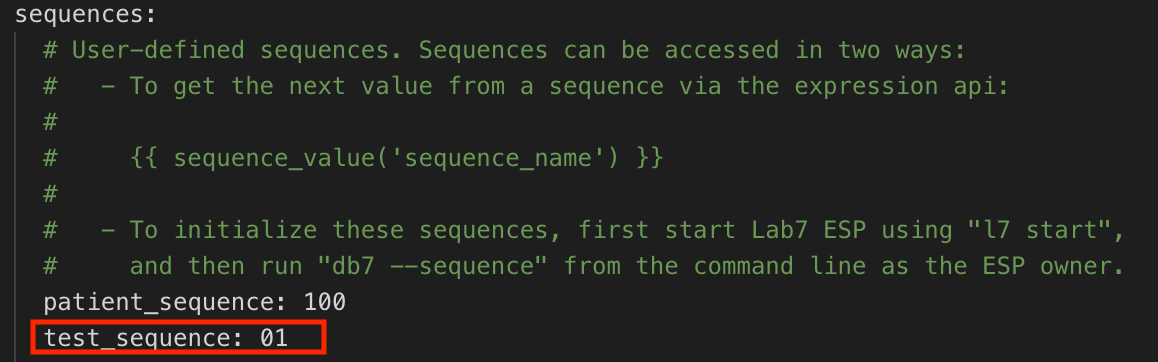
The
"TEST SEQUENCE"example generates unique Experiment Names in the following format:TEST00001,TEST00002,TEST00003, etc.
Restart L7|ESP using the command
l7 stop && l7 start. To begin using the new Experiment Name sequence, create a new Workflow or update an existing Workflow (refer to Manage Workflows).
5.2. Ontology Feature
The Ontology feature is a customizable template for enforcing predefined formats when data is being collected in a Worksheet. For example, if a Protocol contains a "Name" column for users to document their names, you can create and define a "Name" Ontology that requires the format of "First Name" and "Last Name" for that "Name" column. The Ontology feature is beneficial because it standardizes how data is captured across all users.
To create an Ontology:
Go to the L7|ESP installation directory. Under the data/reference folder, create a .json file titled "attribute_ontology".
In the .json file, define your formats (refer to the examples below).
 {
    "name": "Sample Picklist",
    "type": "dropdown",
    "description": "Sample Species",
    "content": ["Mouse", "Fly", "Human"],
    "defaultValue": "Human",
    "multiple": false,
    "required": true
}
{ "name": "Employee Data", "type": "category", "content": [ { "name": "First Name", "type": "text" }, { "name": "Last Name", "type": "text" }, { "name": "Age", "type": "numeric" }, { "name": "Actively Employed", "type": "checkbox", "defaultValue": true }, { "name": "Address", "type": "category", "content": [ { "name": "Street", "type": "text" }, { "name": "City", "type": "text" }, { "name": "State", "type": "text", "defaultValue": "Texas", "required": true }, { "name": "Zip", "type": "numeric" } ] } ] }
To activate the Ontology feature, go to the L7|ESP installation directory and locate the __init__.py file. Find the
DEFAULT_CONFIG =section and addontology_mode: TRUE,.
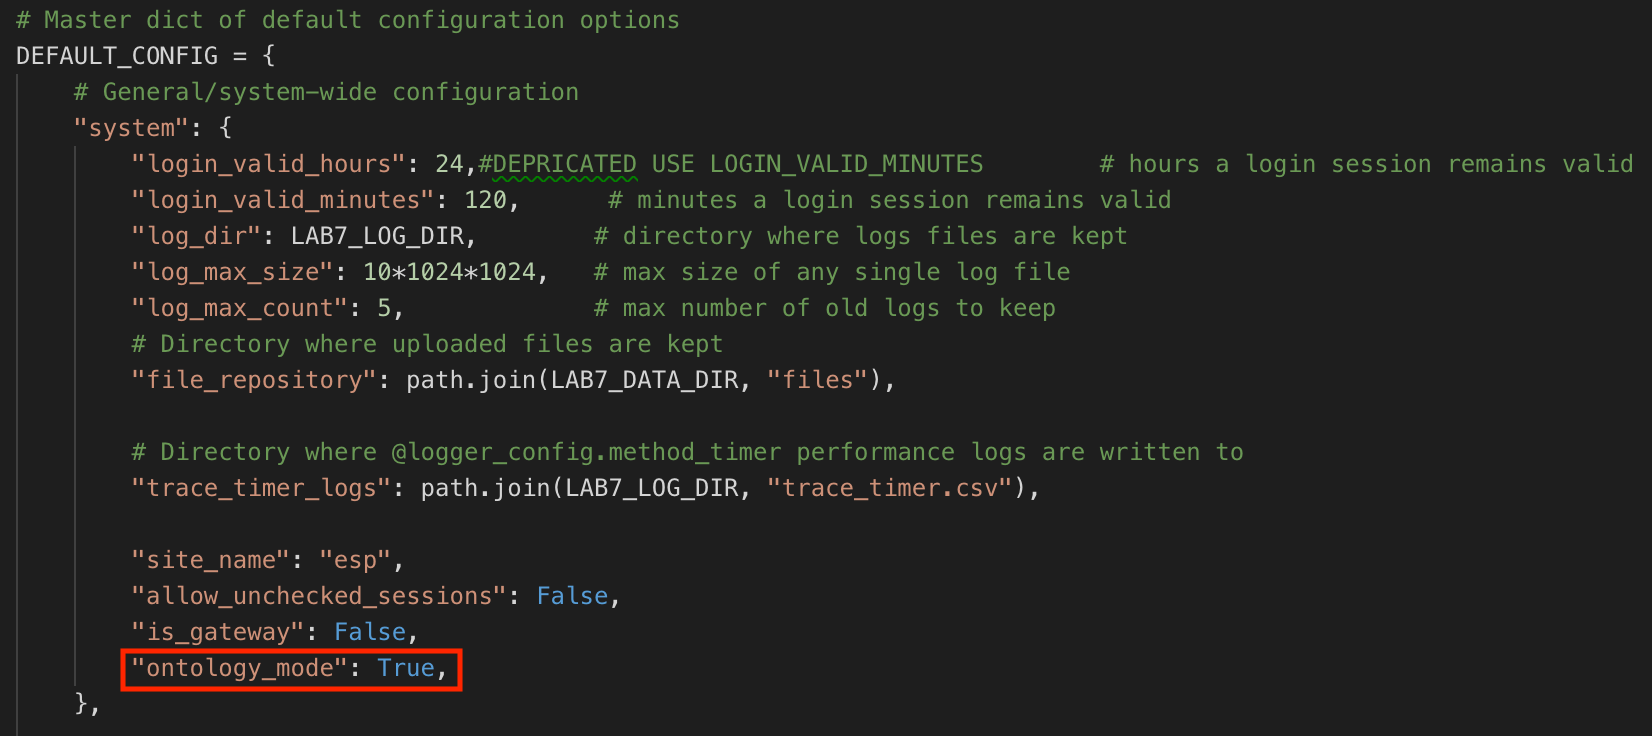
Once activated, the Ontology feature is visible and can be used when adding or updating a column in a Protocol (refer to Manage Protocols).
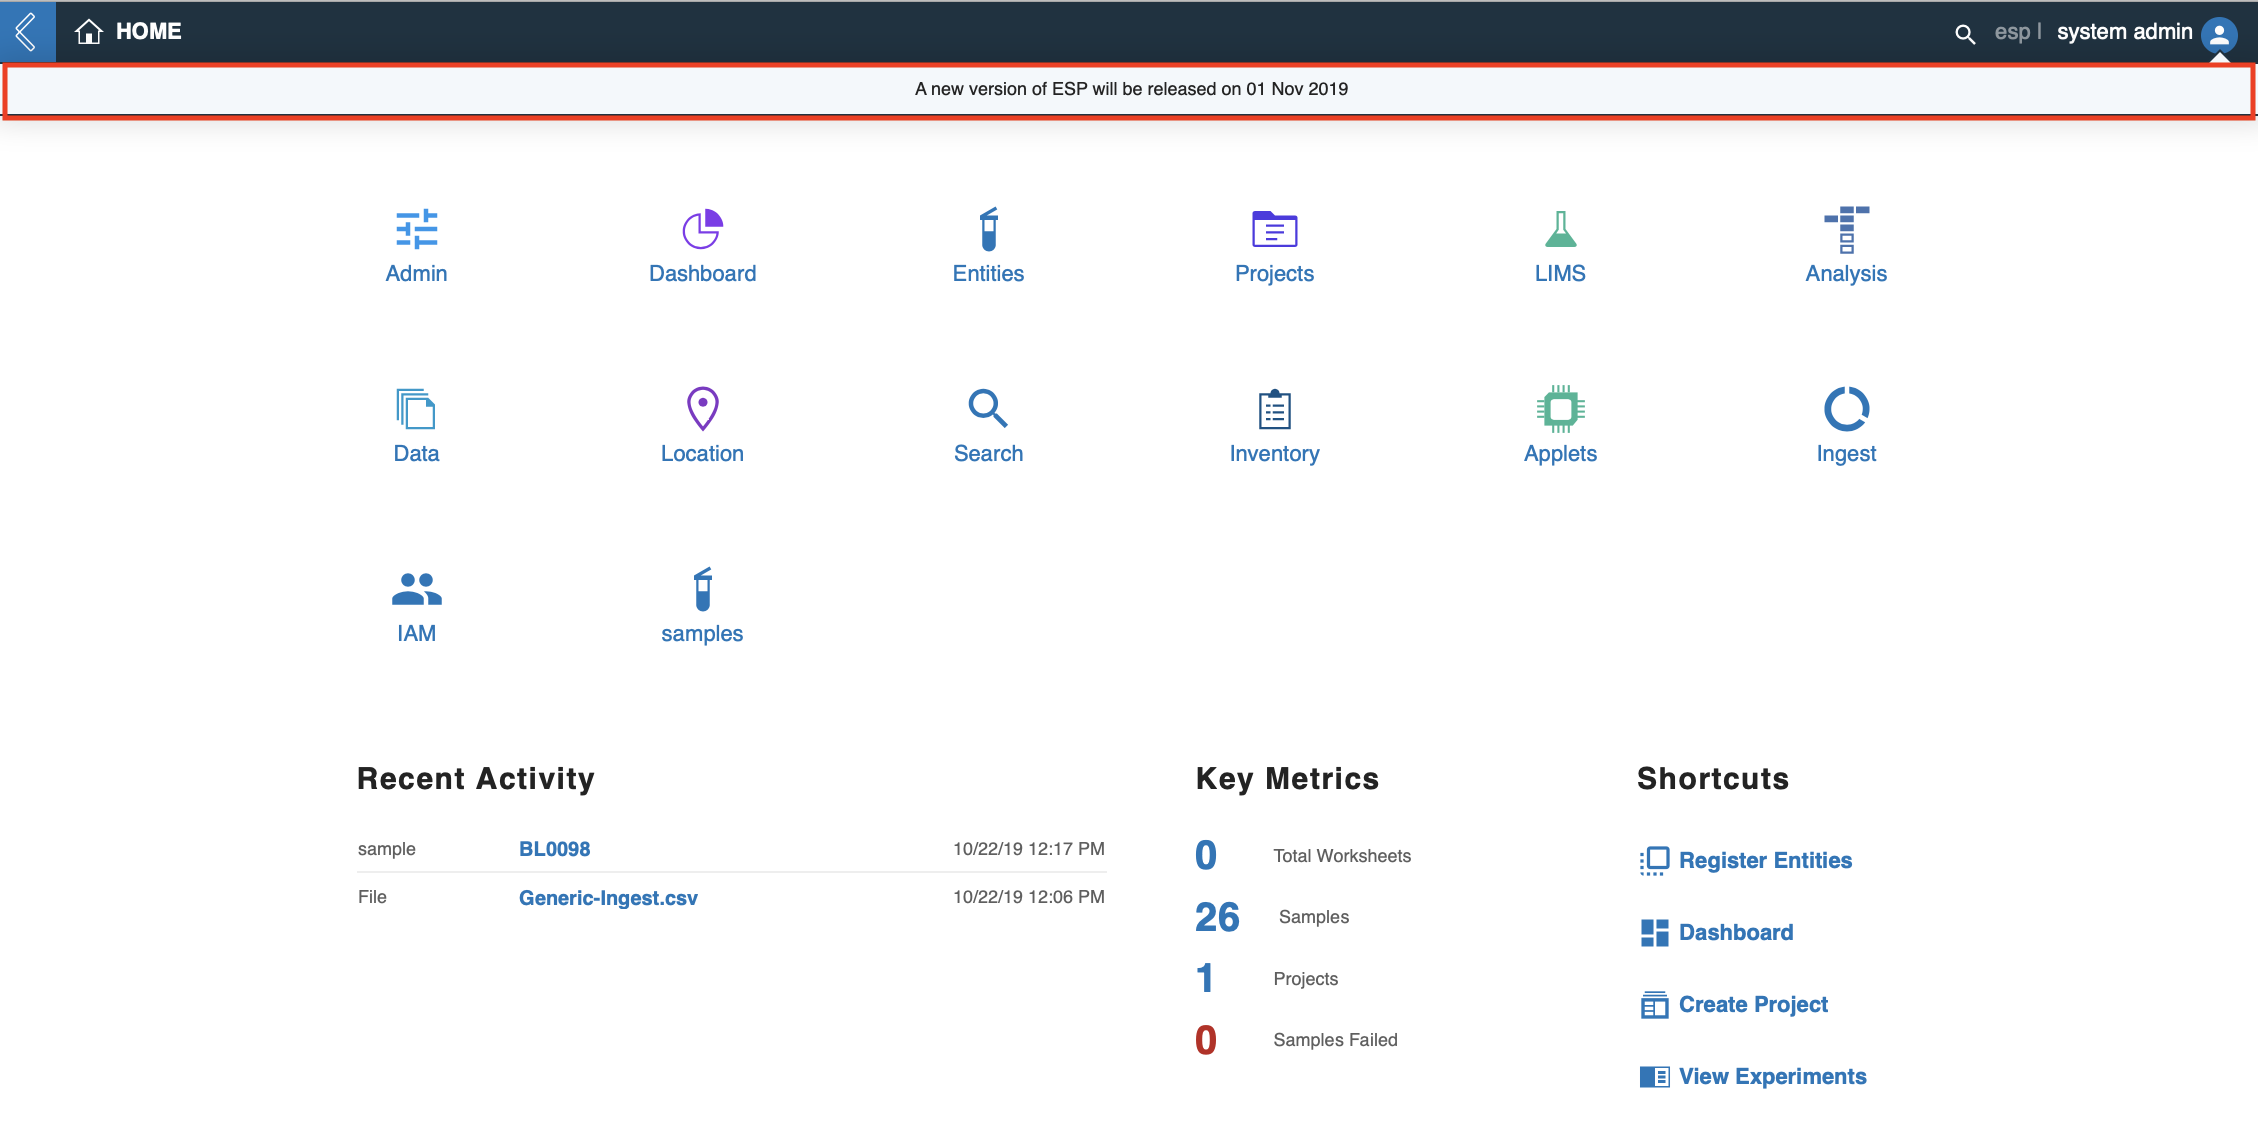
5.3. Banners
System Admins can create a Banner in L7|ESP to easily communicate information to all users. The Banner is displayed at the top of every page in L7|ESP until it is removed by the Admin.
To create a Banner:
Log in as an Admin.
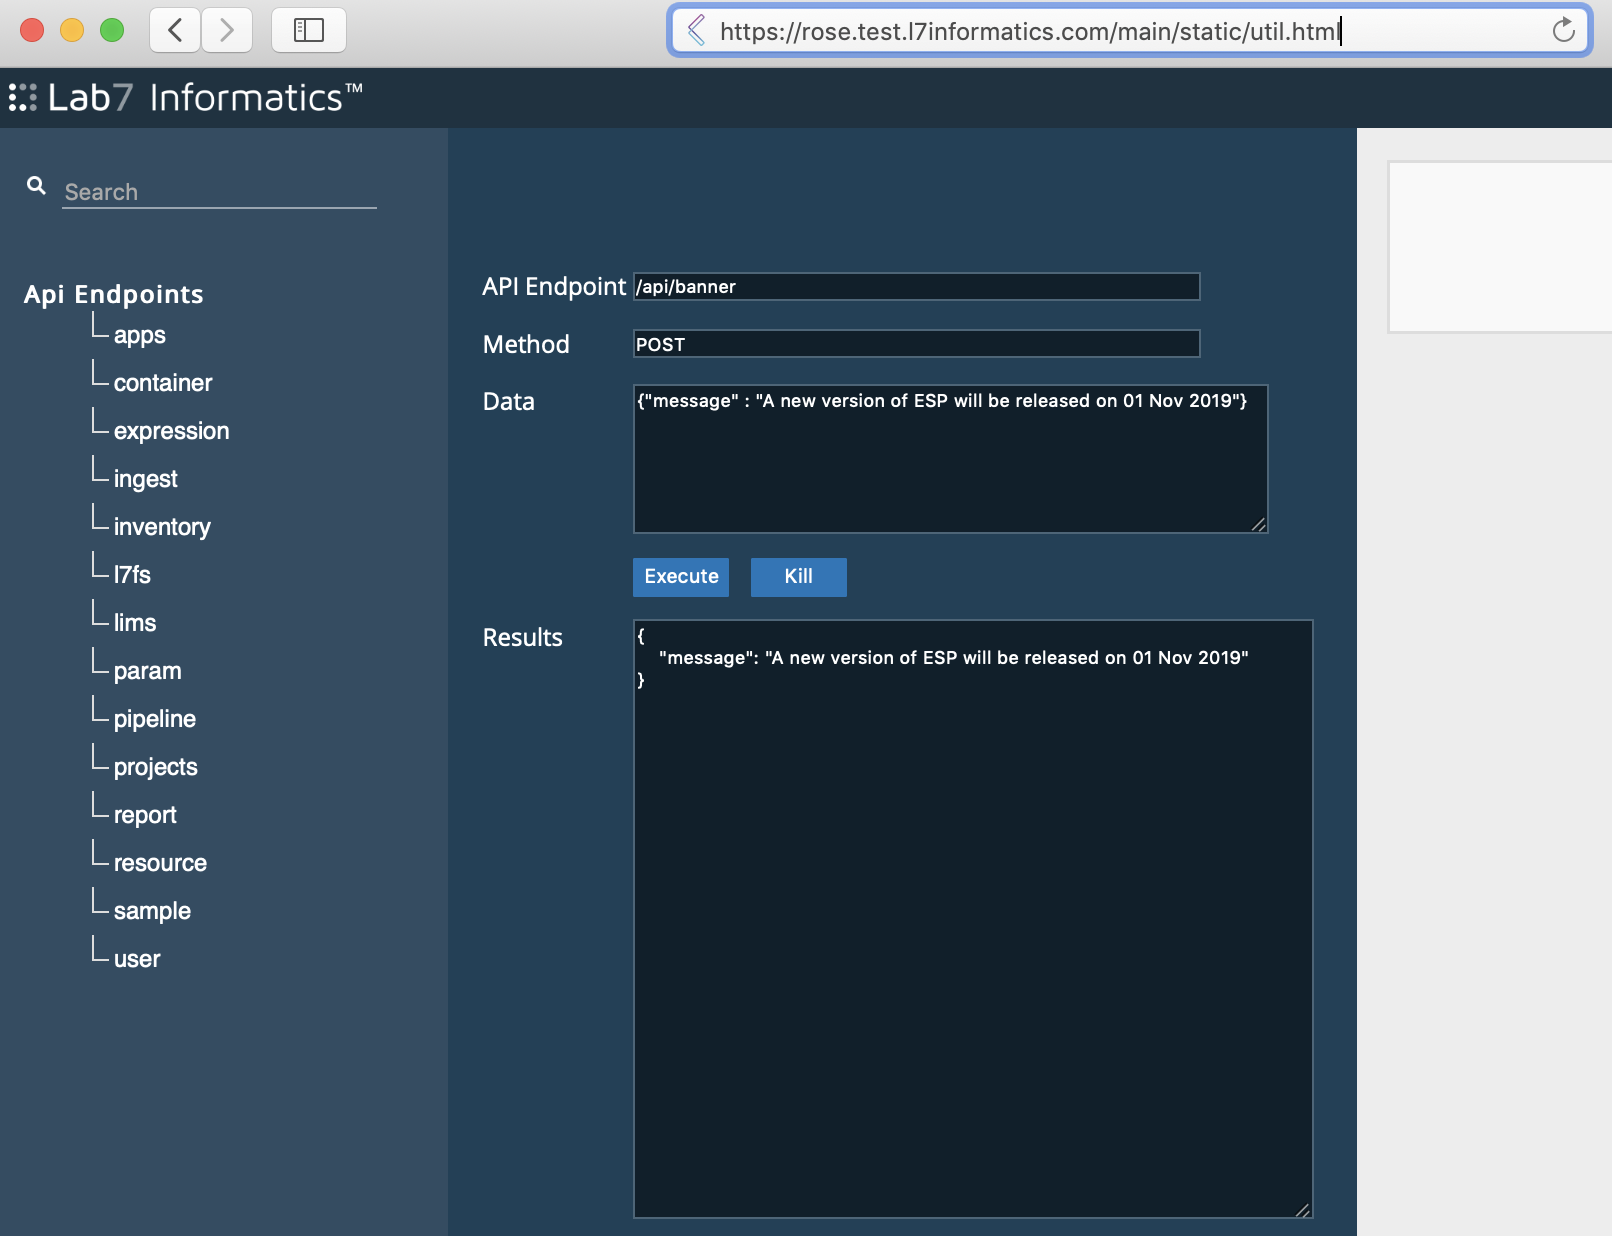
Paste
/main/static/util.htmlafter the.comin your L7|ESP URL.From the API page:
In the API Endpoint field, enter
/api/banner.In the Method field, enter
POST.In the Data field, enter
{"message" : "Your message here"}.
Click Execute.
Return to L7|ESP and the Banner will be visible.
To remove a Banner:
Log in as an Admin.
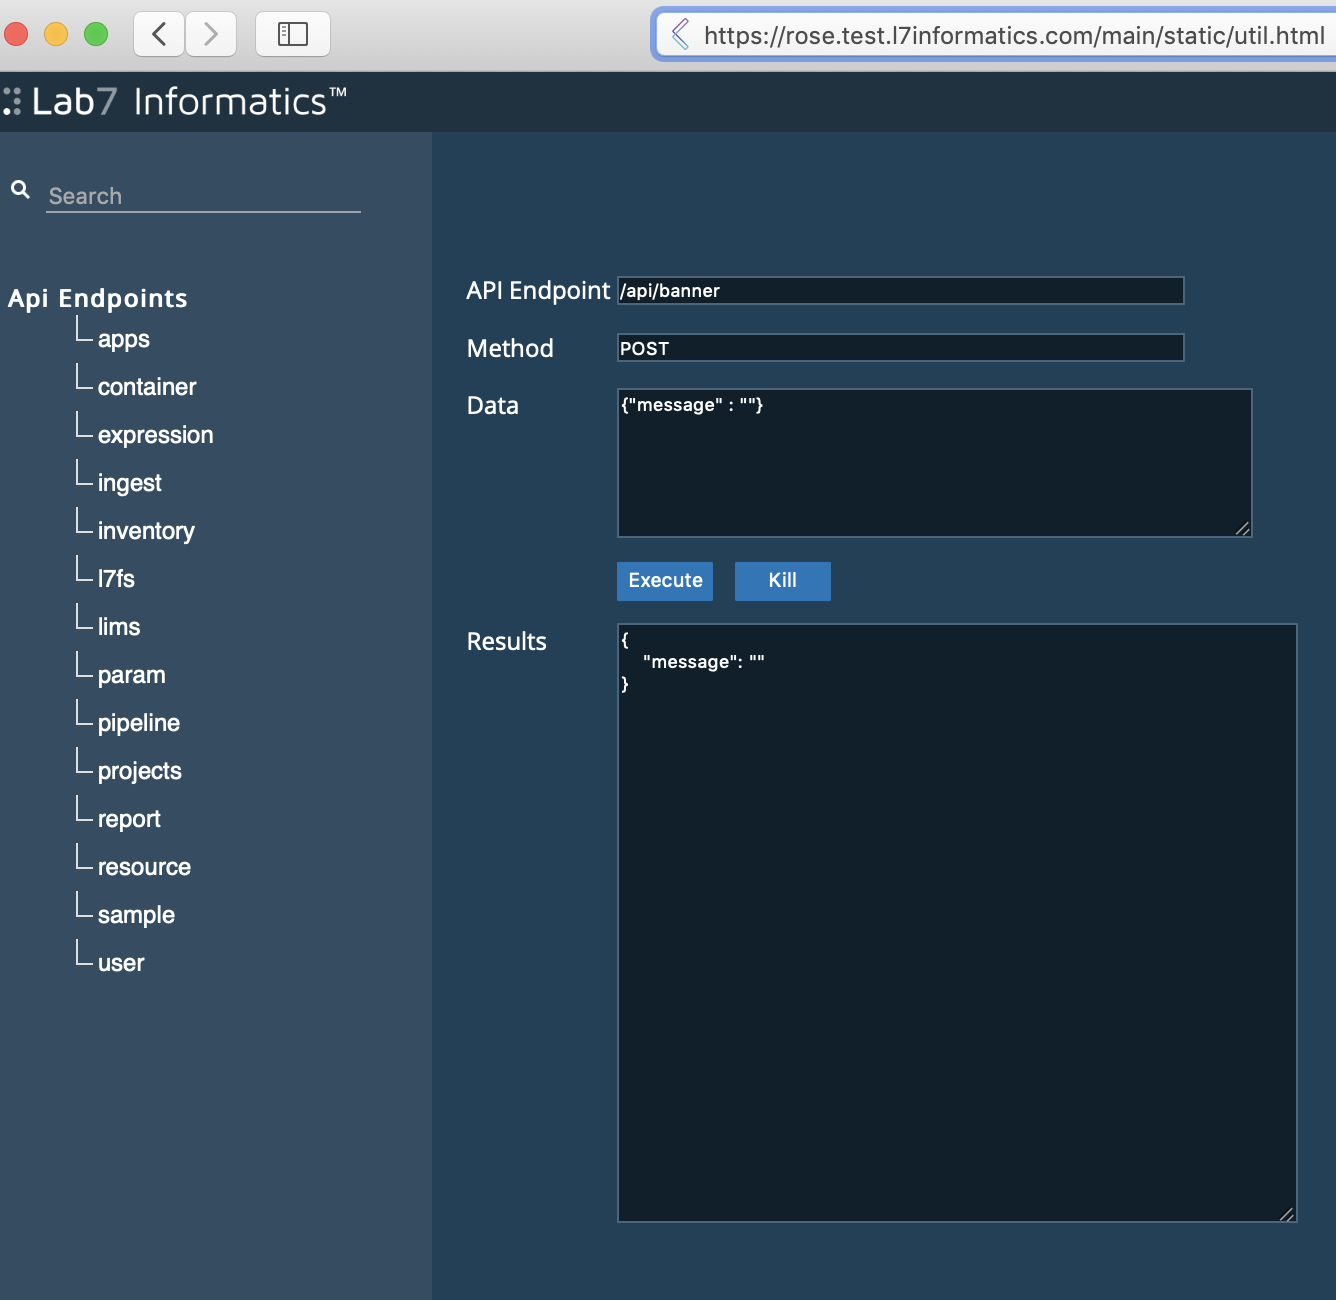
Paste
/main/static/util.htmlafter the.comin your L7|ESP URL.From the API page:
In the API Endpoint field, enter
/api/banner.In the Method field, enter
POST.In the Data field, enter
{"message" : ""}.
Click Execute.
Return to L7|ESP and the Banner is gone.
5.4. Data References
A key part of building usable content is using data input or ingested at a previous time for "smart" interactions, such as computing dilution volumes based on ingested concentrations.
L7|ESP provides a number of expressions that allow for referencing content, all with different strengths. The following guidelines should generally be adhered to to ensure robust and reusable content.
Reference From |
Reference To |
Expression |
Expression Location |
Comments |
|---|---|---|---|---|
Protocol cell |
Another cell within the same Protocol |
|
|
L7 Informatics is considering a shorter alias such as “col” or “cell” as shorthand for this function. |
Protocol cell |
Cell within another Protocol in the Workflow |
|
Data Link |
In general, a Protocol should have all information it needs to perform its own calculations/computations. If external data is required, then the Protocol should create a (possibly hidden) column that is referenced within the Protocol. Then data linking can be used to link that column to another value within the Workflow. This makes the Protocol's "input requirements" explicit. |
Protocol cell |
Cell within a Protocol outside the current Workflow |
|
Preferably a Data Link to avoid embedding/hiding the external dependency too deep in the content |
Use of Use of either |
Custom report (JavaScript) |
Cell within a Protocol |
|
Within the report |
|
Custom bioinformatics scripts |
Cells within a Protocol |
|
Within the script |
Most scripts will be focused on accessing data present within the current Experiment/Worksheet. Consequently, using Use of |
5.5. Testing
When creating
espclient-based Workflow or Workflow Chain tests:
Always provide a
verifyblock that verifies calculations for every column with a default value (whether literal default or expression-based default).When specifying Entities and providing Entity identifiers for those Entity, use a large-numbered identifier (e.g.,
SAM999901instead ofSAM000001).Use a large-numbered identifier because the client pushes the names directly without triggering any updates to the underlying database sequence, so if you use low-numbered identifiers and then attempt to perform manual testing, there will be UI confusion because you will easily wind up with multiple
SAM000001Entities.
For accelerated development, create test cases for each Workflow so you can update and develop on that Workflow in isolation from other Workflows.
Create unit tests for custom expression functions.
Make sure all branches of Workflow Chain transitions are tested.
You still need one or more end-to-end (E2E) tests to verify that the full Workflow Chain works as expected.
You still need to walk through the entire Workflow Chain one or more time(s) manually, especially to verify any custom JavaScript (and/or to write Cypress tests).
5.6. Custom JavaScript
Understand how to use the renderers.js and invokables.js files. In general:
renderers.jscan be used to add custom column renderers.Invokables can be used to add reusable functions that can be called from
onrenderandonchangehandlers.
Minimize the amount of JavaScript implemented directly in onrender/onchange handlers by putting the code in invokables.js instead. This increases productivity significantly by allowing the developer to update the invokables.js file and refresh the page without having to create a new experiment with each JavaScript code change.
5.7. Complexity of Custom (Python) Expressions
The more complex the expression, the more likely there is an error in the expression. Complex expressions can only be tested by loading the actual Workflow content.
In general, prefer registering custom expression functions that receive parameters and calculate the desired result. These functions can then be unit tested directly using standard Python testing tools, more quickly testing a larger number of edge cases.
5.8. Pipelines vs. Invokables
Both Pipelines and Invokables allow L7 Informatics to write custom Python that interacts with L7|ESP to perform automation tasks. Pipelines allow Pipeline Protocols to be included in the LIMS app to give you, the user, push-button automation. Invokables can be triggered from custom Protocol buttons, which also gives you push-button automation. So, when should you use a Pipeline/Pipeline Protocol and when should you use an Invokable? Below are a few guidelines.
First, determine if the process requires provenance tracking (see flowchart below).
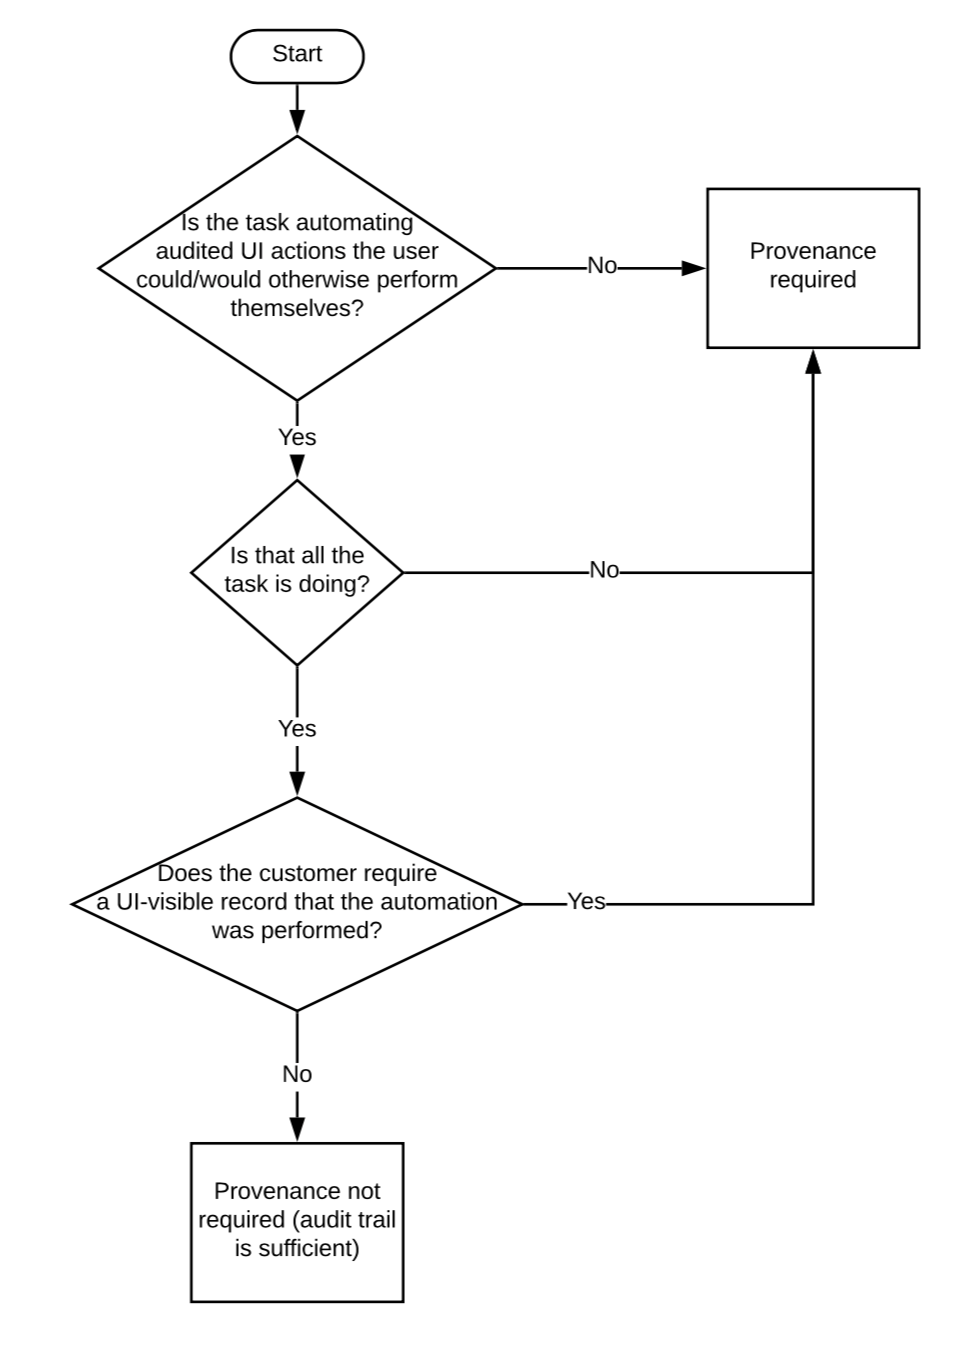
If the process requires provenance, a Pipeline is your only option. If the process does not require provenance, consider the following questions:
Does the process make changes to the database? Do all of the changes need to be in a single transaction?
If they do, then an Invokable is your only option, but clarify between "nice to be in a single transaction" vs. "must be in a single transaction".
In general, if a process is idempotent (i.e. you can run it a second time and no changes will be made to the system between what you did the first time), a transaction is helpful, but not required.
Idempotent operations would lean toward Pipelines. Not idempotent lean toward Invokables.
Does the process run quickly?
Slow processes should generally be avoided in Invokables currently since they tie up a web worker until the process is finished.
Does the process need to be run one time for all Entities, and the results of the process distributed across Entities, with different values for each Entity?
Doing this with a Pipeline generally works best with two Protocols; alternatively, it can be accomplished relatively easily with an Invokable + custom Protocol button.
If there are no requirements dictating the use of a Pipeline vs. Invokable, then consider the user experience.
If the process needs to be executed 1 time for each Entity in a Worksheet, then a Pipeline Protocol makes the most sense because it gives you a button-per-Entity plus a nicer UX (e.g., progress monitoring and associated Reports/dialog).
If the process needs to be executed once for all Entities in a Worksheet, then an Invokable is usually the better UX, depending on the nature of the Task.
The final consideration is development and maintenance burden.
Invokables are time-consuming to develop against because the internal server APIs they must use are more cumbersome to learn than the customer APIs.
They are more expensive to maintain because they are directly tied to the internal server APIs, so if those change, the Invokables must be updated.
In general, if the UX won't significantly suffer for the user, you should lean toward using Pipelines as the preferred mechanism of automation.