3. L7|Master Guide
Admin privileges are available to users of the Admin Role only. For a new L7|ESP install, this consists of only the admin@localhost user. To access the L7|Master app of L7|ESP, log in as admin@localhost (or another user with the Admin Role).
As an Admin, you can view the entire system, configure the system, give permission to other users of the system, manage users, and more.
3.1. User Interface (UI)
To simplify usage, the various pages of the L7|Master app are designed similarly and use common user interface (UI) design elements. These UI patterns make navigating and using L7|ESP easier. For more information on the UI, refer to User Interface (UI).
3.2. Manage Data
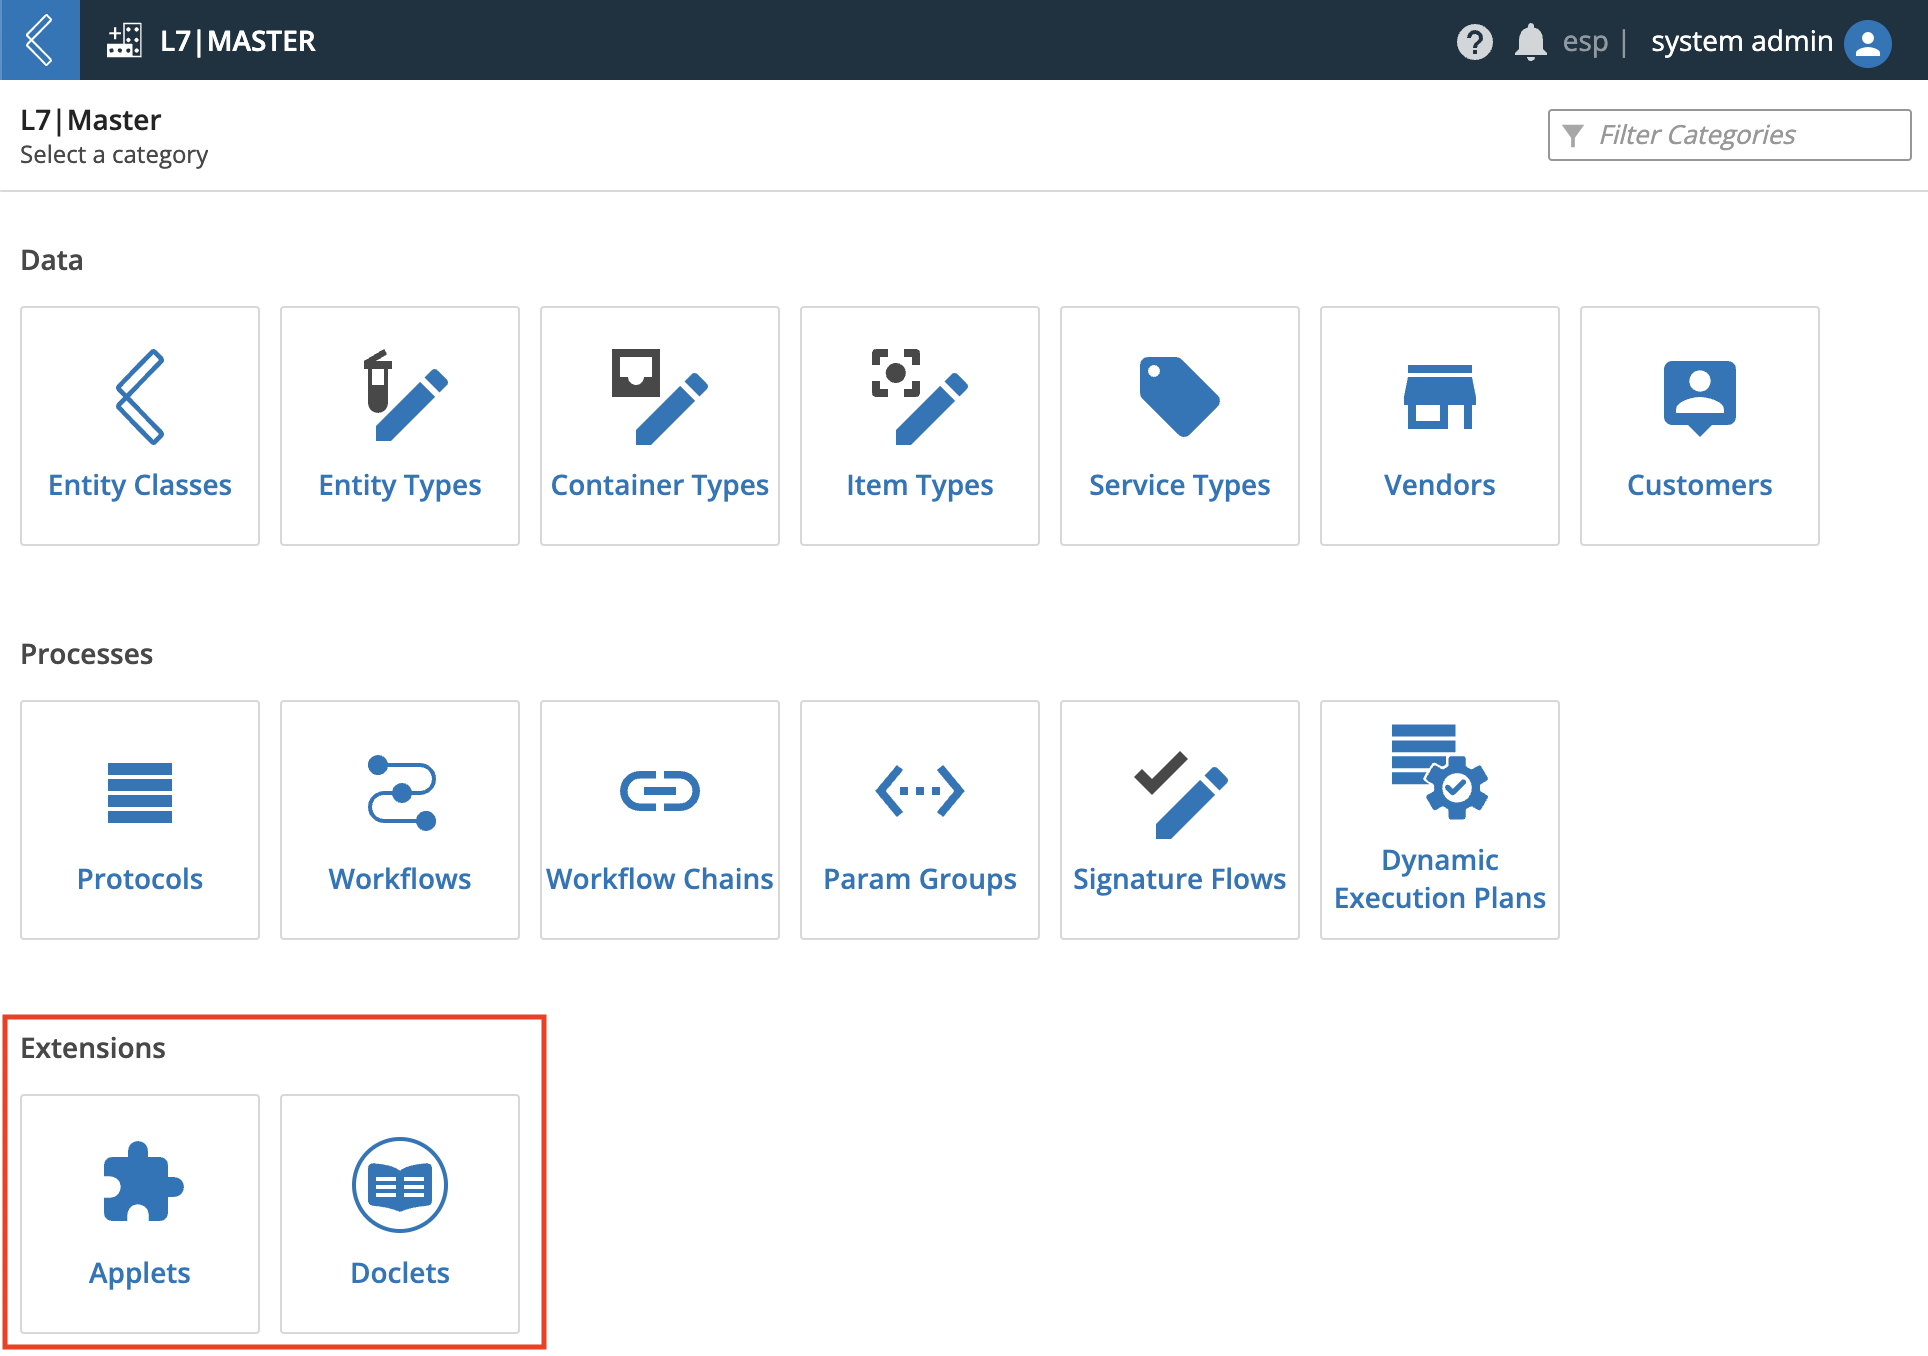
The sections to follow provide instructions for how to manage data (i.e., Entity Types, Container Types, Item Types, Service Types, Vendors, Customers, and Applets) in L7|ESP.
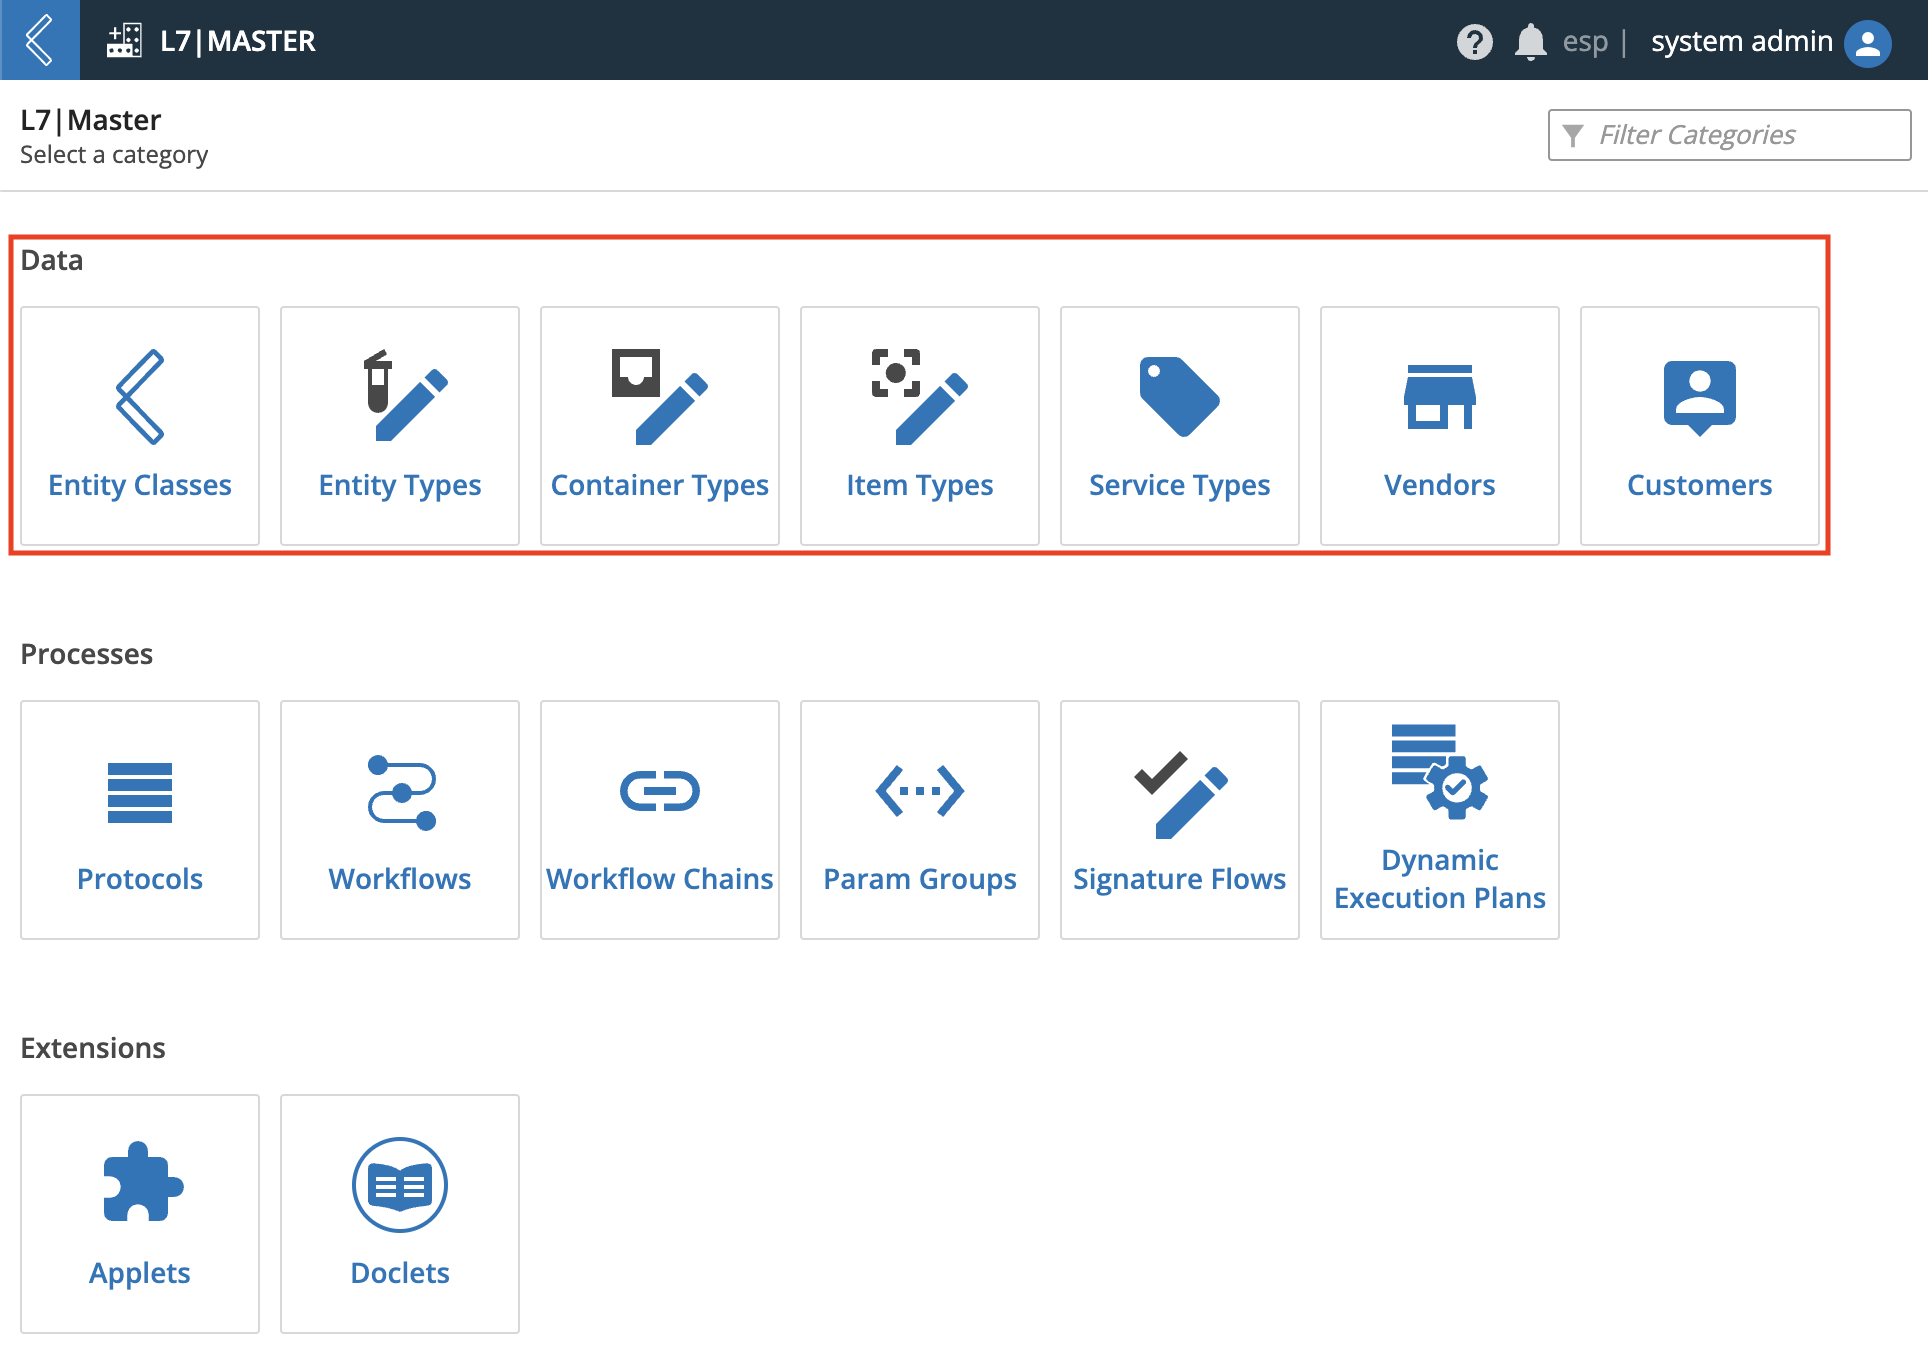
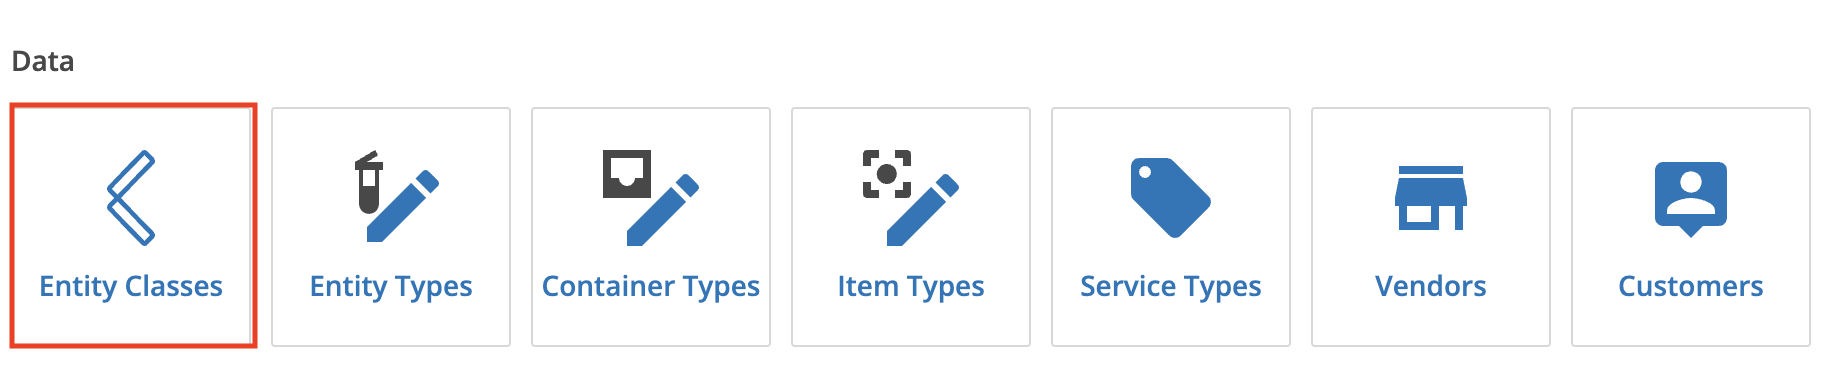
3.2.1. Manage Entity Classes
Create New Entity Class
Click the L7|Master app. Click Entity Classes from the Data menu to access the Entity Classes page.
Click + New Entity Class.

Enter information for the new Entity Class:
Enter the Display Name of the Entity Class.
Enter the Plural Name of the Entity Class.
Optional: Enter a Description.
Optional: Enter one or more Tag(s).
Click Save.
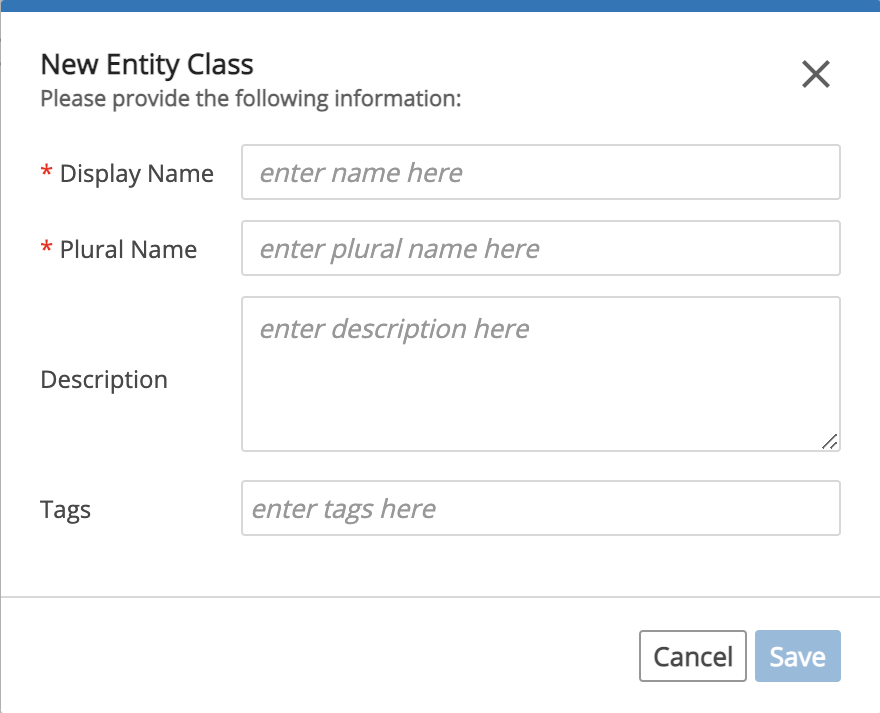
Save the new Entity Class.
Edit Entity Class
Click the L7|Master app. Click Entity Classes from the Data menu to access the Entity Classes page.
Click the Name of an Entity Class.
Edit the desired information (e.g., Display Name, Plural Name, Description, Tags). You can also archive the Entity Class by clicking Archive.
Save the updated Entity Class.
3.2.2. Manage Entity Types
Entities must be Typed in L7|ESP. An Entity Type can be a simple to differentiate between types of materials (e.g., DNA, RNA) or complex to include meta-data fields for each Entity.
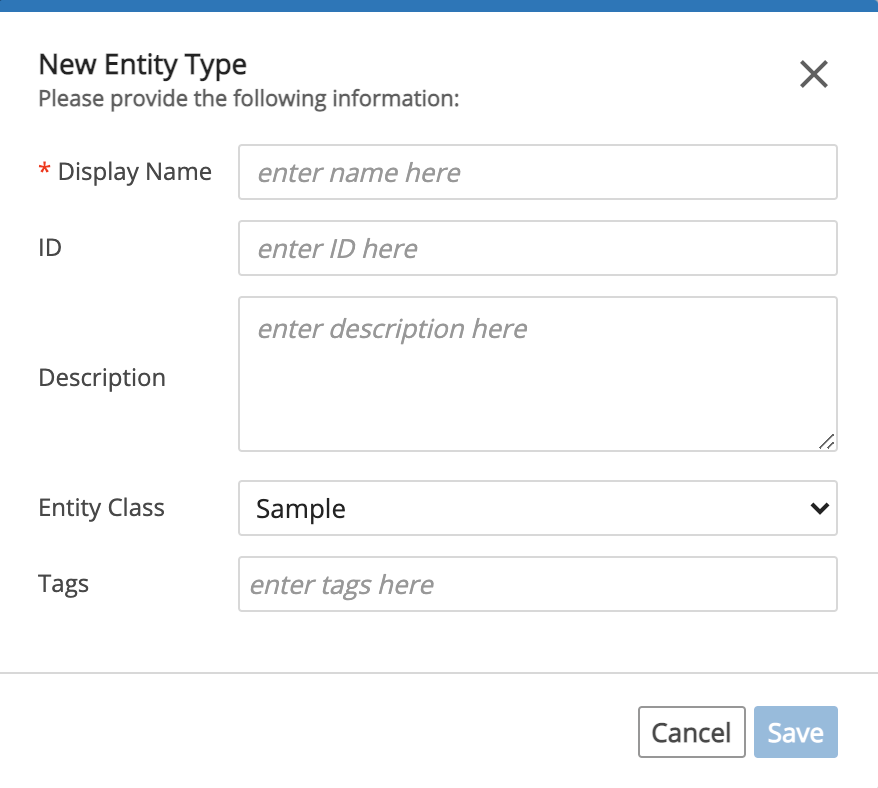
Create New Entity Type
Click the L7|Master app. Click Entity Types from the Data menu to access the Entity Types page.

Click + New Entity Type.

Enter information for the new Entity Type:
Enter the Display Name of the Entity Type.
Optional: Enter an ID.
Optional: Enter a Description.
Select an Entity Class.
Optional: Enter one or more Tag(s).
Click Save.
Click + Add Custom Field. When an Entity is created, the Custom Field is visible.

Fill out the Add Custom Field dialog:
Enter a Display Name.
Optional: Enter an ID.
Optional: Enter a Description.
Optional: Enter a Default value.
Select if Required (Yes, No, or Conditional).
Select if Read Only (Yes, No, or Conditional).
Select if Visible (Yes, No, or Conditional).
Optional: Enter one or more Tags.
Optional: Enter a Var Group. Var Grouping is used to visually group Custom Fields that are assigned the same Var Group name.
Hint
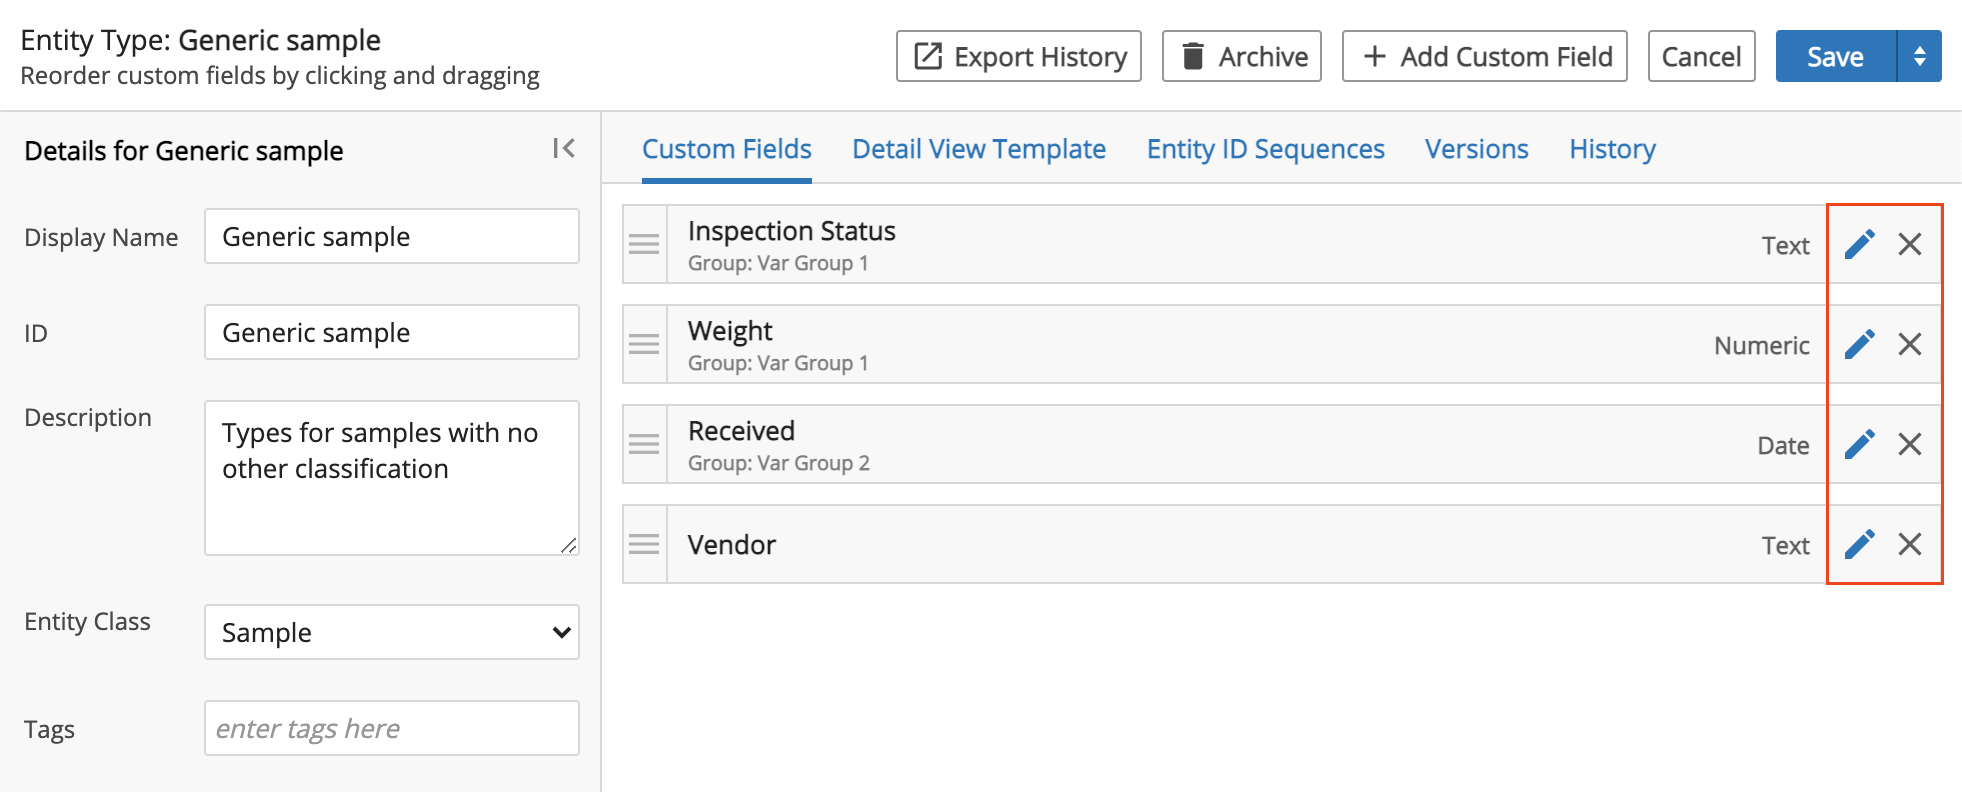
In the example below, the Generic Entity Entity Type has 4 Custom Fields. The Inspection Status and Weight Custom Fields are assigned the same Var Group name (i.e., Var Group 1). The Date Received Custom Field is a assigned a different Var Group name (i.e., Var Group 2). The Vendor Custom Field is not assigned a Var Group.
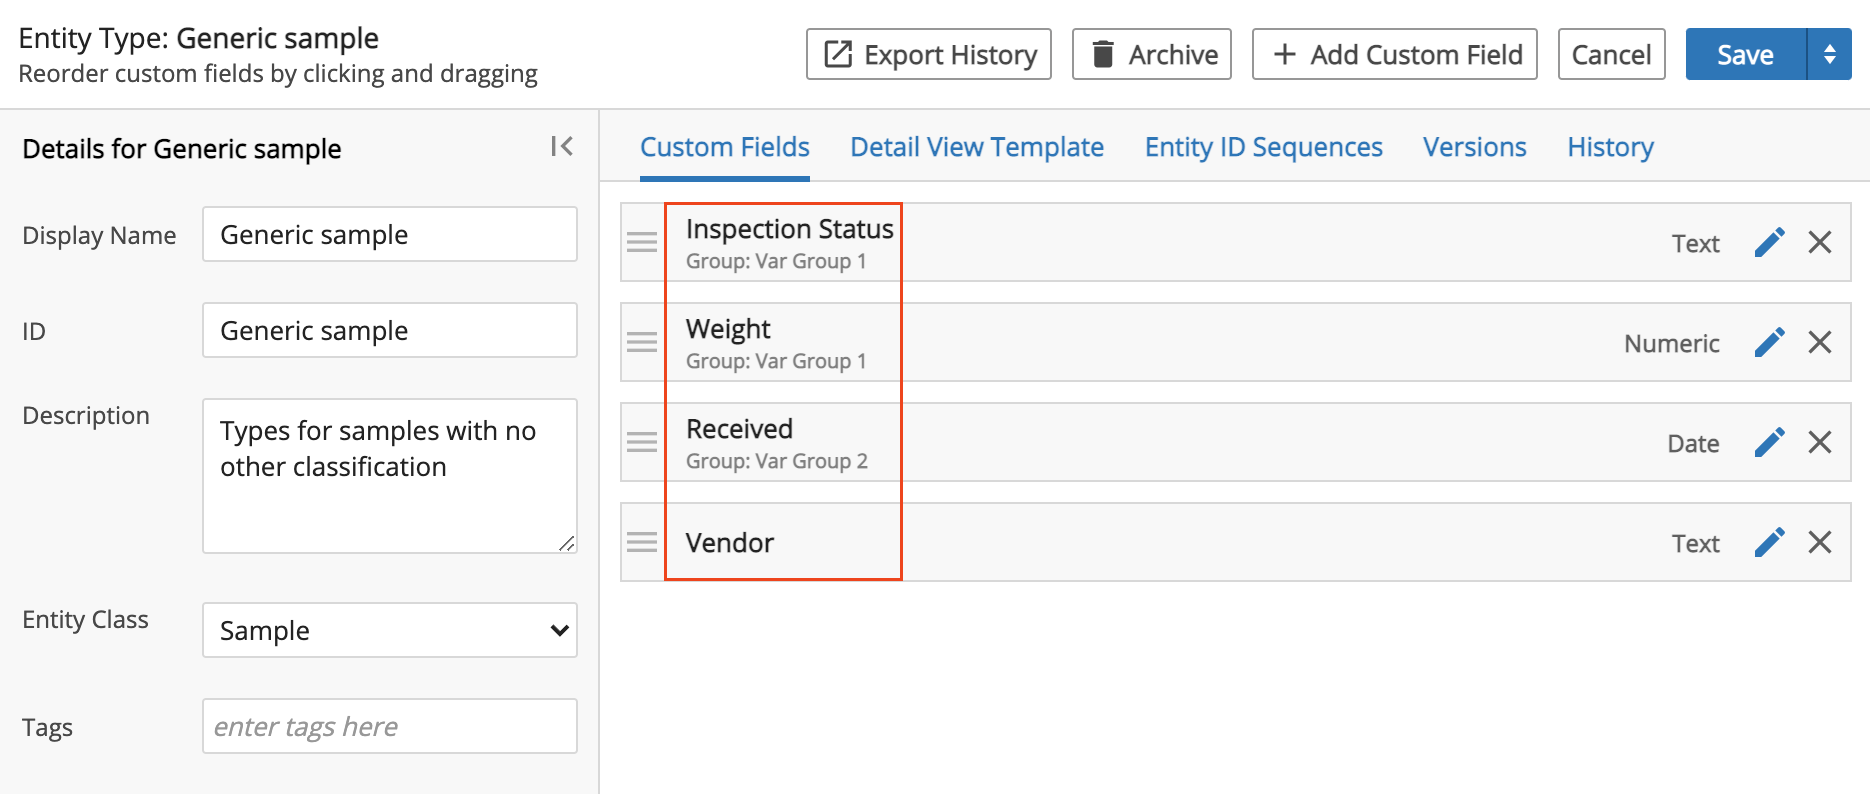
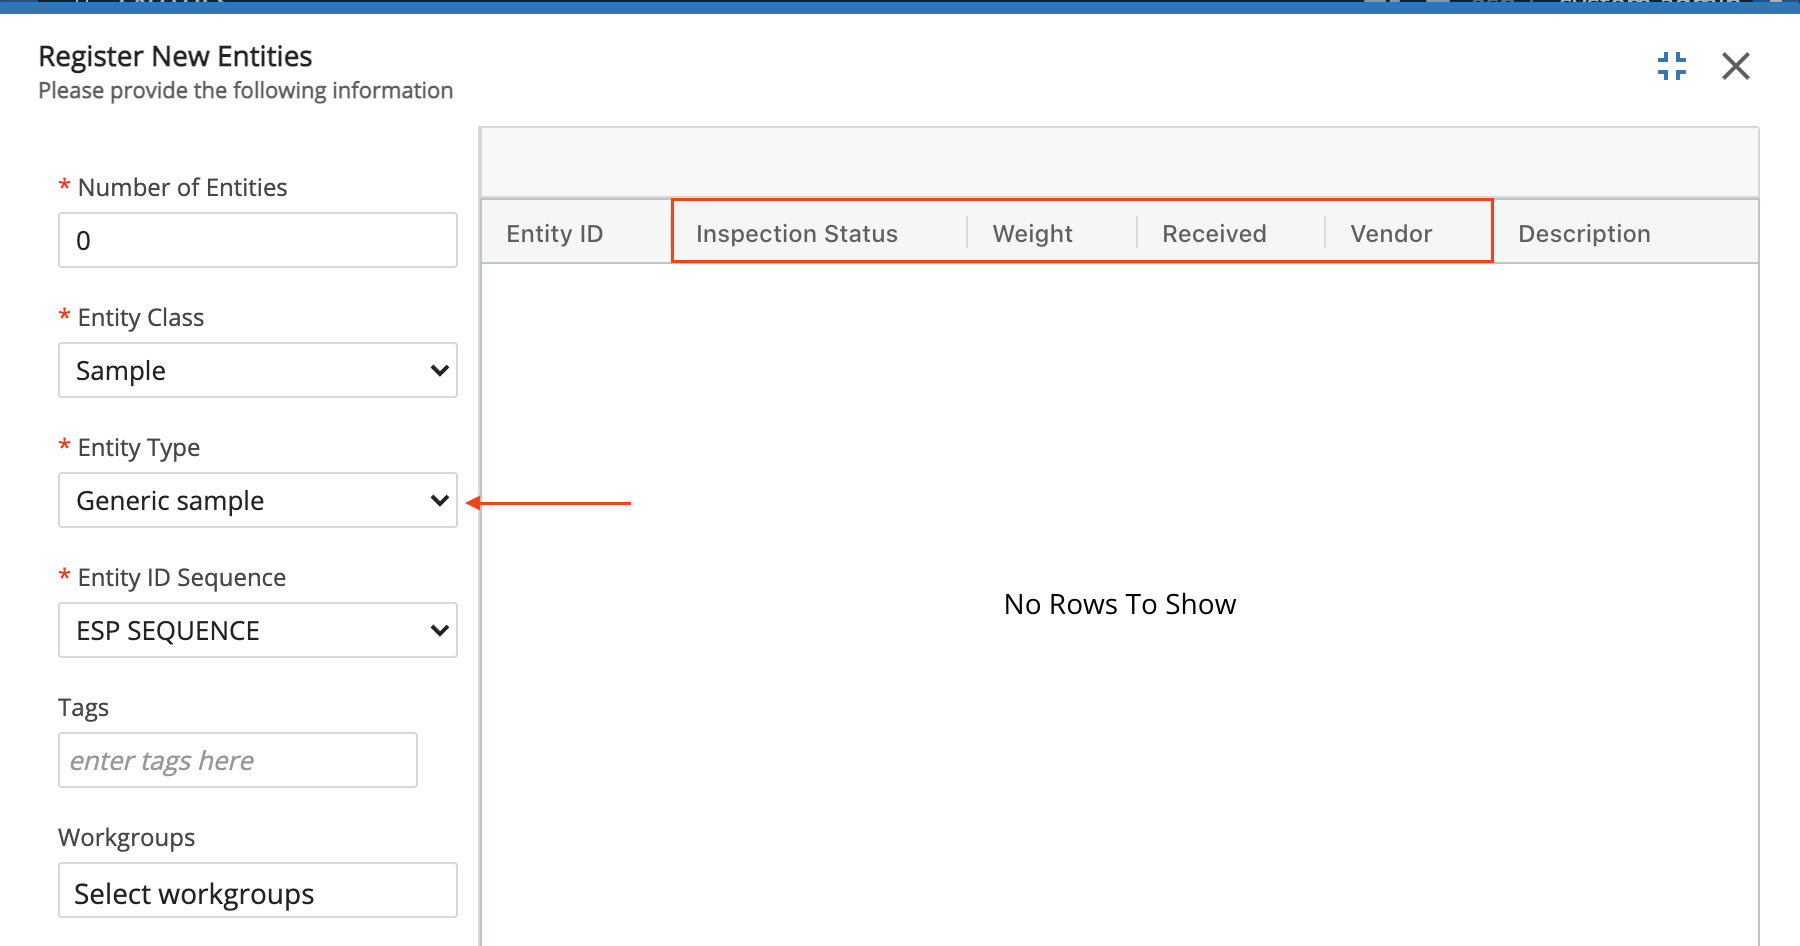
To observe how Var Grouping works, an Entity was created under the Generic Entity Entity Type. (Notice that the Custom Fields associated with the Generic Entity Entity Type are available in the Register New Entities dialog.)
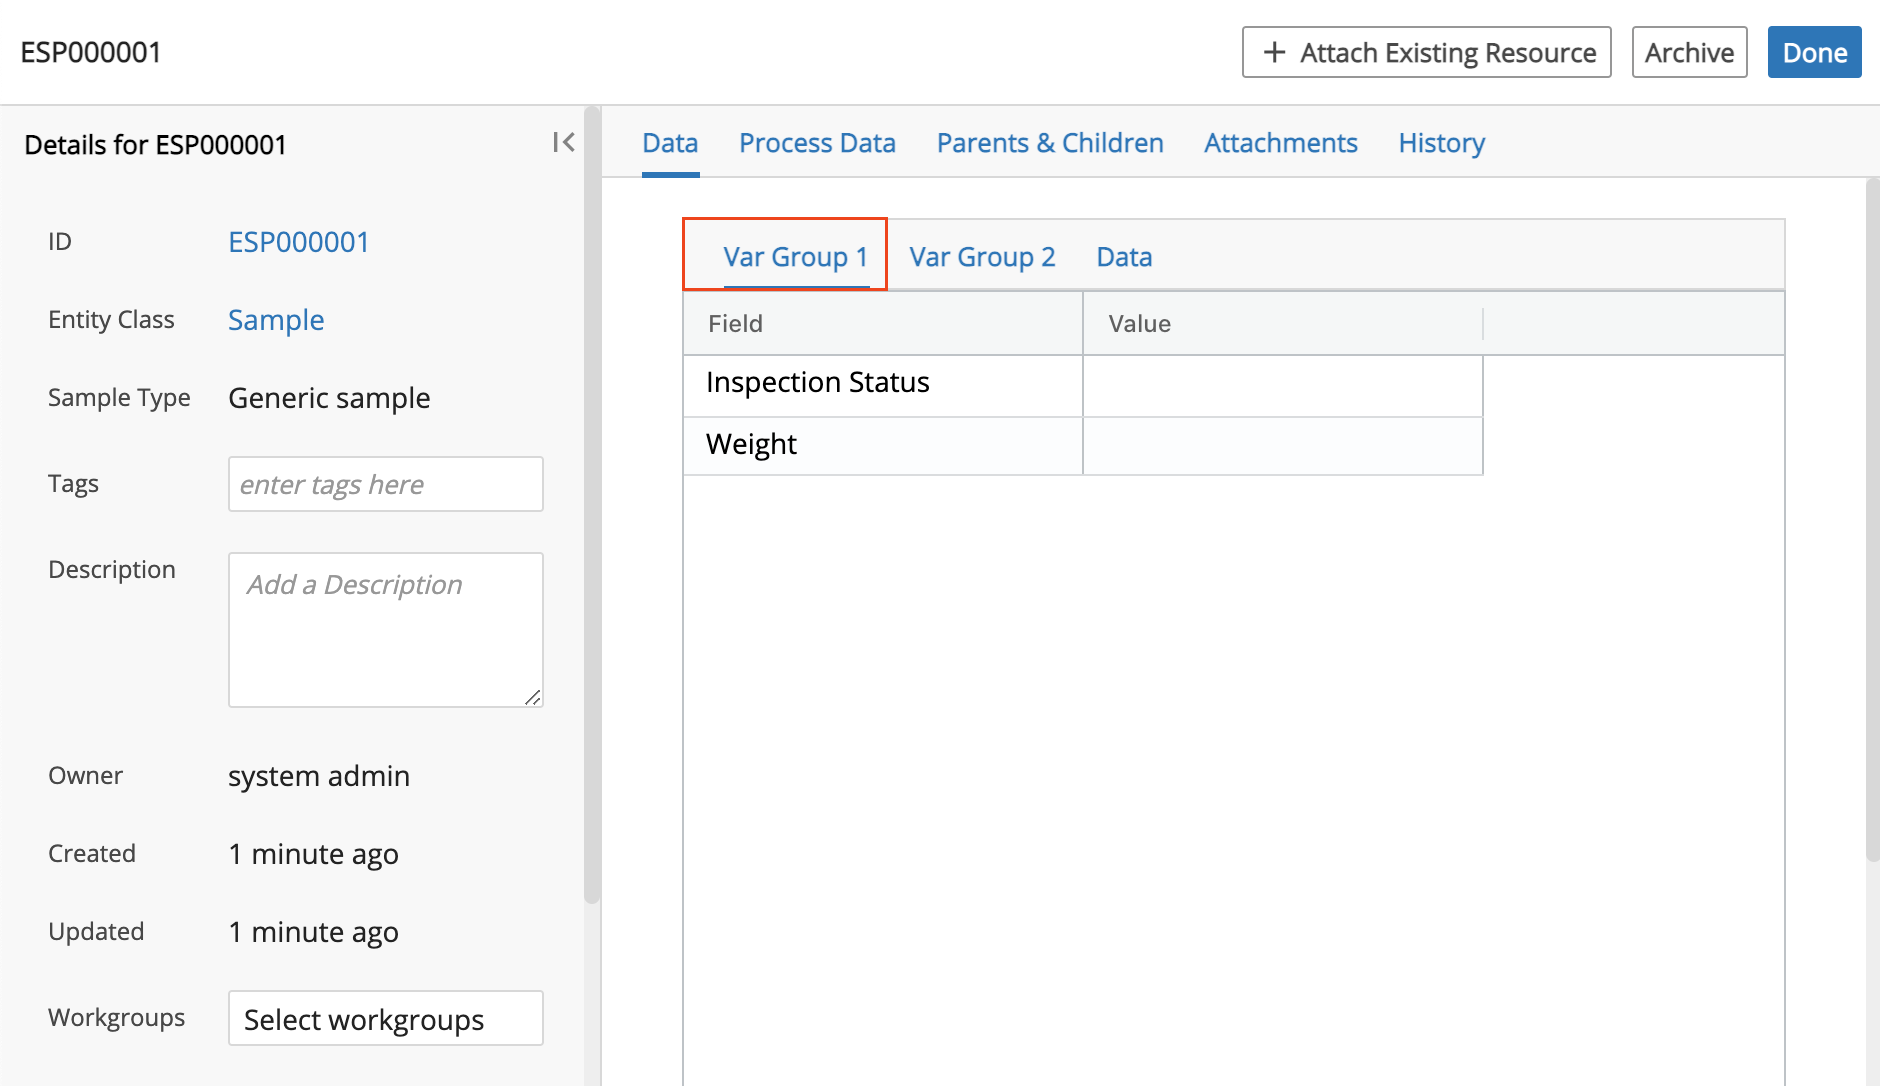
From the new Entity's details page, observe the Var Grouping under the Data tab. In this example, there are 3 sub-tabs under the Data tab:
Var Group 1 sub-tab, which contains the Inspection Status and Weight Custom Fields.
Var Group 2 sub-tab, which contains the Date Received Custom Field.
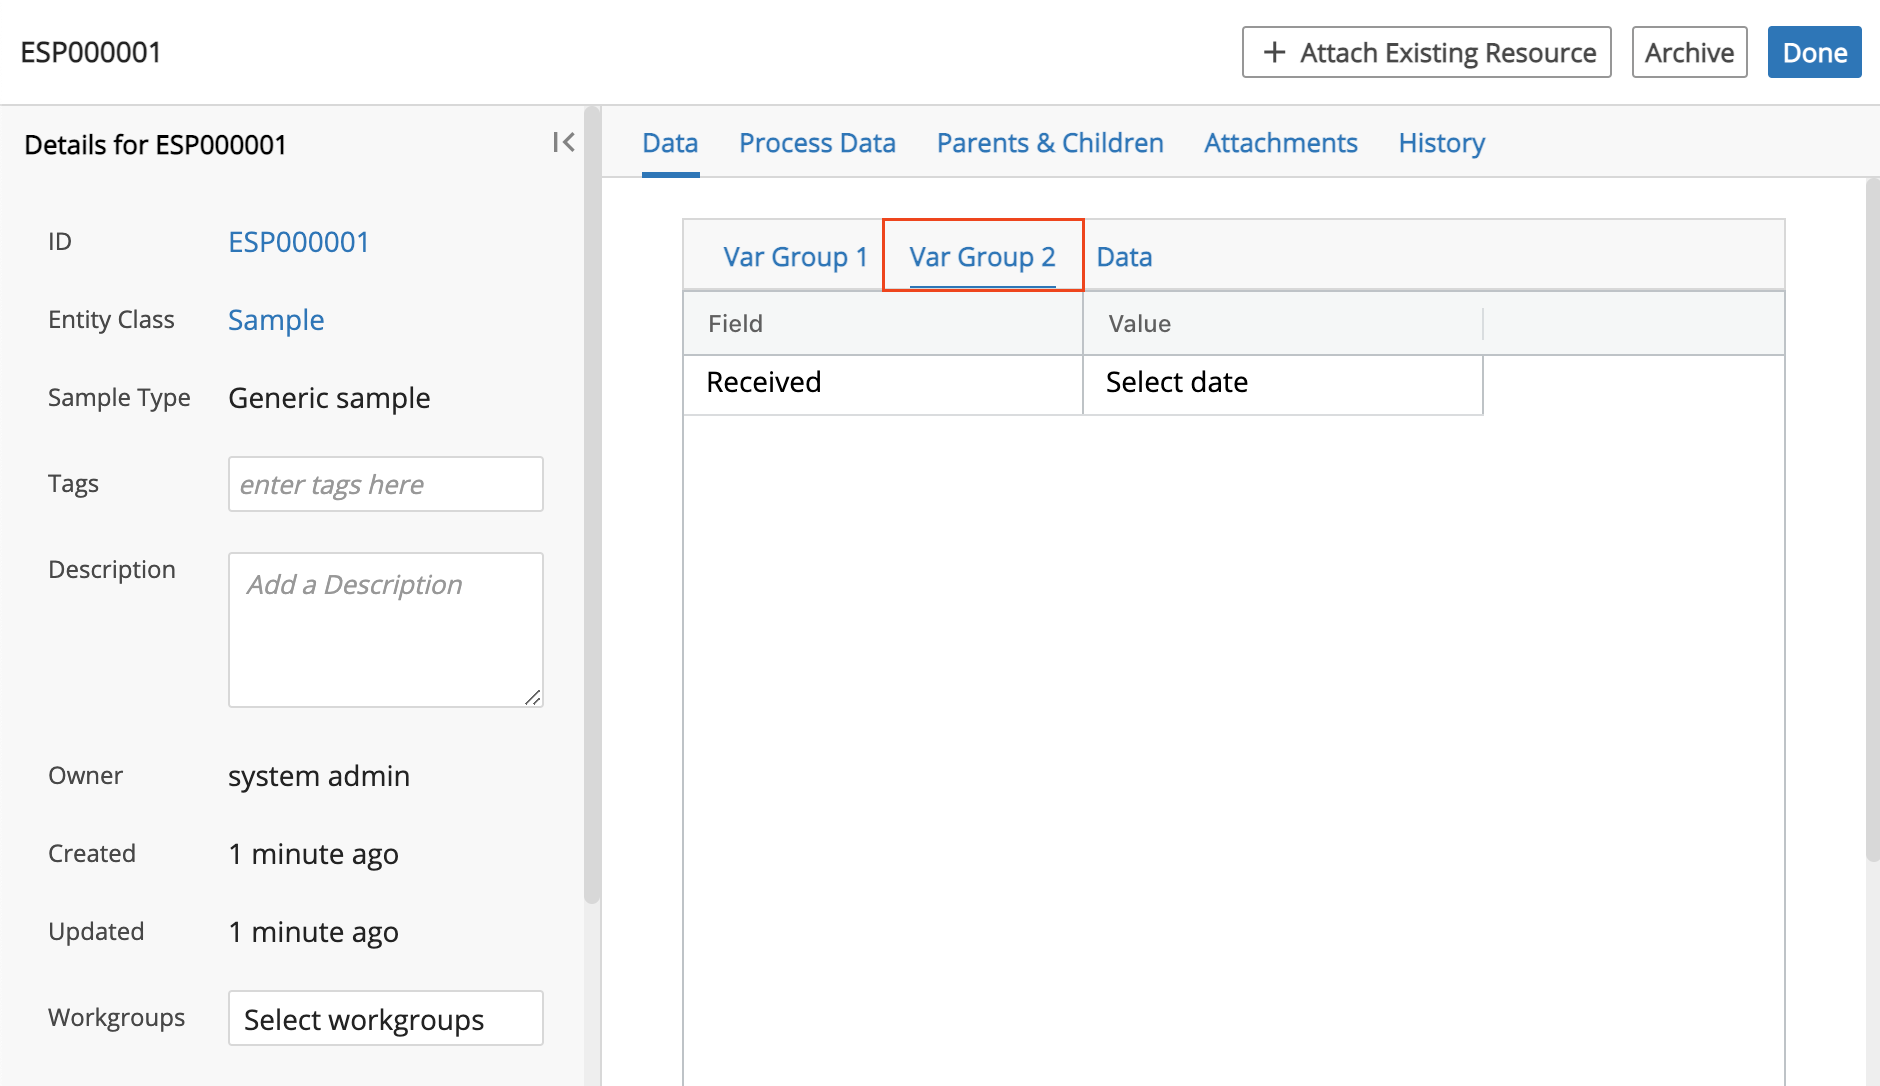
Data sub-tab, which contains any Custom Field(s) not assigned a Var Group (i.e., (the Vendor Custom Field).

Lastly, from the Entity details page, you can enter values directly into applicable Custom Fields.

Select a Type. The Type field specifies the option available to the user when filling out that custom field. Types are defined as follows:
Free-form text entry - Allows the user to enter any characters (text and numbers allowed).
Numbers only allowed - Allows the user to enter any number.
Picklist - Predetermine options for the user to choose from in a drop-down list format.
Date/Time - Allows the user to select a date.
Checkbox - Allows the user to check a checkbox to indicate "true" or "false" for a condition.
Attachment - Allows the user to upload an associated file.
Barcode - Allows the user to generate and assign a unique barcode to an Entity.
Resource Link - Allows the user to link a Resource (i.e., Entity, File, Container, Report, Project, Experiment, or Inventory Item).
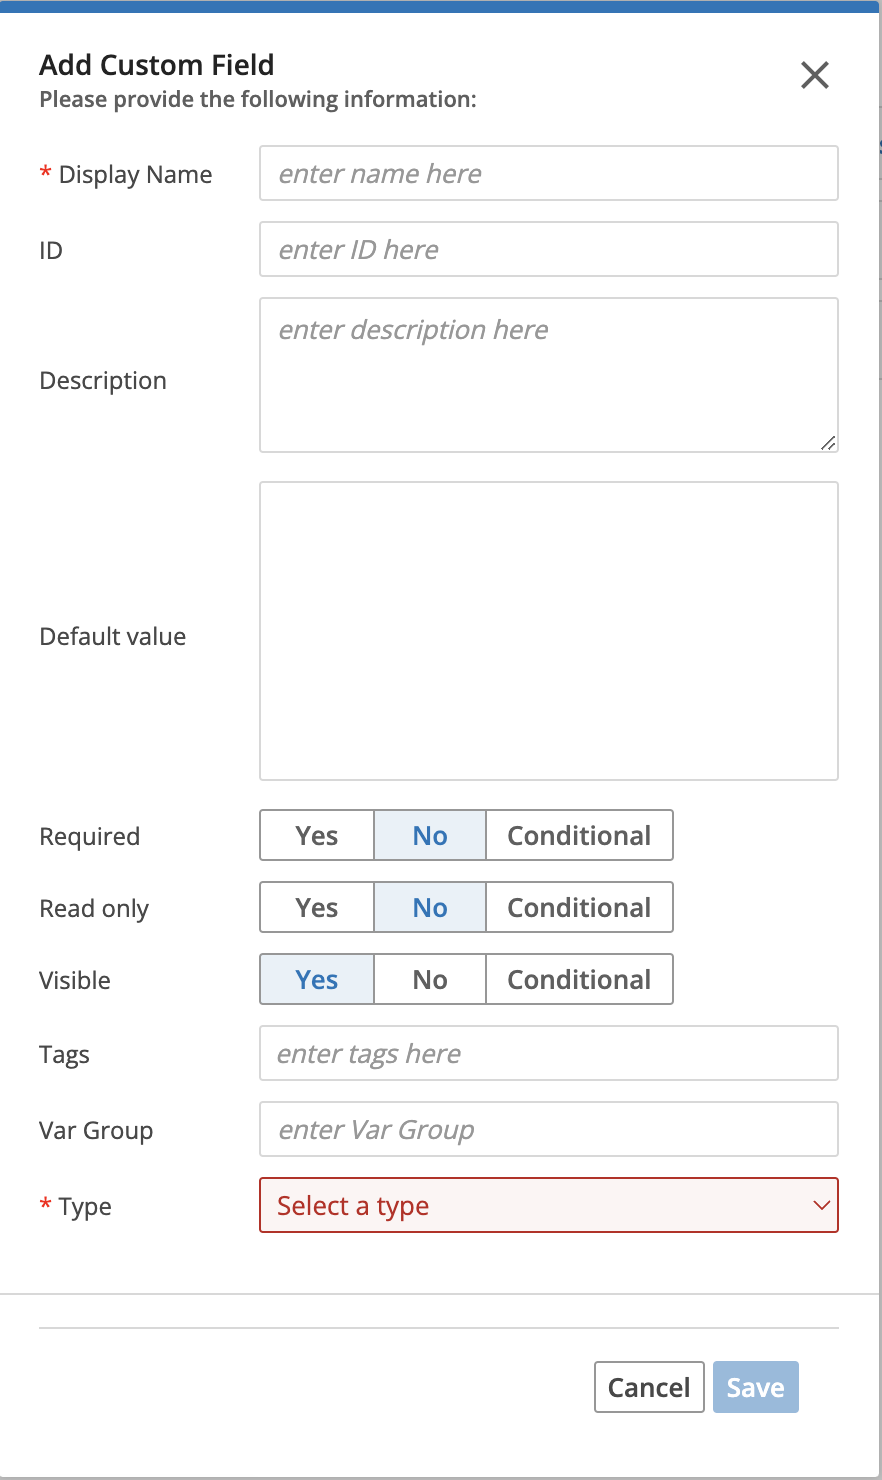
Click Save.
Hint
You can edit the custom field(s) by clicking the Edit pencil icon. You can delete a custom field by clicking the X icon. You can change the order of custom fields by clicking on the bar of a custom field and dragging it.
Click the Entity ID Sequences tab. An Entity ID Sequence is required and is used to generate Entity names automatically as Entities are registered. Observe that ESP Sequence is selected by default. The ESP Sequence numbering format is a prefix followed by an incrementing number.
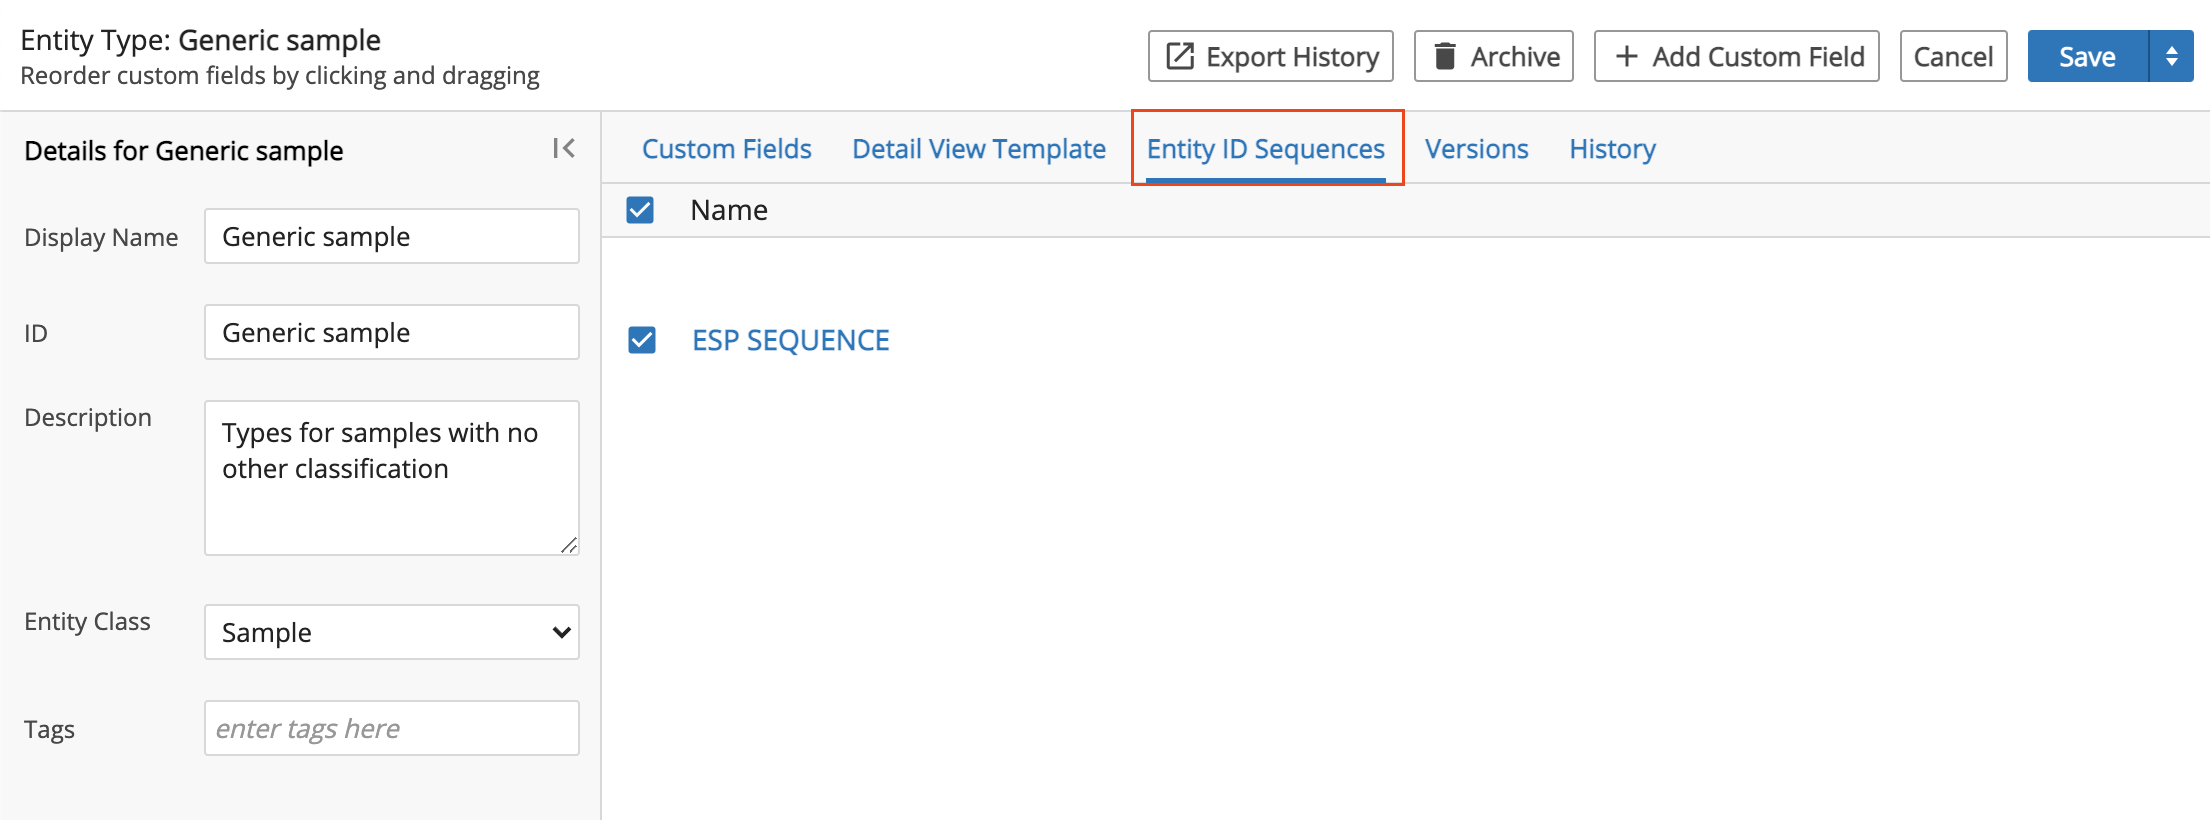
Select any additional Entity ID Sequence(s) to apply.
Save the new Entity Type.
Edit Entity Type
Click the L7|Master app. Click Entity Types from the Data menu to access the Entity Types page.
Click the Name of an Entity Type.
Edit the desired information (e.g., Display Name, ID, Description, Entity Class, Tags, Custom Field(s), Entity ID Sequences, Var Group(s)). You can also archive the Entity Type by clicking Archive.
Click the Versions tab. All versions of the Entity Type are listed.
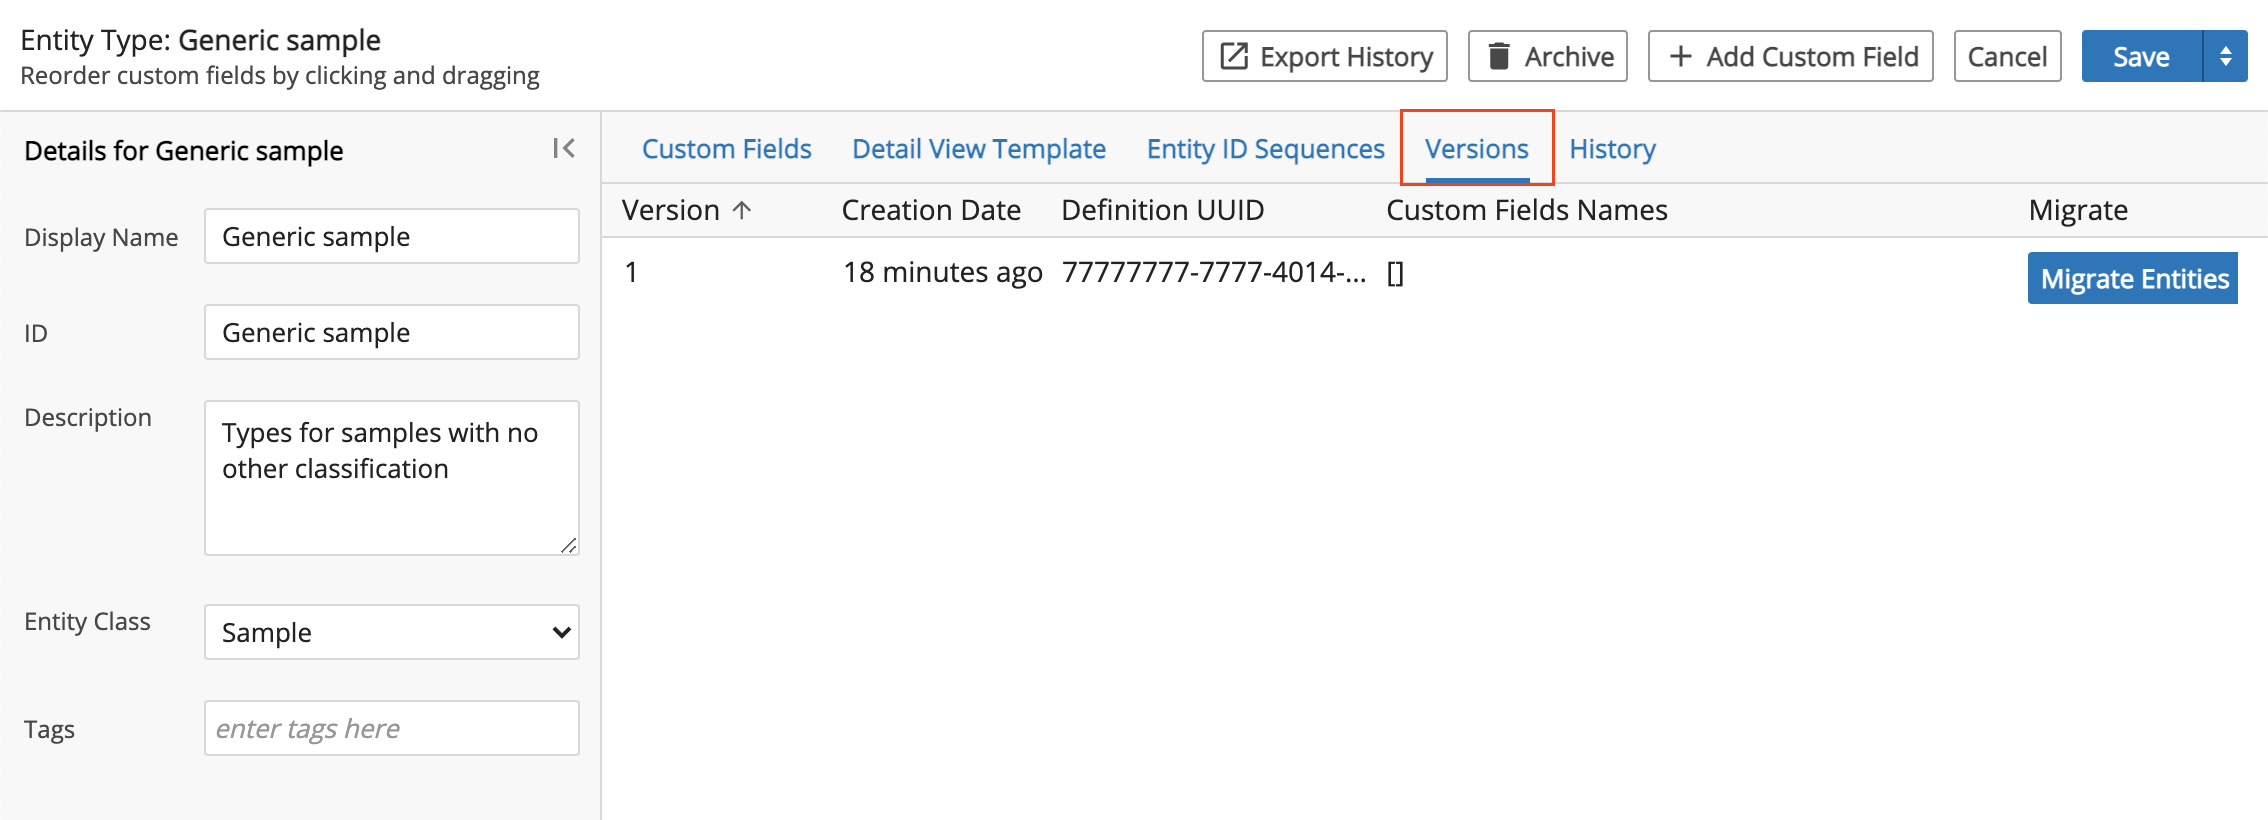
Click the Migrate Entities button to open a dialog box where entities can be filtered and selected to migrate them to a selected Entity Type Version.
After selecting entities, click the Migrate button.
Save the updated Entity Type.
3.2.3. Manage Container Types
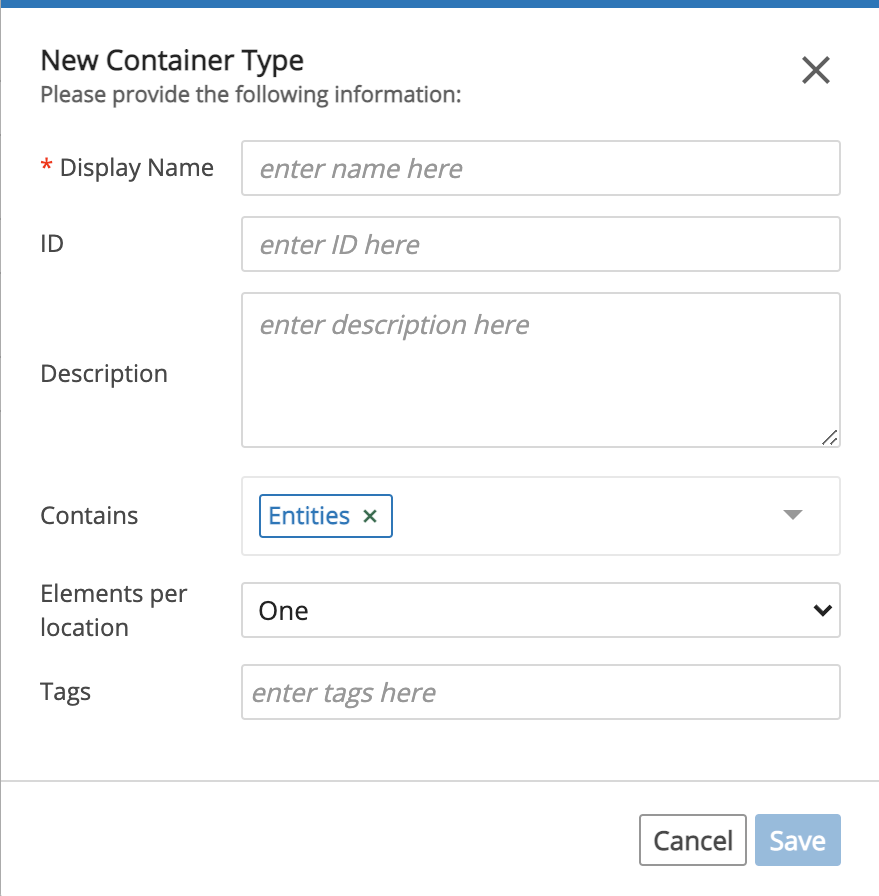
Create New Container Type
Click the L7|Master app. Click Container Types from the Data menu to access the Container Types page.

Click + New Container Type.

Enter information for the new Container Type:
Enter the Display Name of the Container Type.
Optional: Enter an ID.
Optional: Enter a Description.
Optional: Select what the Container Type Contains (i.e., Entities, Containers, or Entities and Containers).
Optional: Select the allowable Elements per Location (i.e., One or Unlimited).
Optional: Enter one or more Tag(s).
Click Save.
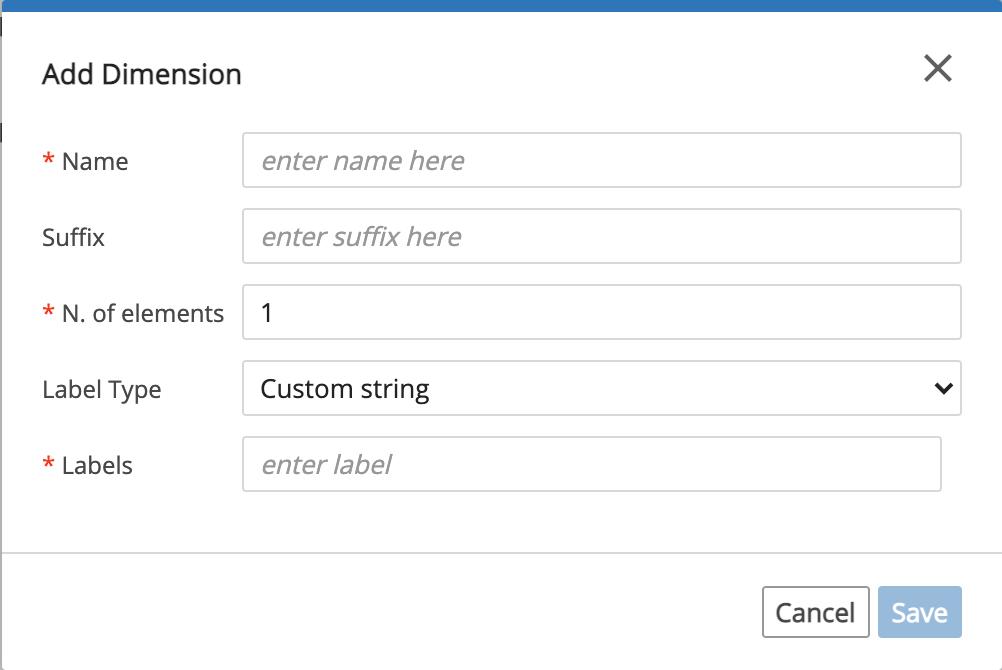
Click + Add Dimension and fill out the Add Dimension dialog:
Enter a Name for the dimension.
Optional: Enter a Suffix.
Select the N. of Elements.
Optional: Select the Label Type.
Enter a Label.
Click Save.
Optional: Click + Add Custom field. Fill out the Name and select a Type. Optional: Enter an ID, Description, Default Value, Required, Read Only, Visible, Tags and/or Var Group. (For more information on custom fields and related information, refer to the Manage Entity Types section.)
Save the new Container Type.
Edit Container Type
Click the L7|Master app. Click Container Types from the Data menu to access the Container Types page.
Click the Name of a Container Type.
Edit the desired information (e.g., Display Name, ID, Description, Tags, Contains, Elements per Location, Dimensions, and/or Custom Fields). You can also archive the Container Type by clicking Archive (Note: you cannot archive a Container Type that is used in a Protocol Column.)
Click the Versions tab. All versions of the Container Type are listed.
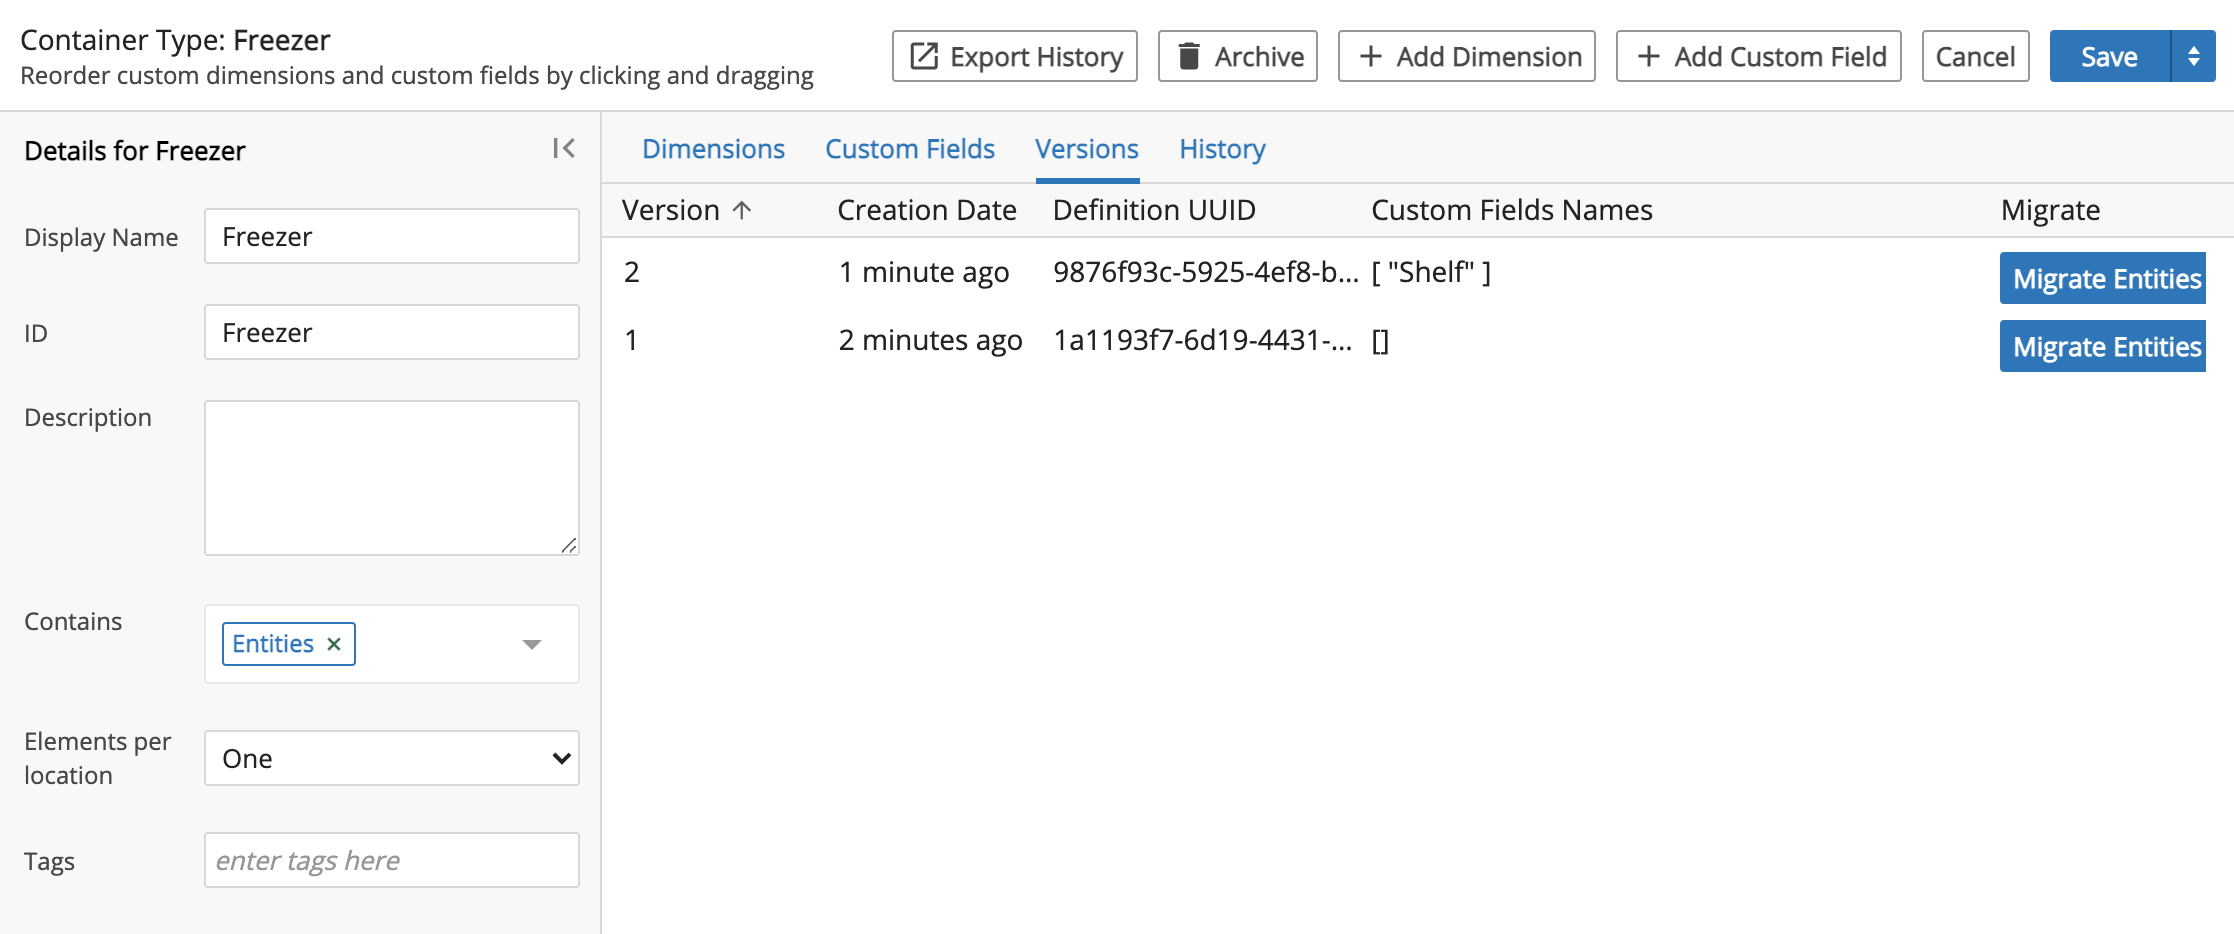
Click the Migrate Entities button to open a dialog box where entities can be filtered and selected to migrate them to a selected Container Type Version.
After selecting Containers, click the Migrate button.
Save the updated Container Type.
3.2.4. Manage Item Types
An Item is a physical, consumable material used in a lab such as buffers, syringes, etc.
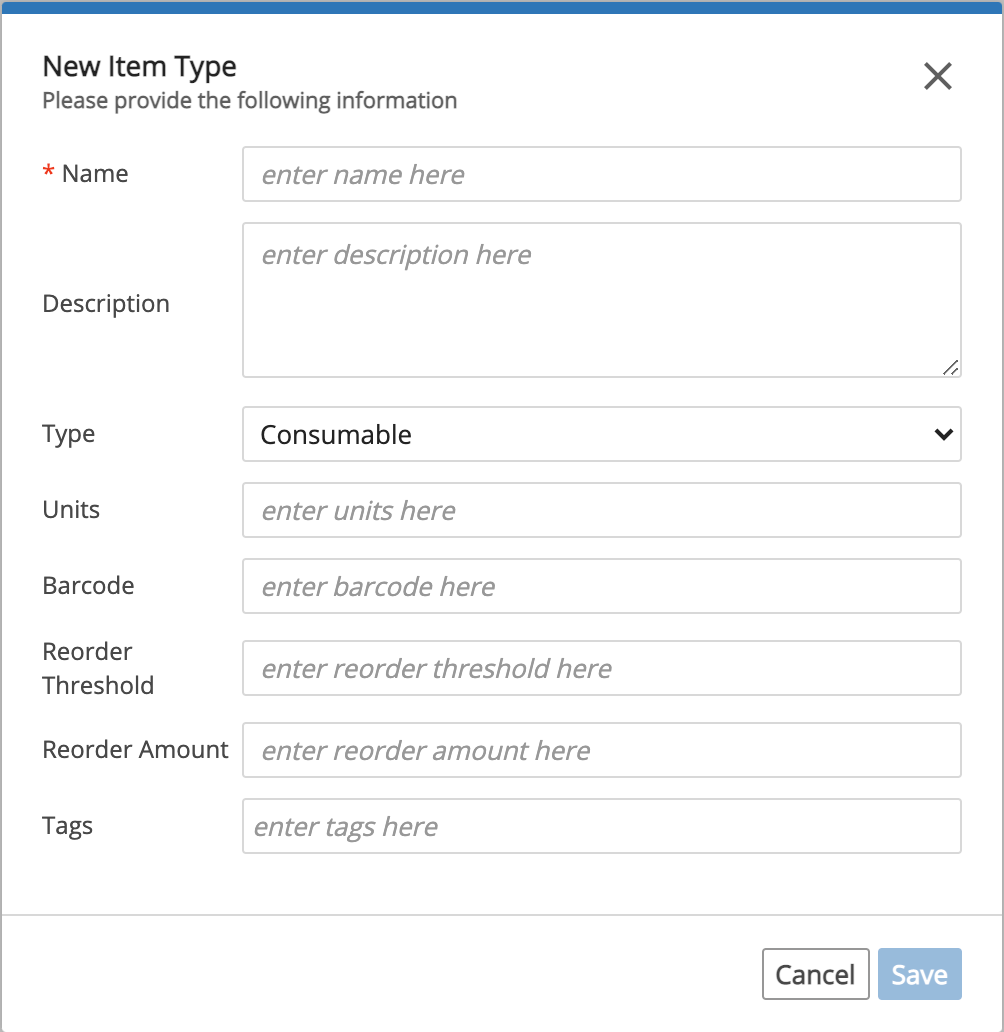
Create New Item Type
Click the L7|Master app. Click Item Types from the Data menu to access the Item Types page.

Click + New Item Type.

Enter information for the new Item Type:
Enter the Name of the Item Type.
Optional: Enter a Description.
Optional: Select a Type.
Optional: Enter Units.
Optional: Enter a Barcode.
Optional: Enter a Reorder Threshold. A threshold is established so you can be notified of the type and quantity of an item to reorder. Refer to the In Need of Restock chart in the Dashboard app/Dashboards tab.
Optional: Enter a Reorder Amount.
Optional: Enter one or more Tag(s).
Click Save.
Save the new Item Type.
Edit Item Type
Click the L7|Master app. Click Item Types from the Data menu to access the Item Types page.
Click the Name of an Item Type.
Edit the desired information (e.g., Name, Description, Barcode, Units, Reorder Threshold, Reorder Amount, Tag(s)). You can also archive the Item Type by clicking Archive.
Save the updated Item Type.
3.2.5. Manage Service Types
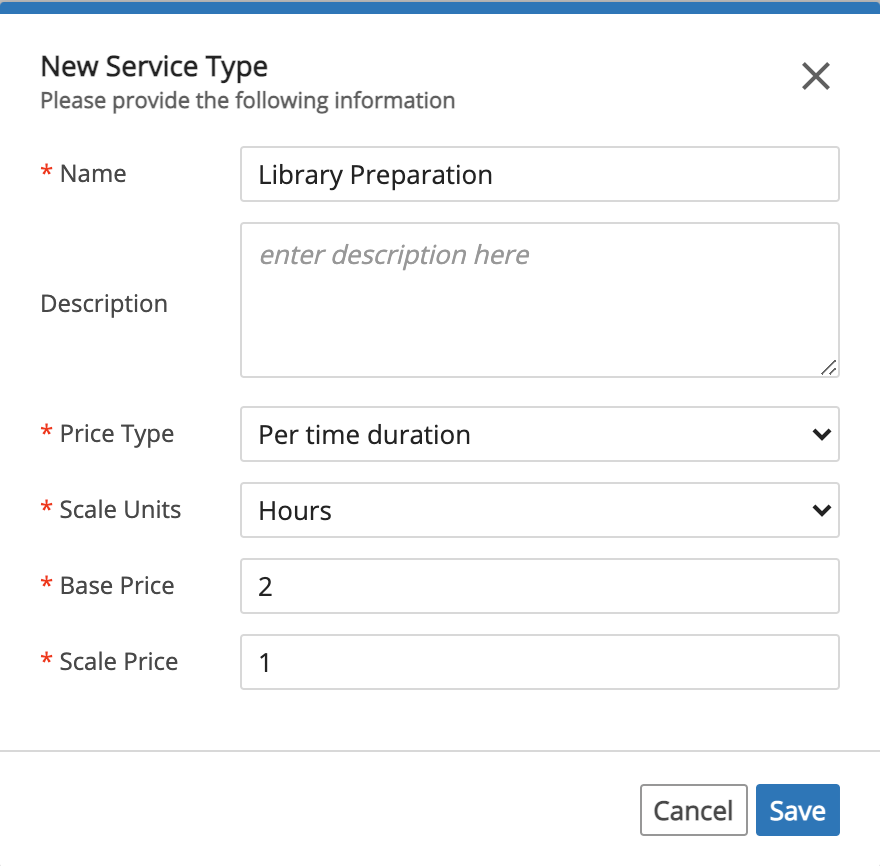
Create New Service Type
Click the L7|Master app. Click Service Types from the Data menu to access the Service Types page.

Click + New Service Type.

Enter information for the new Service Type:
Enter the Name of the Service Type.
Optional: Enter a Description.
Select a Price Type:
If you select Per time duration as the Price Type, then select the Scale Units, enter a Base Price, and enter a Scale Price.
If you select Per sample as the Price Type, then enter a Base Price.
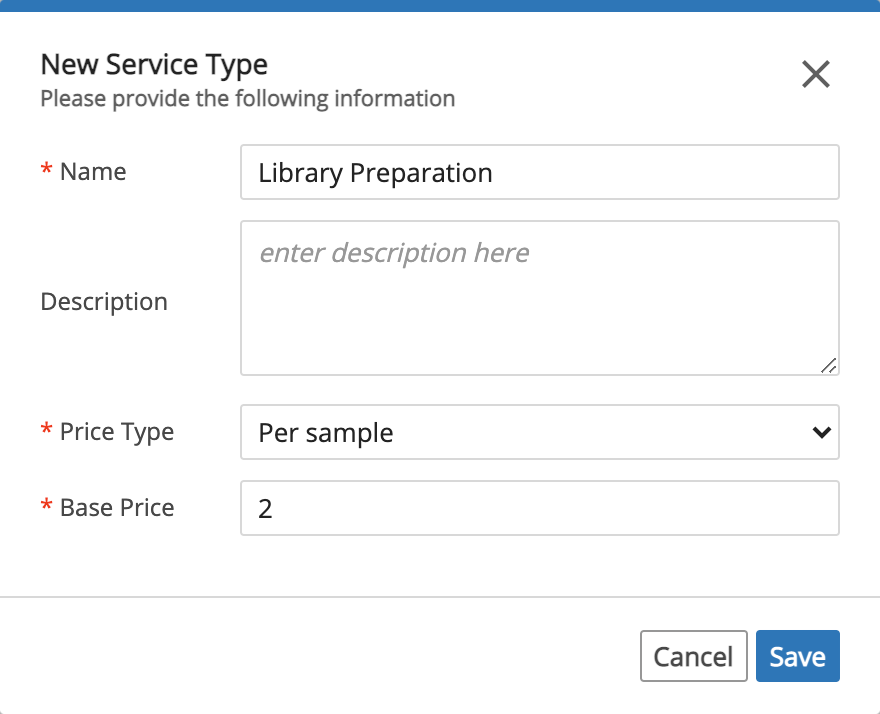
Click Save.
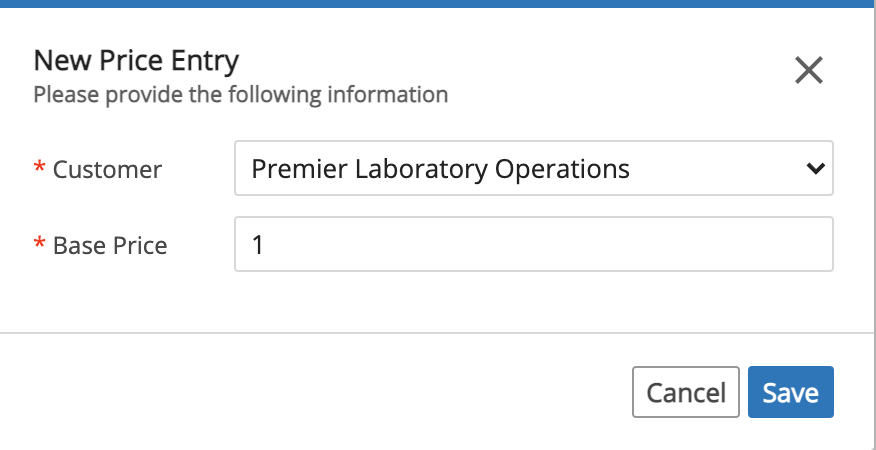
Click the Name of the new Service Type.
Click + New Price Entry.
Note
Before you can add a new price entry, the associated Customer must already exist. To create a new Customer, refer to Create New Customer.
Fill out the New Price Entry dialog:
Select a Customer.
Enter a Base Price.
If applicable, enter a Scale Price.
Click Save.
Hint
You can edit the new price entry by clicking the Edit pencil icon. You can delete the new price entry by clicking the Delete trashcan icon.
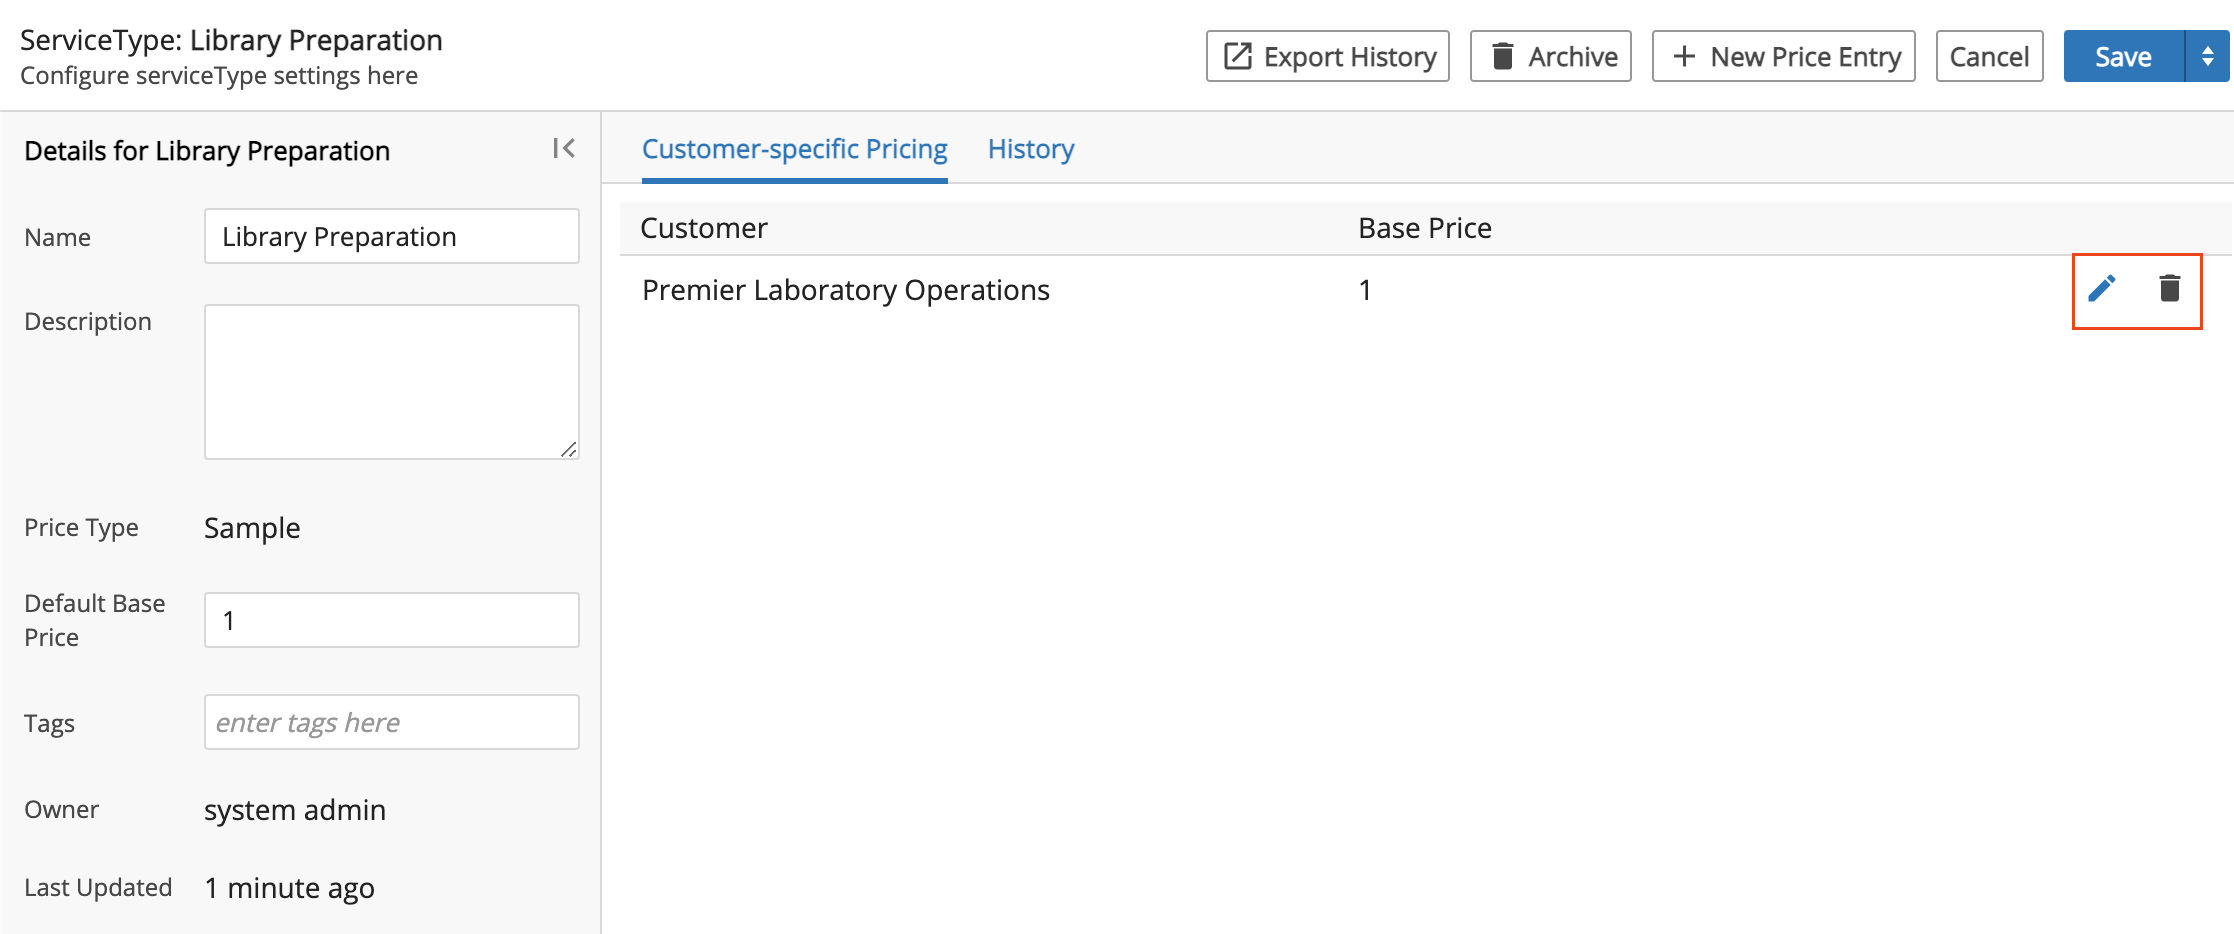
Edit Service Type
Click the L7|Master app. Click Service Types from the Data menu to access the Service Types page.
Click the Name of a Service Type.
Edit the desired information (e.g., Name, Description, Tags, Price Entries). You can also archive the Service Type by clicking Archive.
Save the updated Service Type.
3.2.6. Manage Vendors
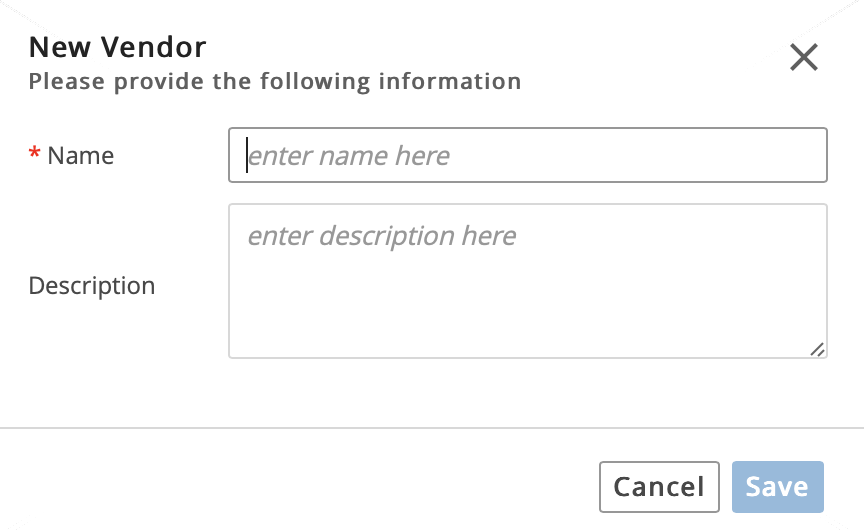
Create New Vendor
Click the L7|Master app. Click Vendors from the Data menu to access the Vendors page.

Click + New Vendor.

Enter information for the new Vendor:
Enter the Name of the Vendor.
Optional: Enter a Description.
Click Save.
Optional: Enter one or more Tag(s).
Optional: Enter a Billing Address and/or a Shipping Address.
Save the new Vendor.
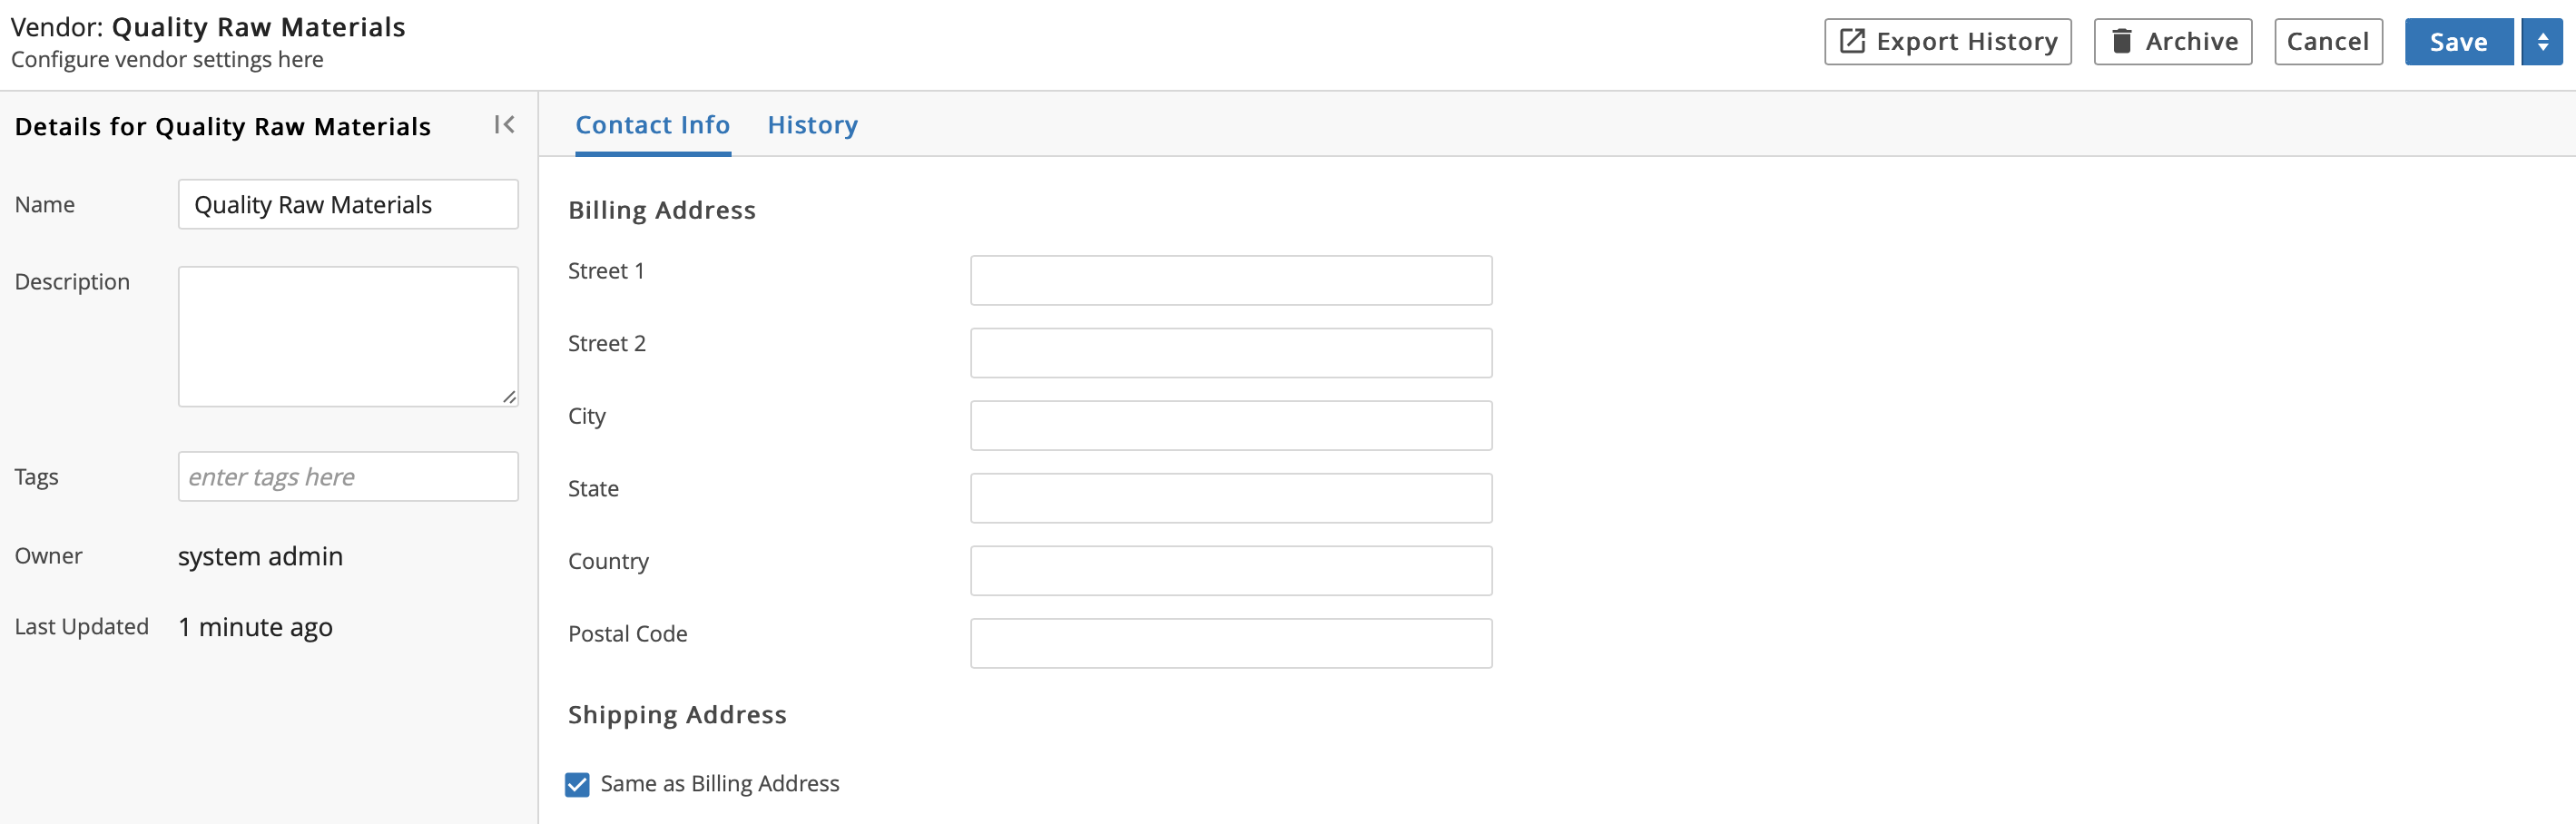
Edit Vendor
Click the L7|Master app. Click Vendors from the Data menu to access the Vendors page.
Click the Name of a Vendor.
Edit the desired information (e.g., Name, Description, Tags, Billing Address, Shipping Address). You can also archive the Vendor by clicking Archive.
Save the updated Vendor.
3.2.7. Manage Customers
Create New Customer
Click the L7|Master app. Click Customers from the Data menu to access the Customers page.

Click + New Customer.

Enter information for the new Customer:
Enter the Name of the Customer.
Optional: Enter a Description.
Click Save.

Optional: Enter one or more Tag(s).
Optional: Enter a Billing Address and/or a Shipping Address.
Save the new Customer.
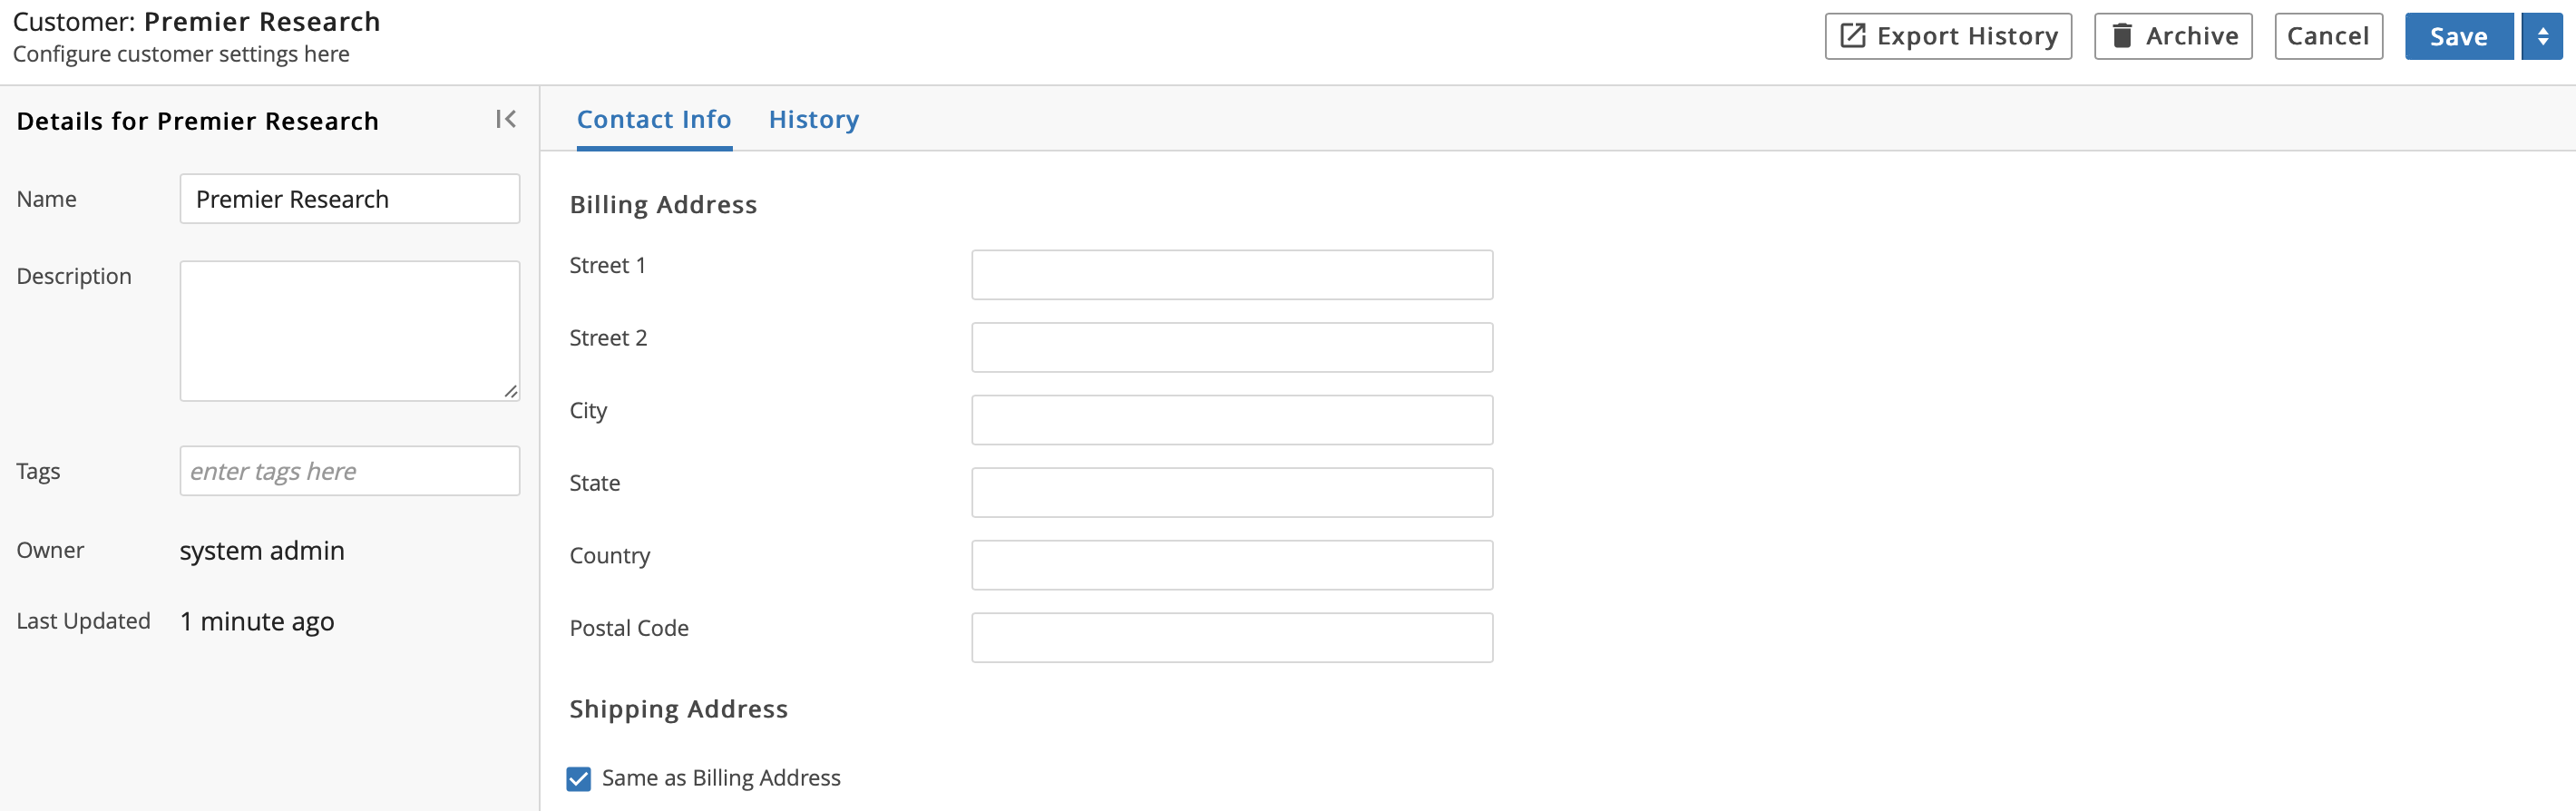
Edit Customer
Click the L7|Master app. Click Customers from the Data menu to access the Customers page.
Click the Name of a Customer.
Edit the desired information (e.g., Name, Description, Tags, Billing Address, Shipping Address). You can also archive the Customer by clicking Archive.
Save the updated Customer.
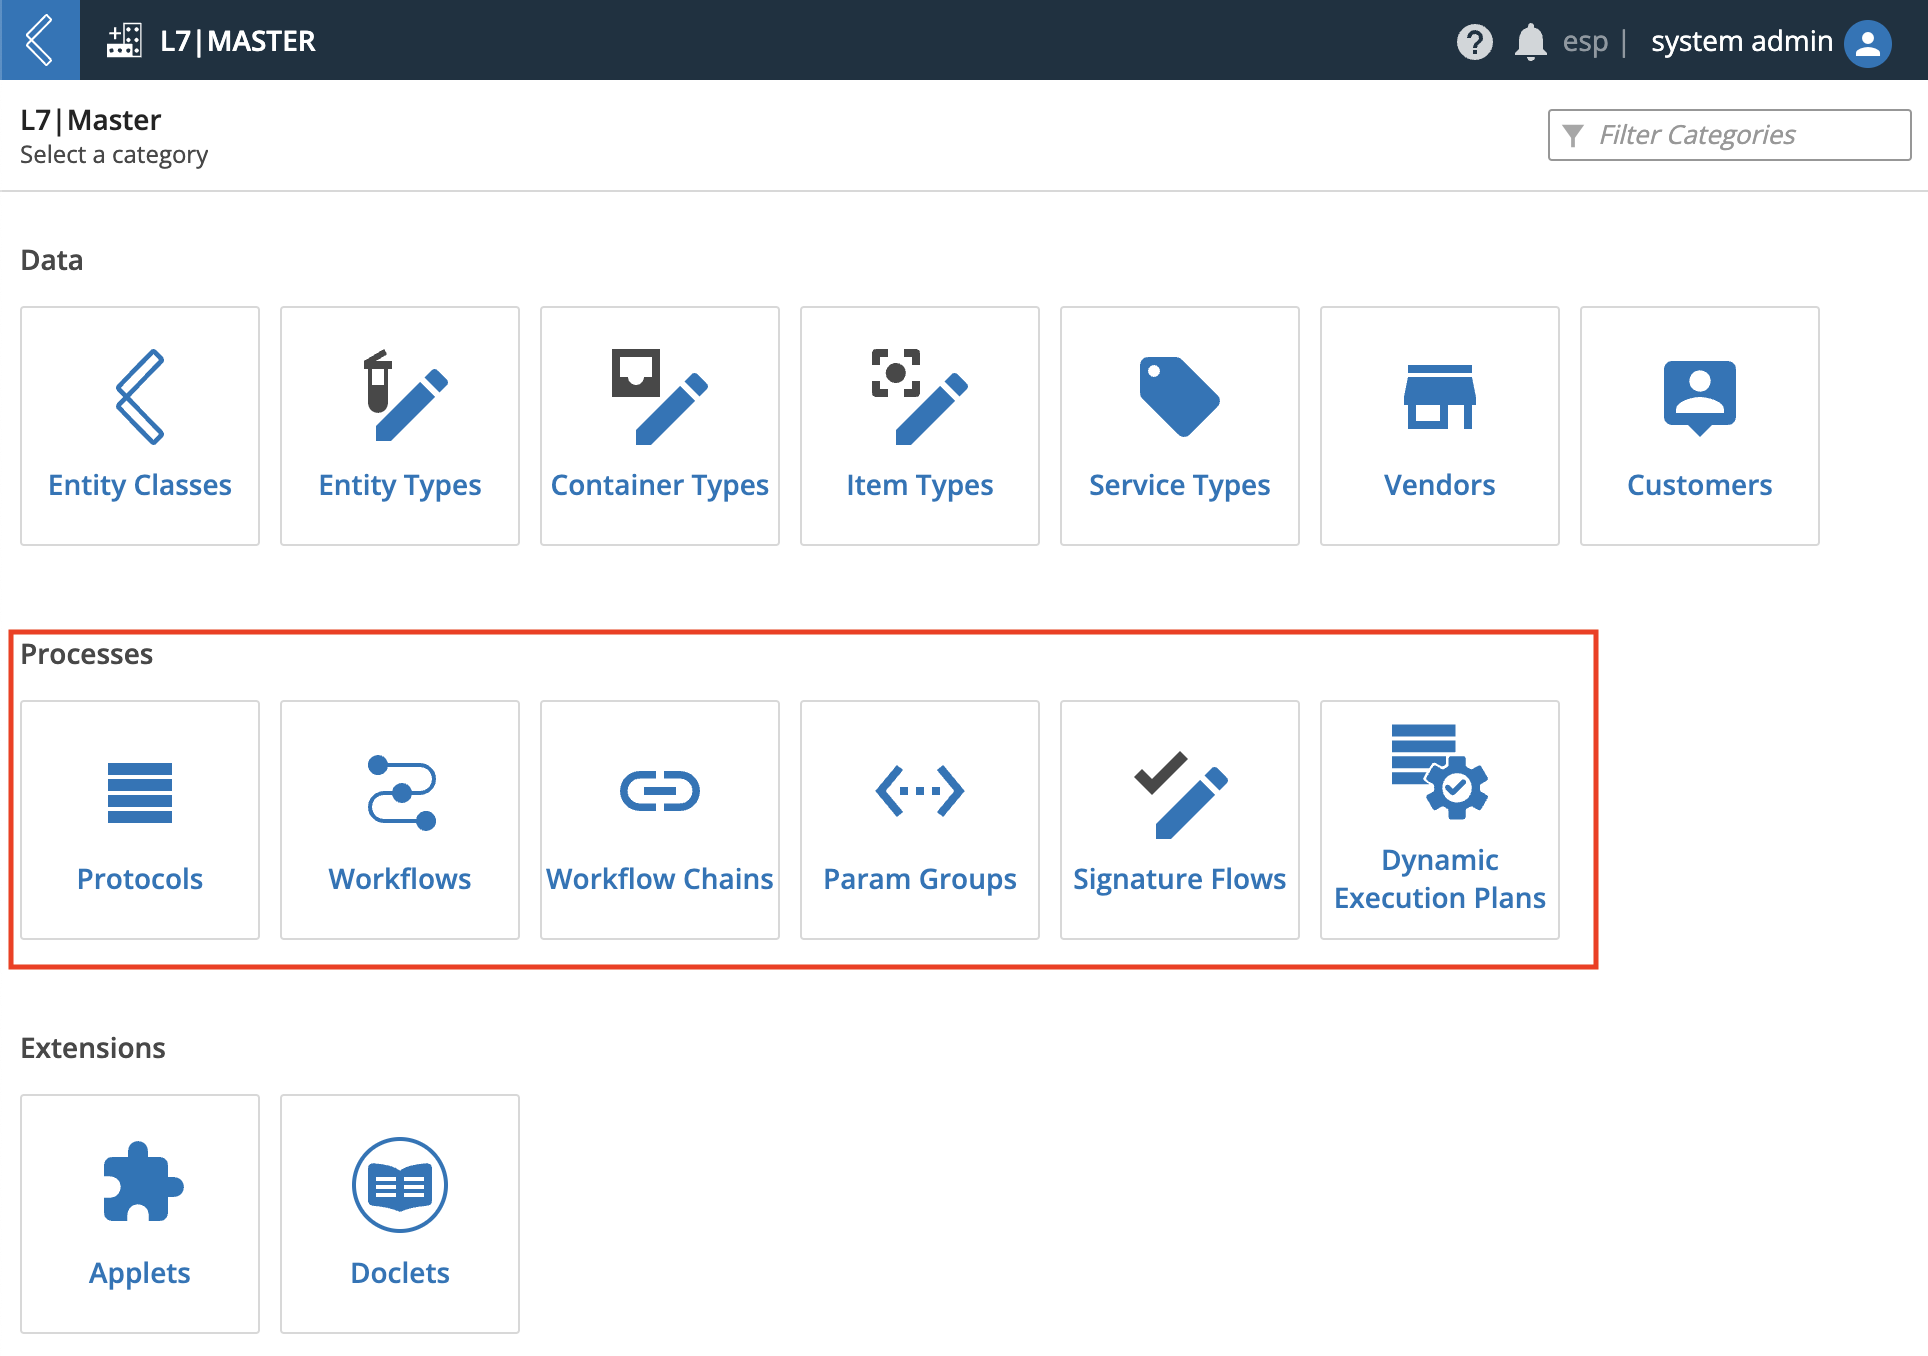
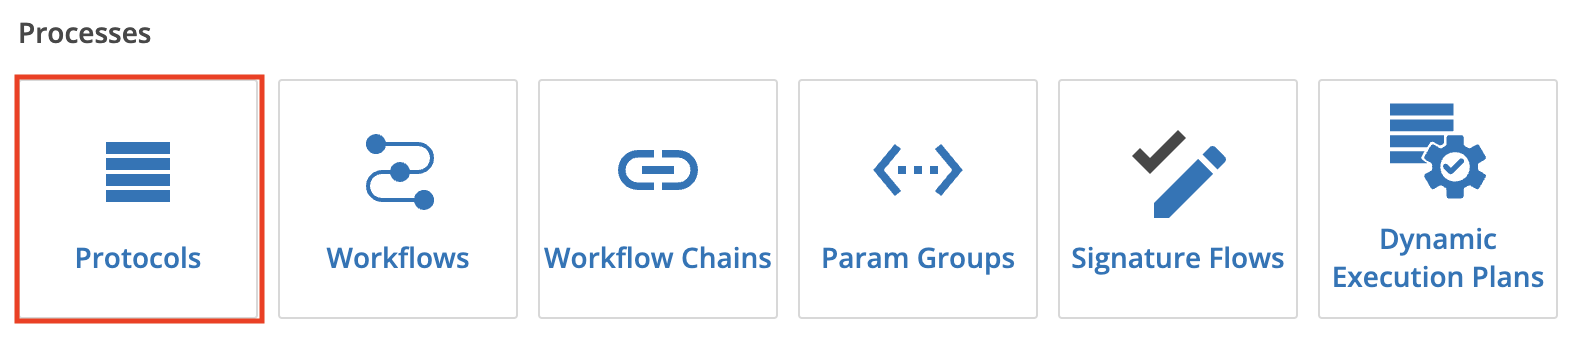
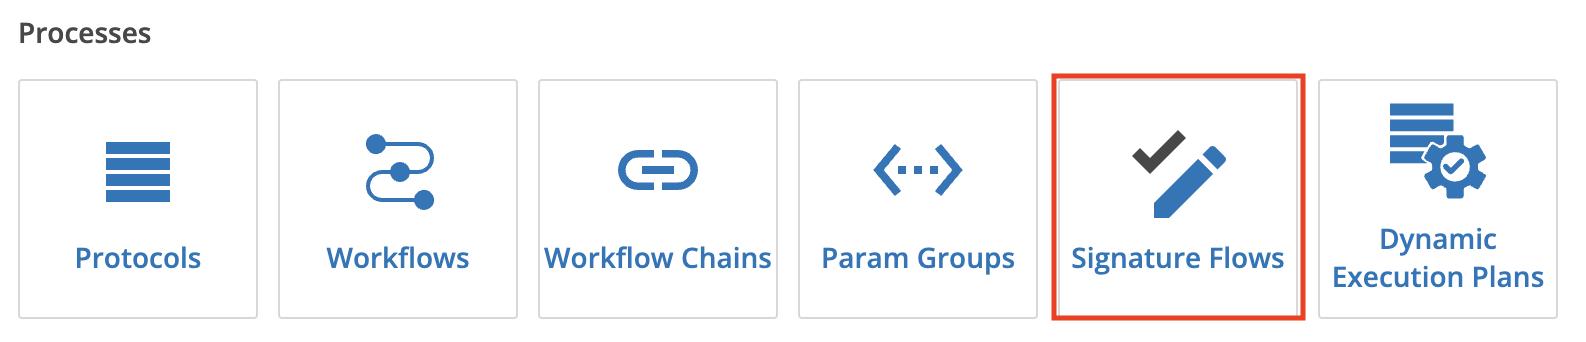
3.3. Manage Processes
The sections to follow provide instructions for how to manage processes (Protocols, Workflows, Workflow Chains, and Param Groups, Signature Flows, and Dynamic Execution Plans) in L7|ESP.
3.3.1. Manage Protocols
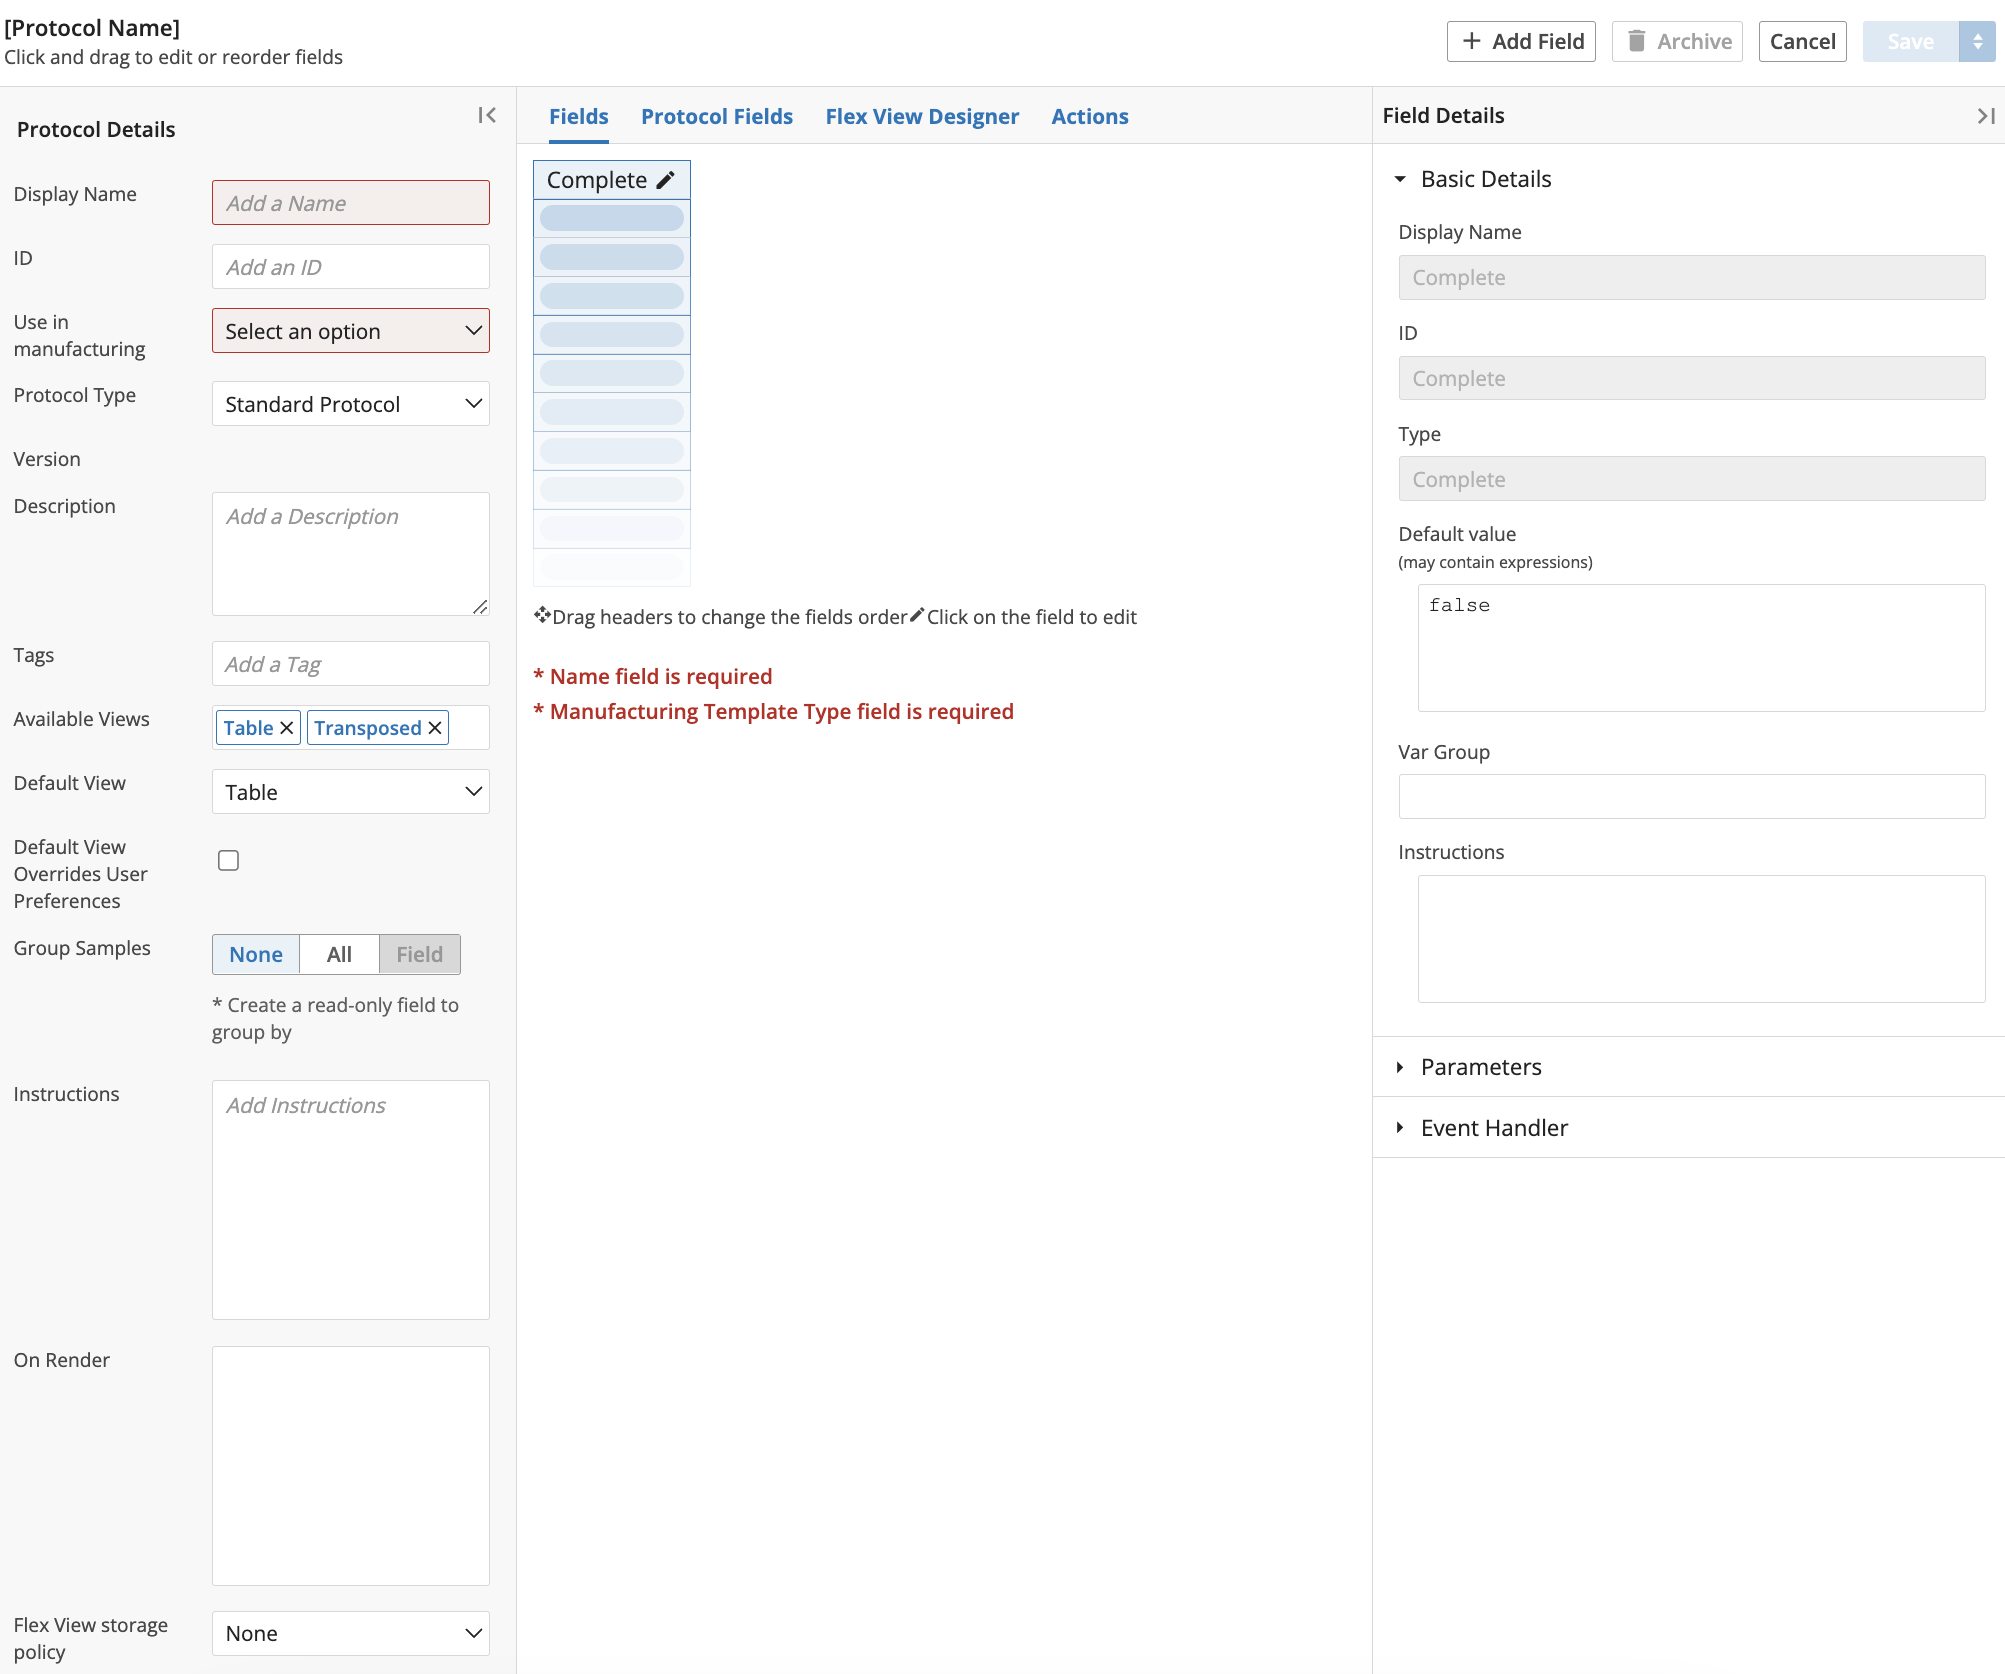
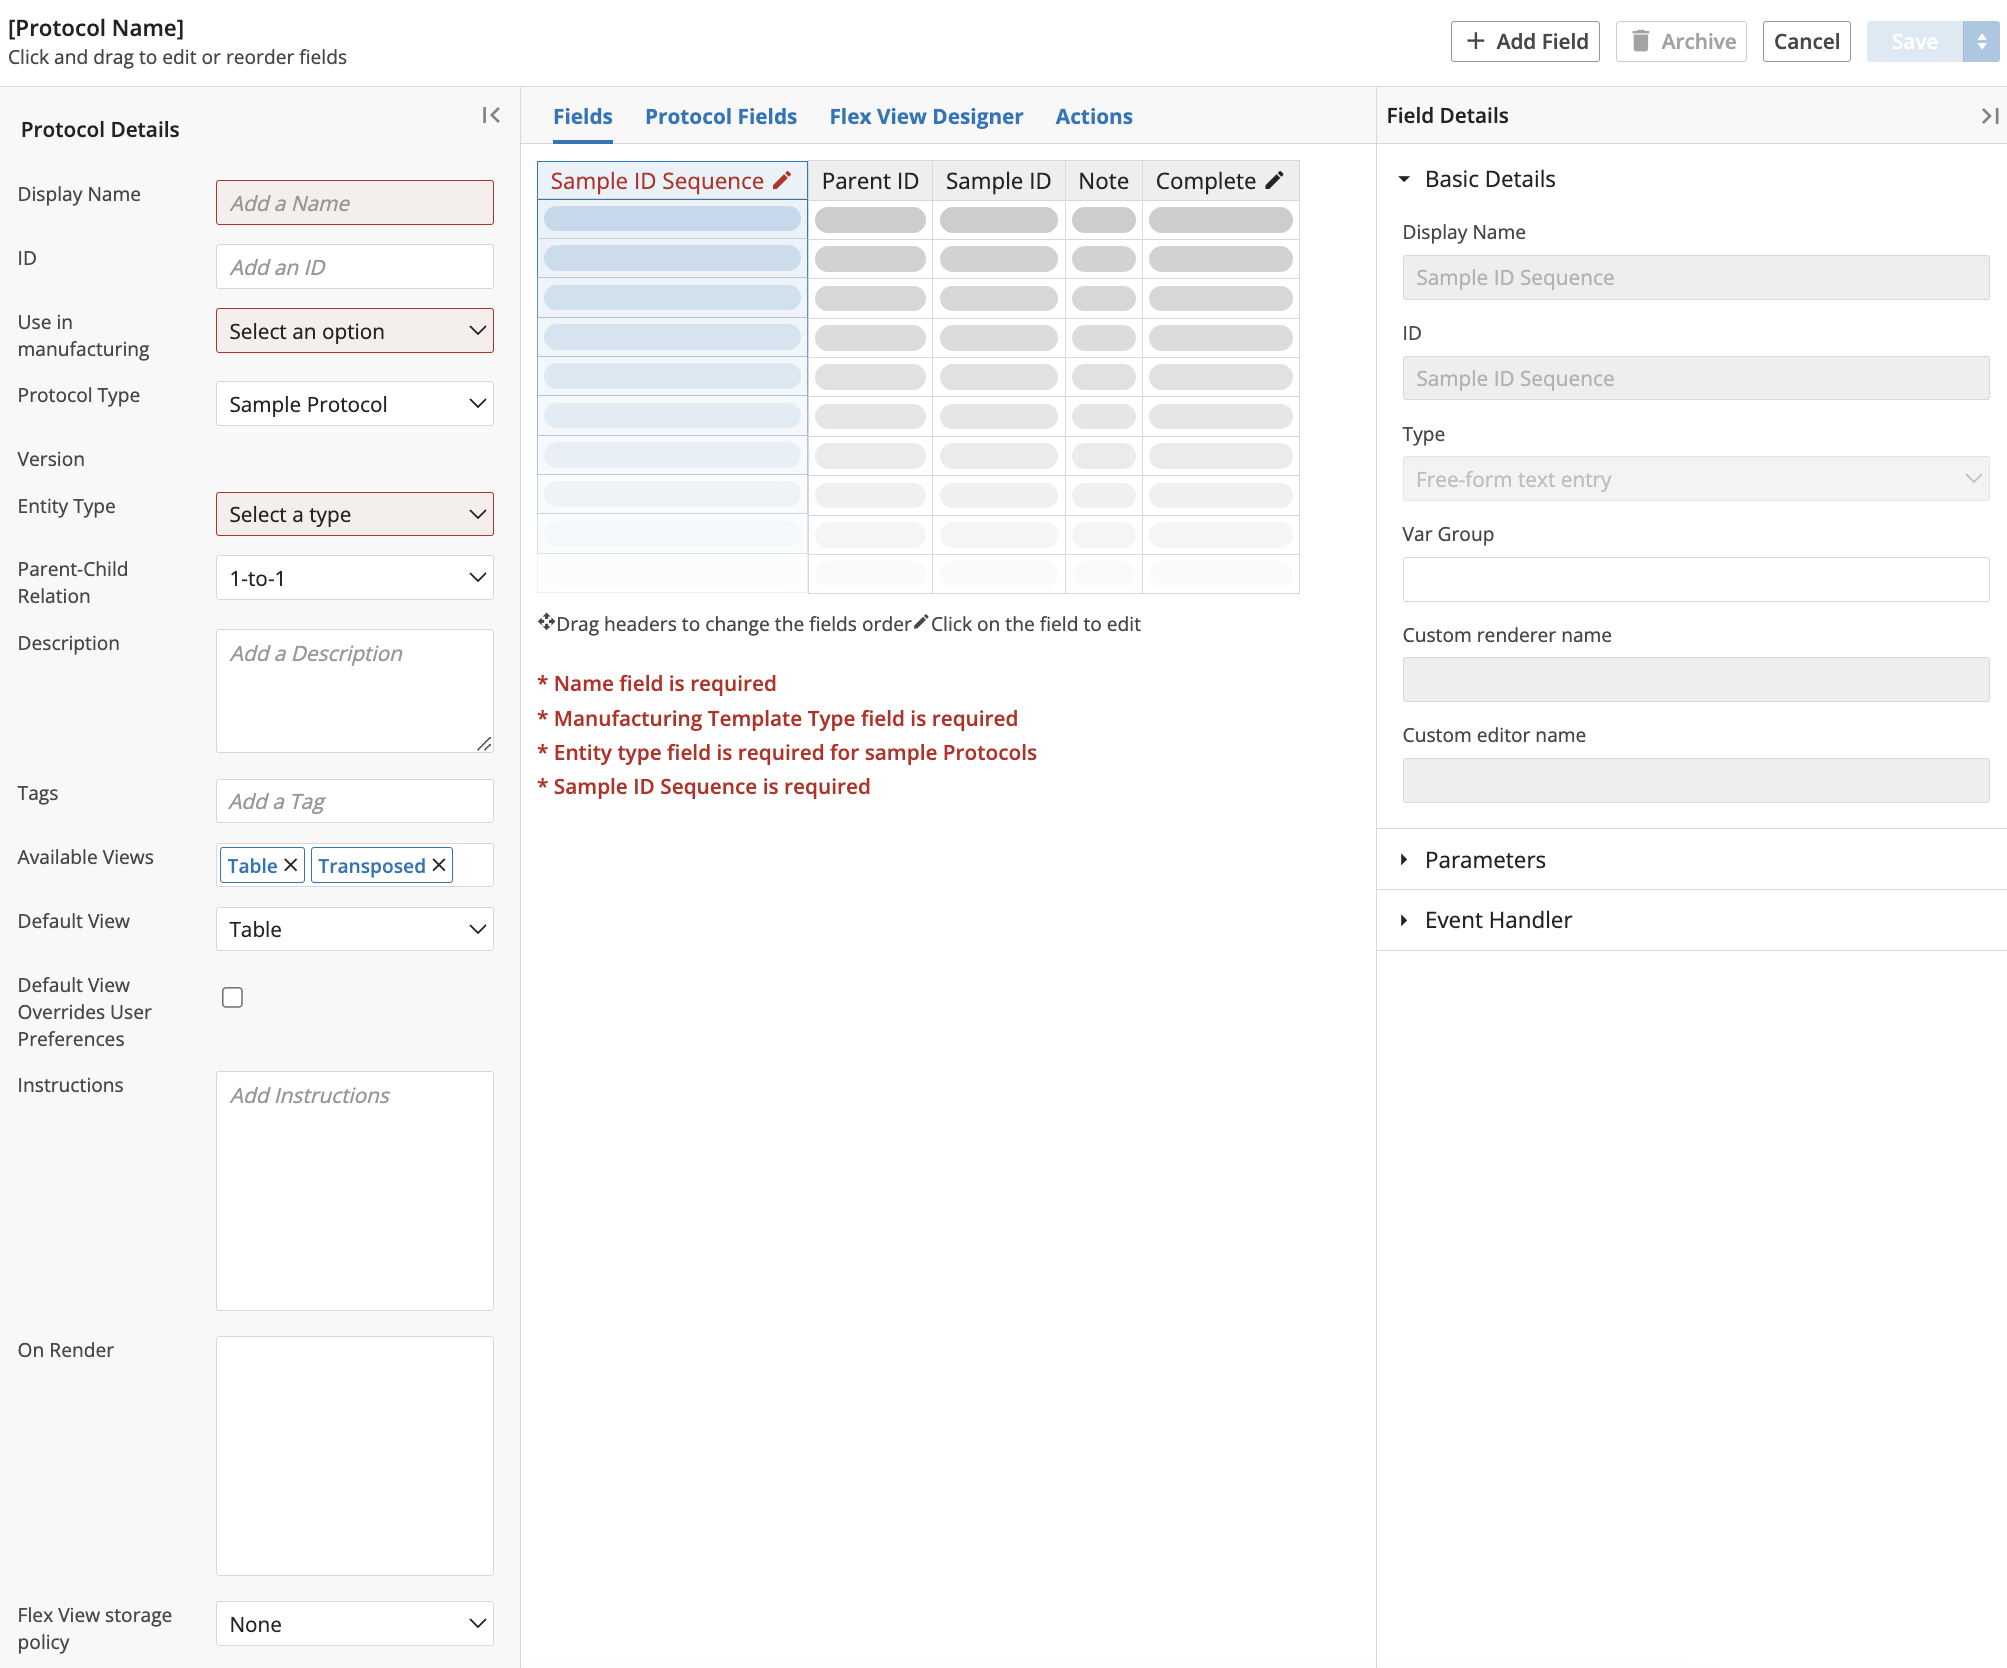
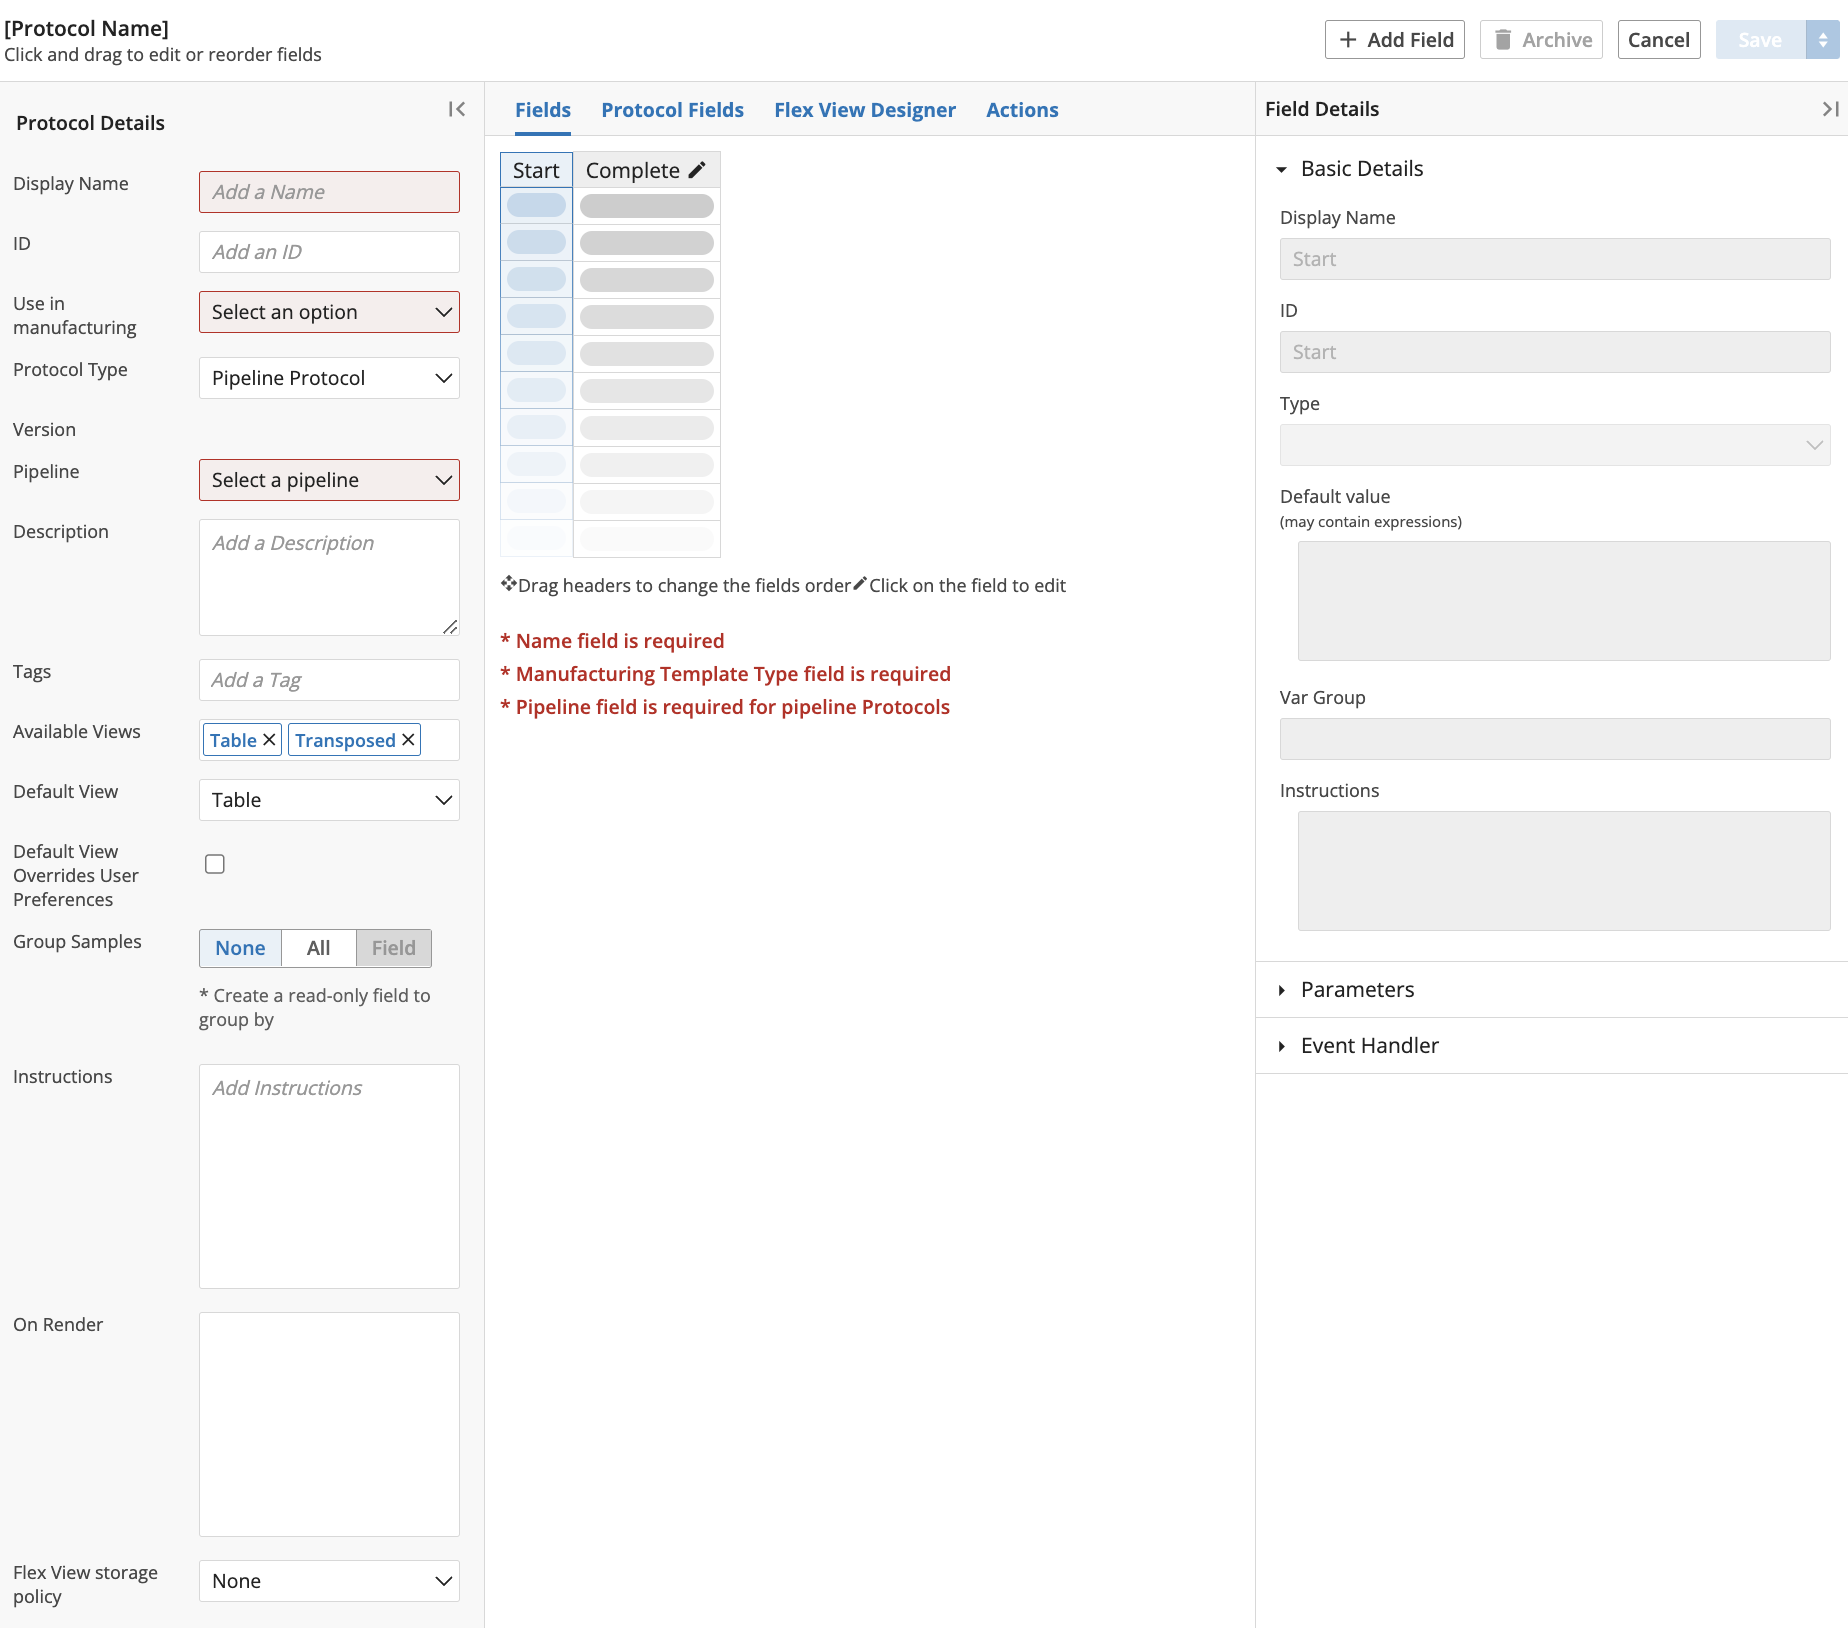
There are three types of Protocols: Standard Protocol, Pipeline Protocol, and Sample Protocol. A Protocol is a collection of one or more data Columns. Data Columns are filled out by the user when Entities are processed in the LIMS app. In the images below, observe how the Grid Preview differs between the Protocol types.
Standard Protocols are for collecting data.
Sample Protocols are for collecting data and creating child Entities (i.e., 1:1, fan-out, fan-in).
Pipeline Protocols are for collecting data and running code (Pipeline) to produce bioinformatic reports. A Pipeline Protocol connects an Experiment to a Pipeline, providing a mechanism to feed Entity data into the L7 pipeline system for computational analysis. You need to create a Pipeline before creating a Pipeline Protocol. To create a Pipeline, refer to Create Task for Pipeline.
Create New Protocol
Click the L7|Master app. Click Protocols from the Processes menu to access the Protocols page.
Click + New Protocol.

Enter a Display Name for the Protocol, select a Protocol Type, and answer Use in manufacturing.
Optional: Enter an ID, Description, Tags, Instructions, Available Views, Default View, Instrutions, and/or fill out On Render.
For a Standard Protocol or Pipeline Protocol, you have the option to Group Entities by Column. Select whether to Group All Entities or Group None of the Entities. Grouping Protocols treats multiple Entities as one Entity.
Hint
Grouping associates Entities that have the same value in the selected Column. Entity Grouping is a convenient way to assign values to many Entities at once. Entity Grouping is useful for situations in which Entities are processed en masse, such as on a plate or when pooled in a lane for sequencing. Entity Grouping is simply a visual mechanism for rolling up Entities to simplify data entry. All Entities are still individually tracked and maintained, but in the Worksheet view they appear as a single line group.
Note
To set up Grouping, the Group column must be read-only. Typically, the Group value is assigned using the instructions in Link Data between Protocols when the Protocol is added to a Workflow. However, it is acceptable to use an L7|ESP Expression for the Default Value to assign Entities to Groups.
For a Sample Protocol, select an Entity Type and Parent-Child-Relation.
Note
- Parent-Child relations are defined as follows:
1-to-1: Creates one child per parent Entity.
Fan-in: Combines Entities to create a child Entity.
Fan-out: Splits an Entity into separate child Entity.
For a Pipeline Protocol, select a Pipeline.
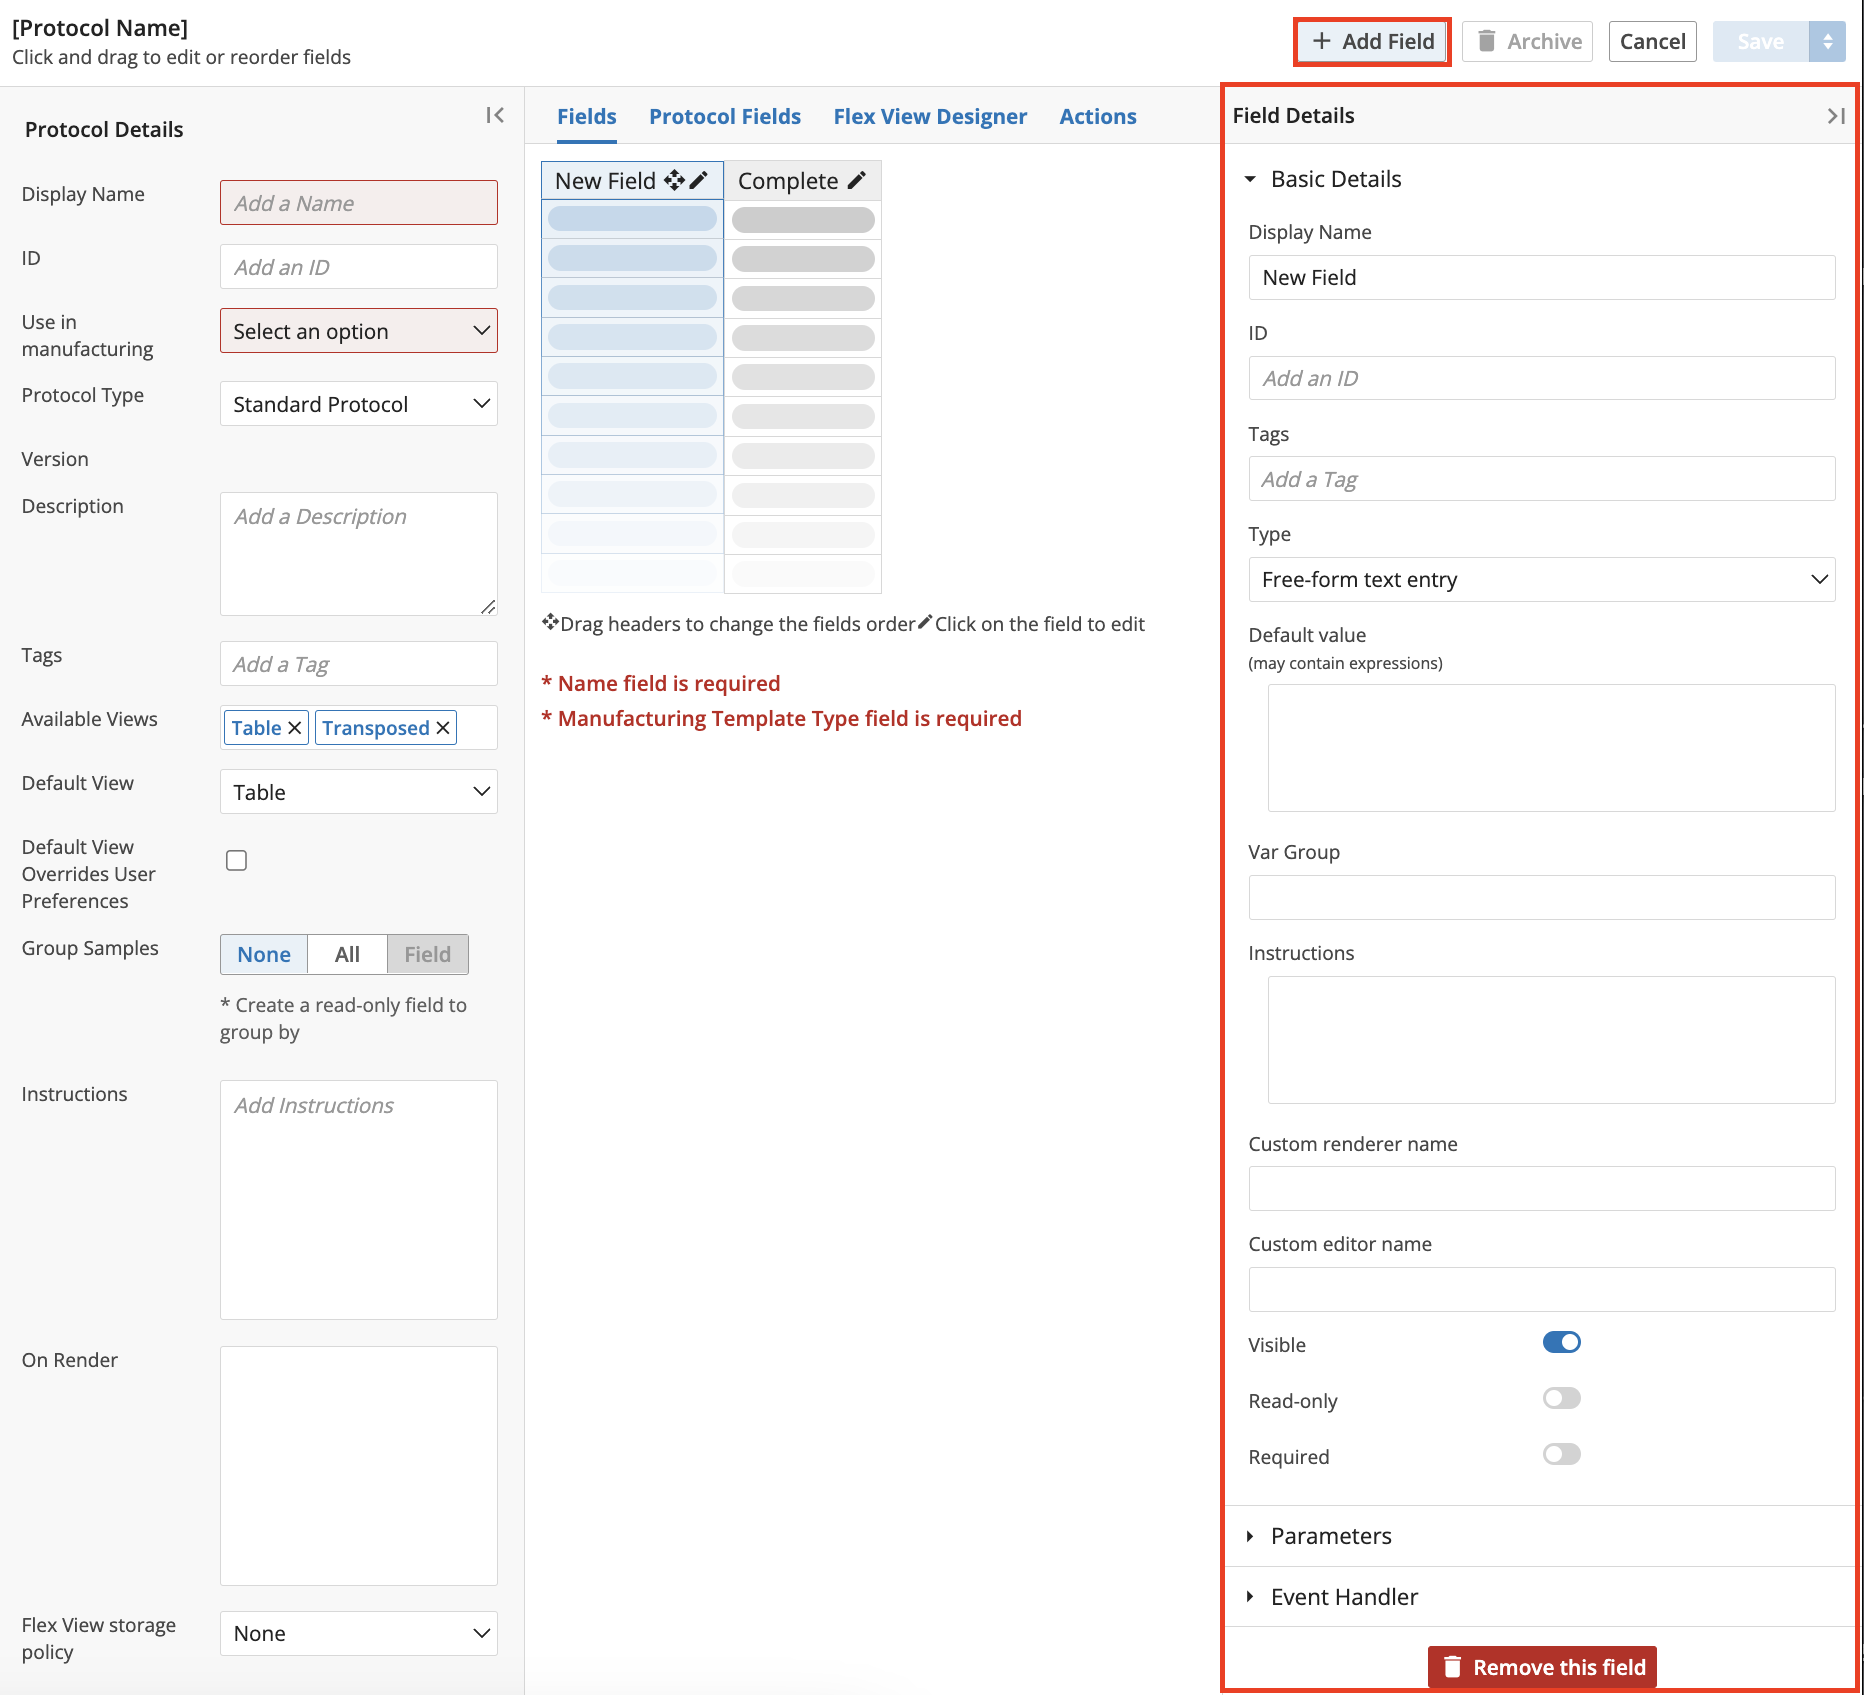
For any Protocol type, add a Column by clicking + Add Field. Fill out the Field Details panel:
Note
If the Ontology feature is active (refer to Ontology Feature), then you will see an additional field titled Select Item in the Field Details panel. Selecting an Item restricts how that column can be filled out.
Enter a Display Name for the field.
Optional: Enter an ID.
Optional: Enter one or more Tag(s).
Select a Type. The Type field specifies the option available to the user when filling out that field. Types are defined as follows:
Free-form text entry - Allows the user to enter any characters (text and numbers allowed).
Numbers only allowed - Allows the user to enter any number.
Picklist - Predetermine options for the user to choose from in a drop-down list format.
Date/Time - Allows the user to select a date.
Checkbox - Allows the user to check a checkbox to indicate "true" or "false" for a condition.
Attachment - Allows the user to upload an associated file.
Barcode - Allows the user to generate and assign a unique barcode to an Entity.
Approval - Allows a user to indicate approval through digital sign-off.
Pipeline Button - Allows user to activate pipeline.
Link - Allows the user to access associated link(s).
Resource Link - Allows the user to link associated L7|ESP Resource(s).
Inventory Item Use - Allows the user to record consumption of item(s) used when processing an Entity.
Instructions - Allows the user document instructions.
Sample Point - Allows user to assign sample point.
Container location - Allows the user to associate an Entity with a specific slot in a specific Container.
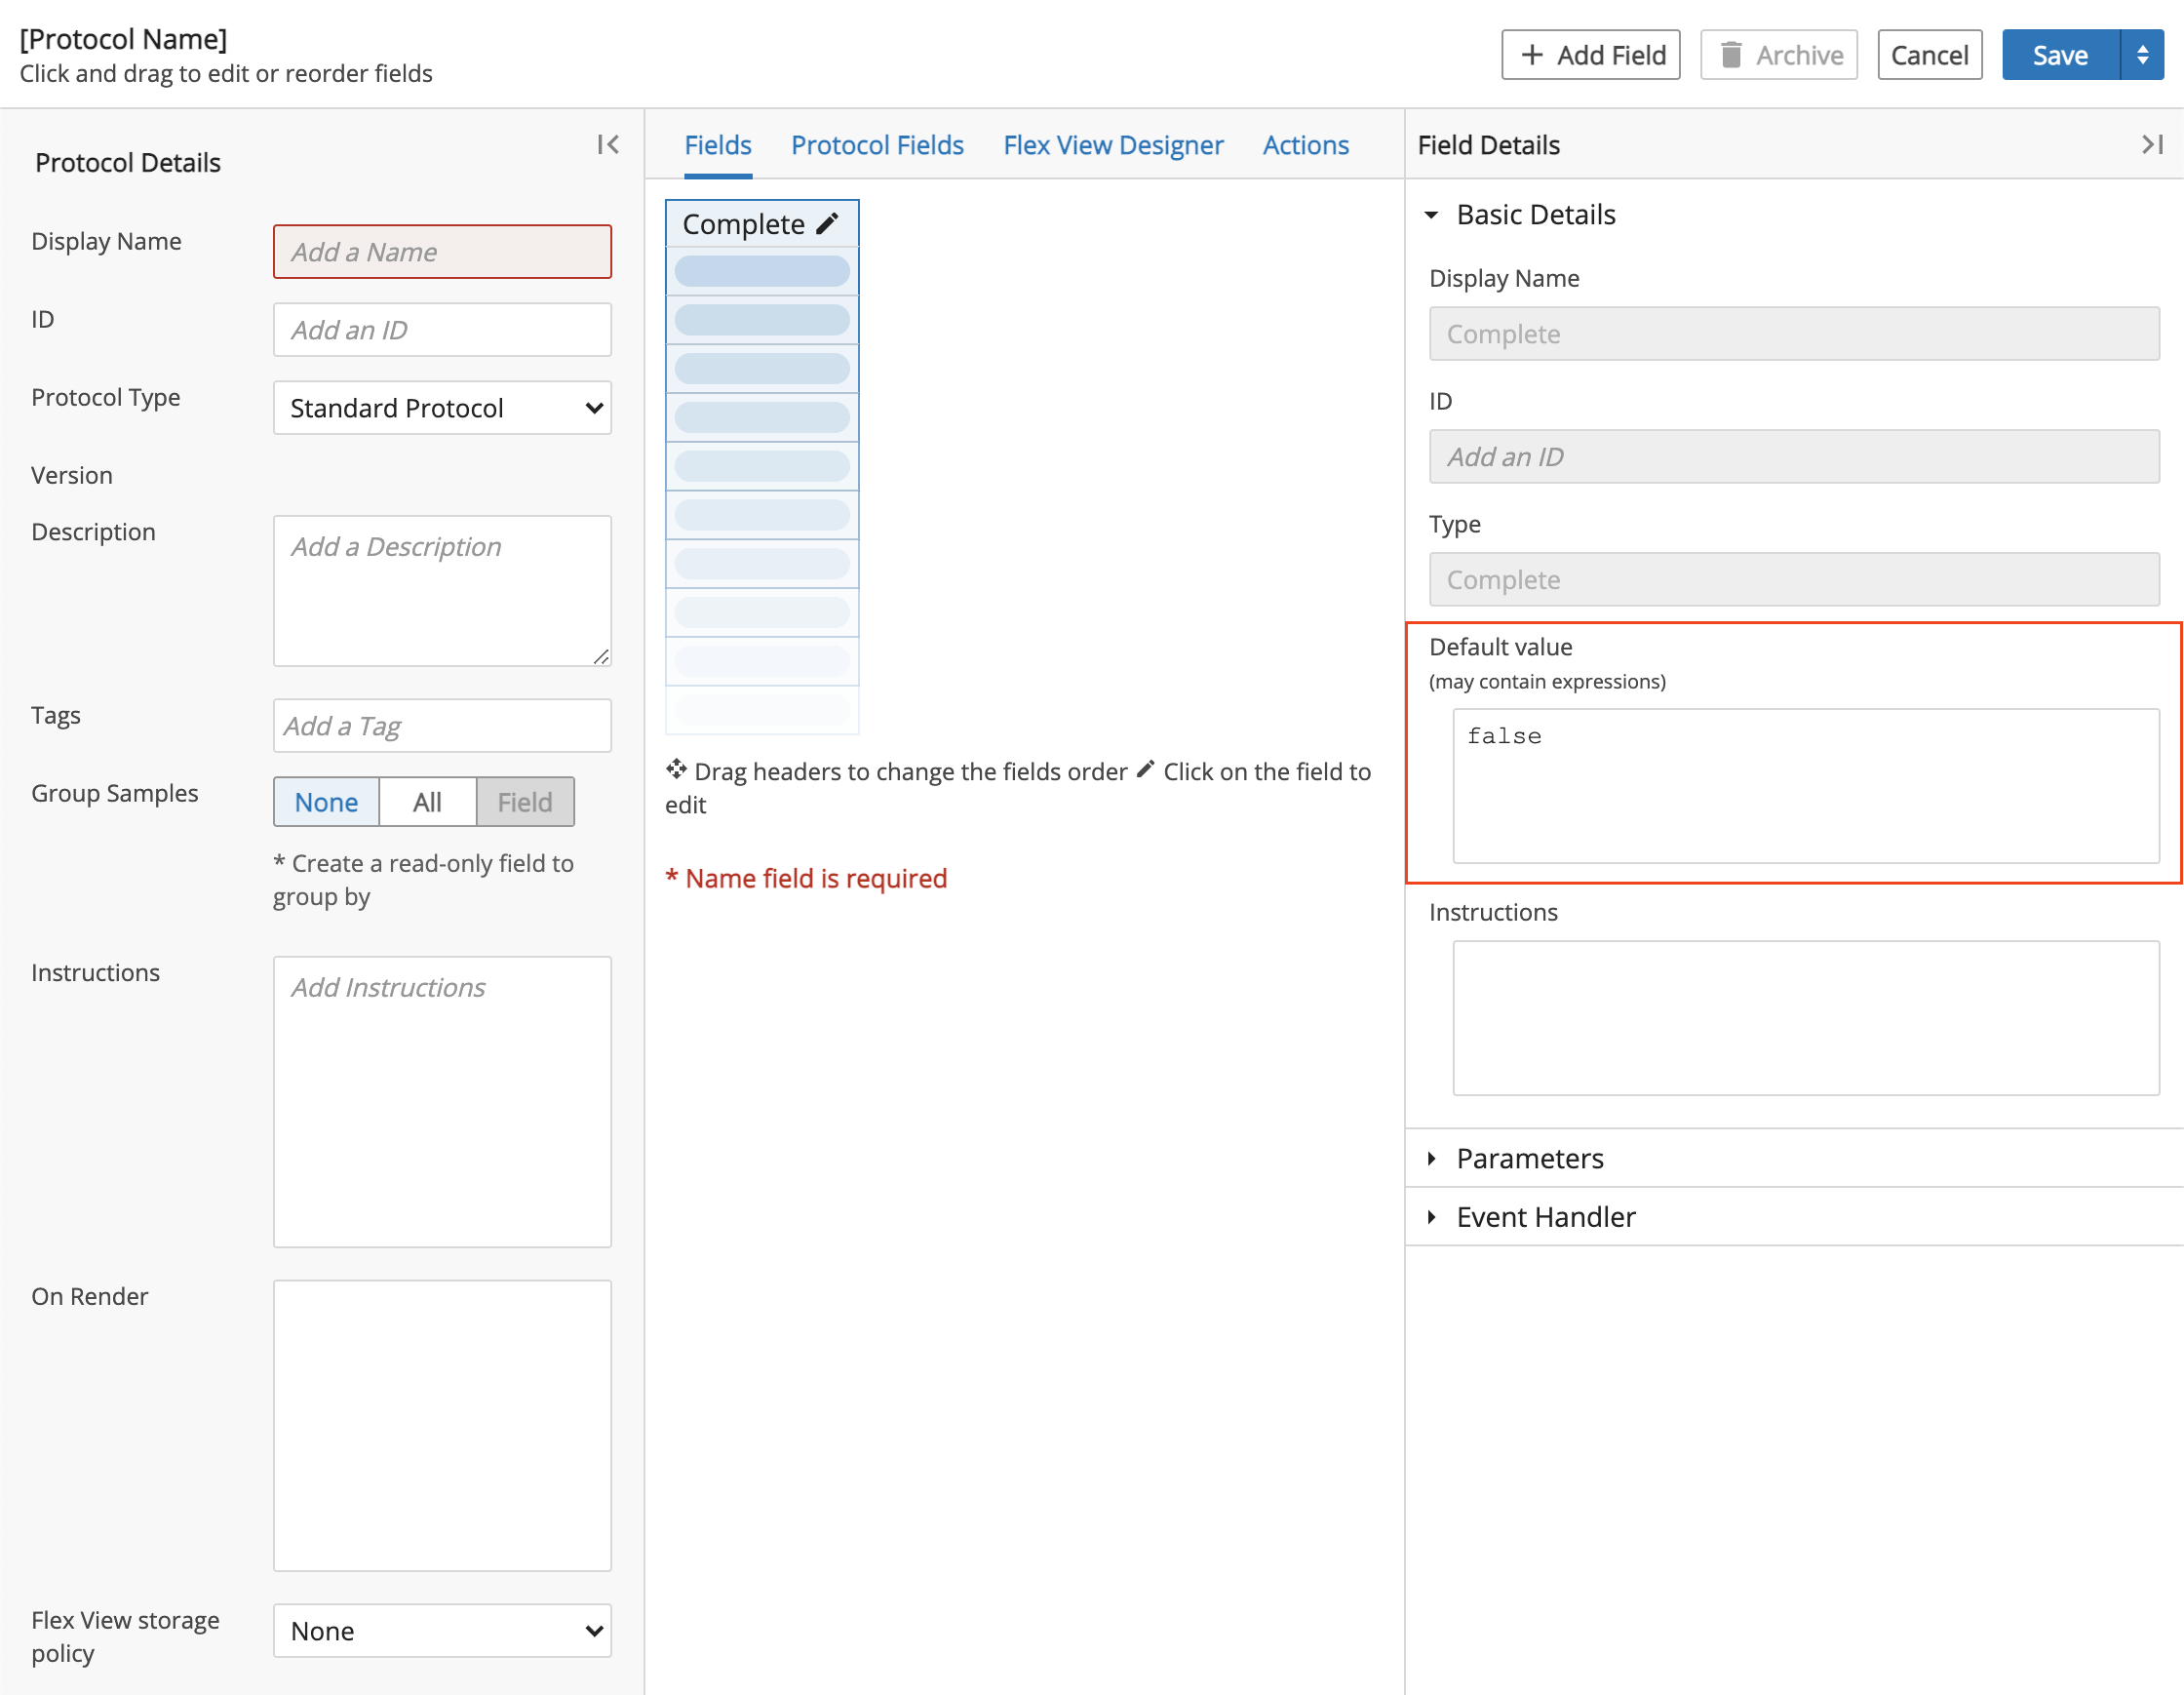
Optional: Enter a Default Value. The Default value will be pre-populated in the field. A Default Value can be an expression. For information on creating custom expressions, refer to L7|ESP Expression Language.
Indicate whether this field is Visible to the user.
Indicate whether this field is Read-only. A read-only field means the field value cannot be changed by a user.
Indicate whether this field is Required. A required field means that the field must be filled out before the user can move to the next step.
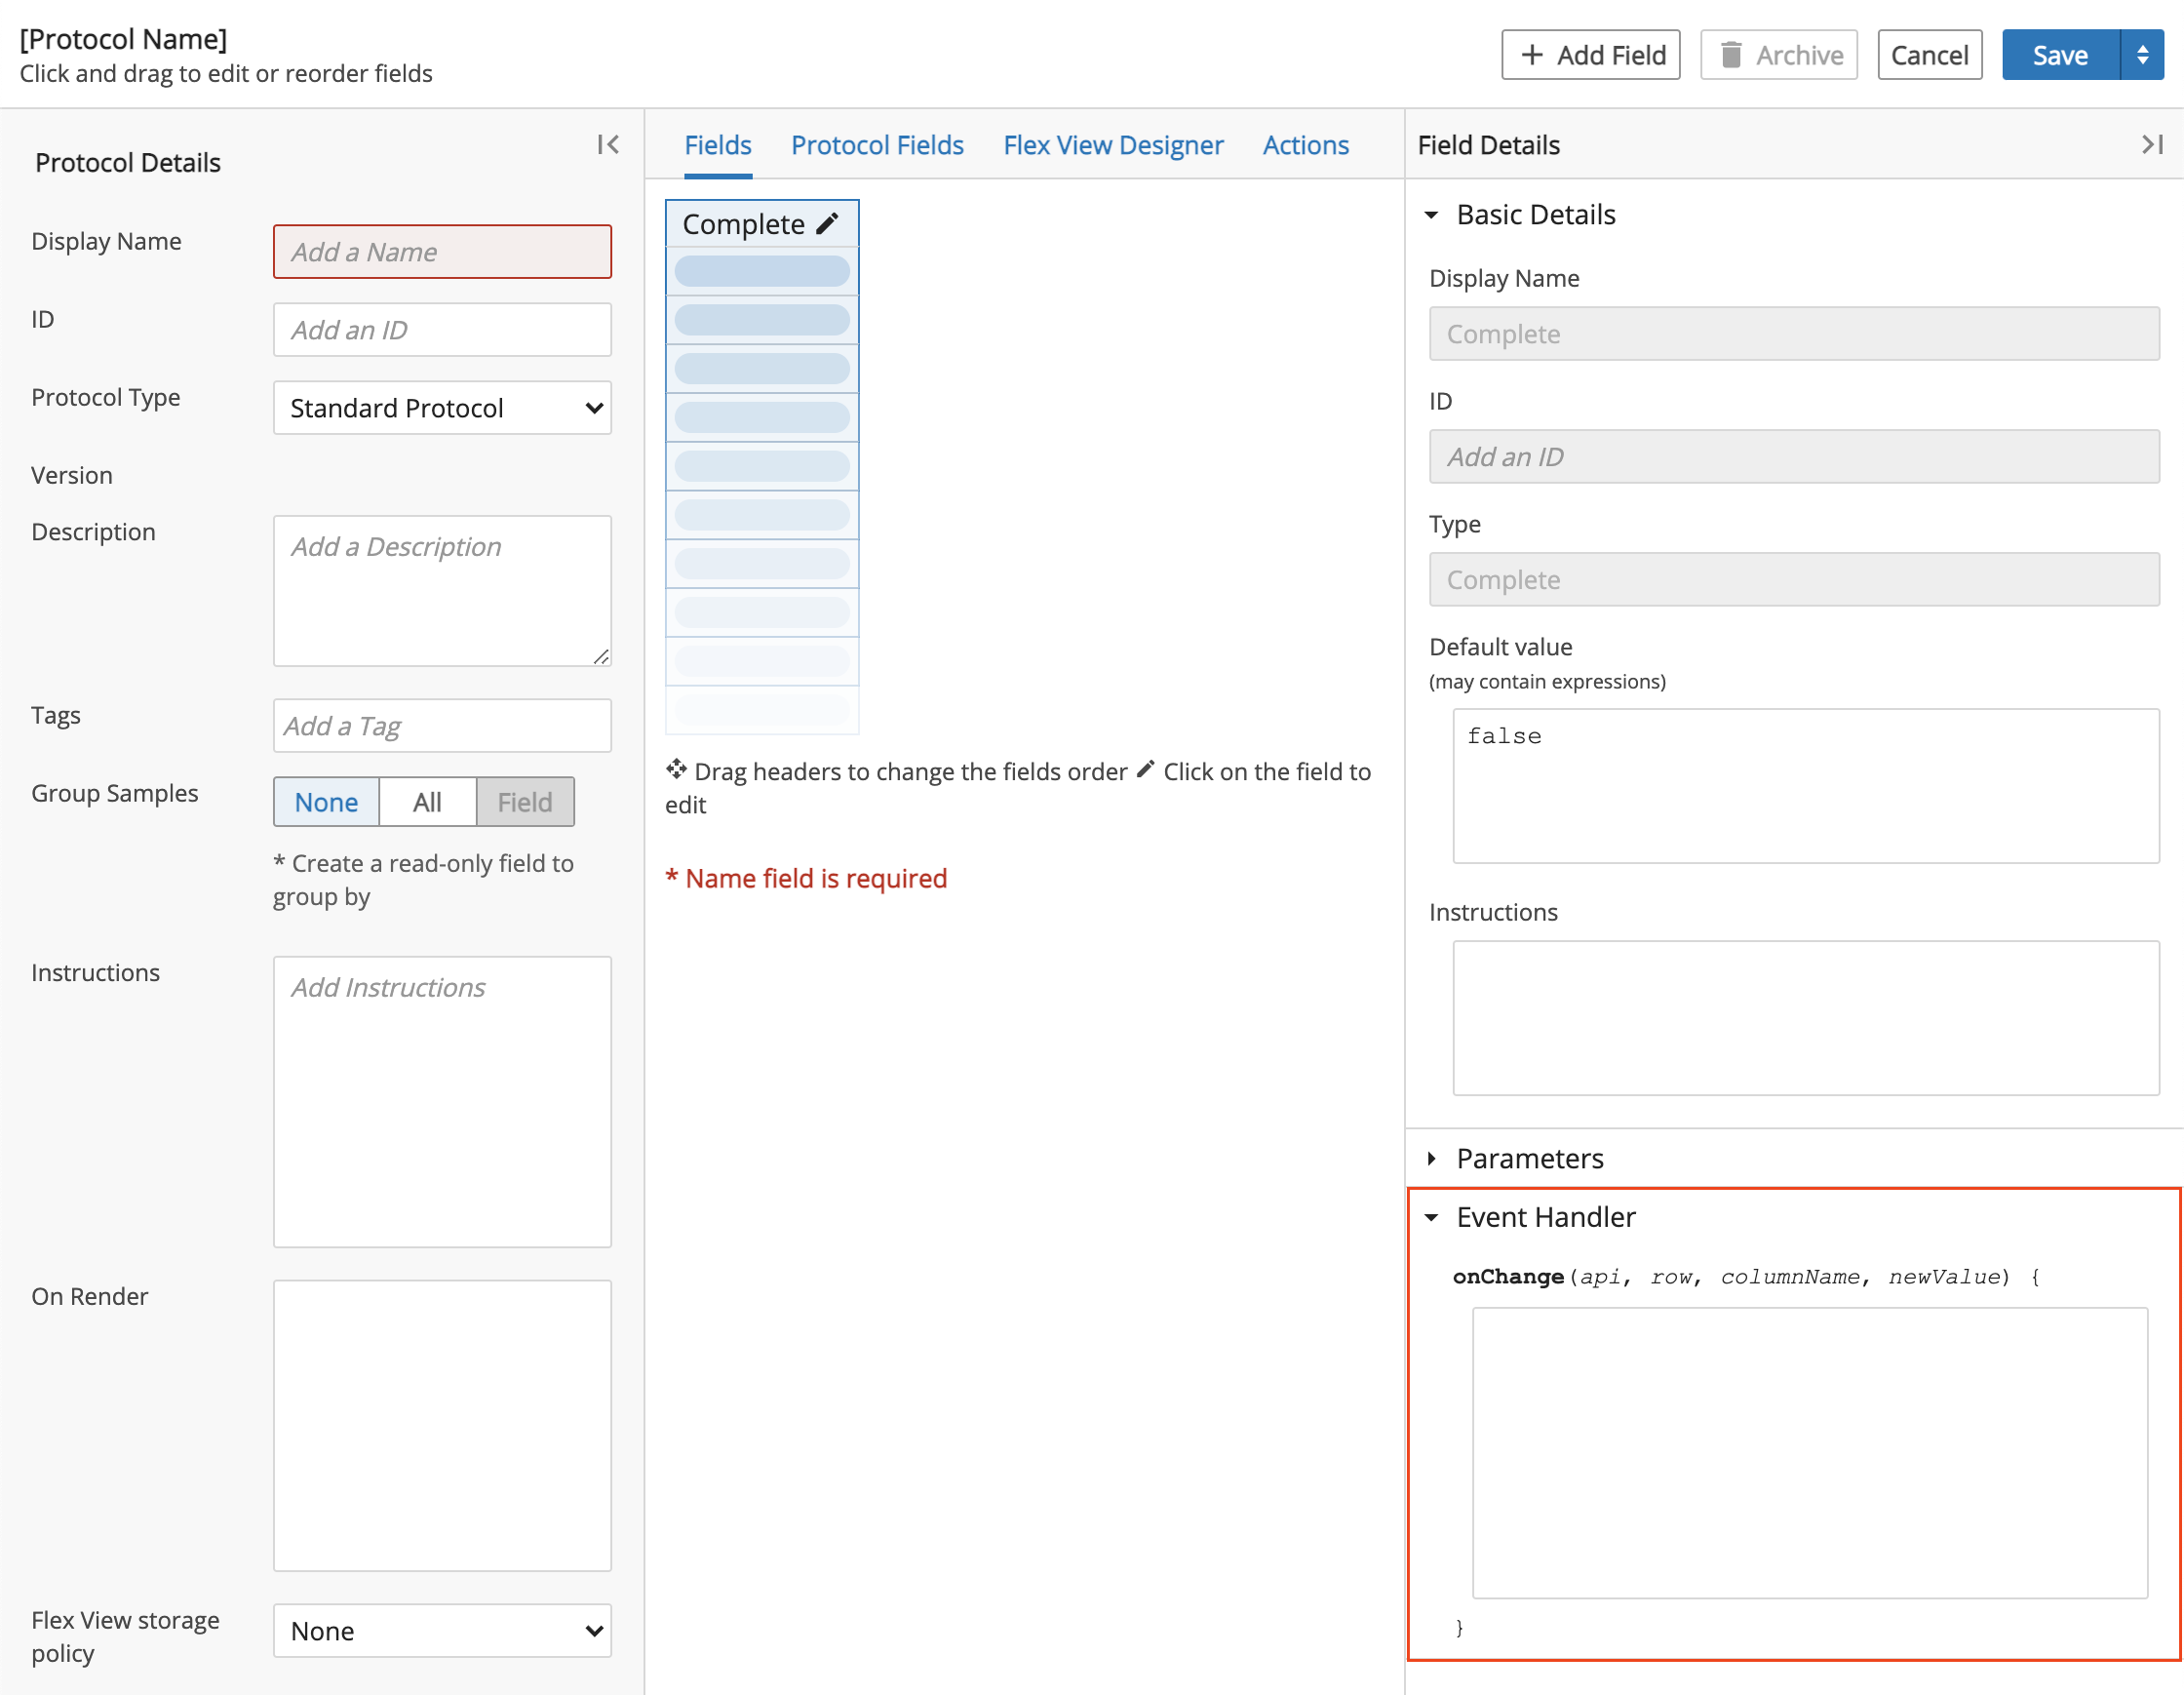
Optional: Enter an Event handler onChange. This field is used to create custom behavior that will be reflected in the UI.
Save the new Protocol.
Edit Protocol
Note
Any changes made will not apply to current Experiments that use the Protocol. Refer to Versioning System for more information.
Click the L7|Master app. Click Protocols from the Processes menu to access the Protocols page.
Click the Name of a Protocol.
Edit the desired information (e.g., Name, ID, Description, Instructions, Tags, Protocol Type, Group Samples, Fields). You can archive the Protocol by clicking Archive.
Save the updated Protocol.
3.3.2. Flex View Designer
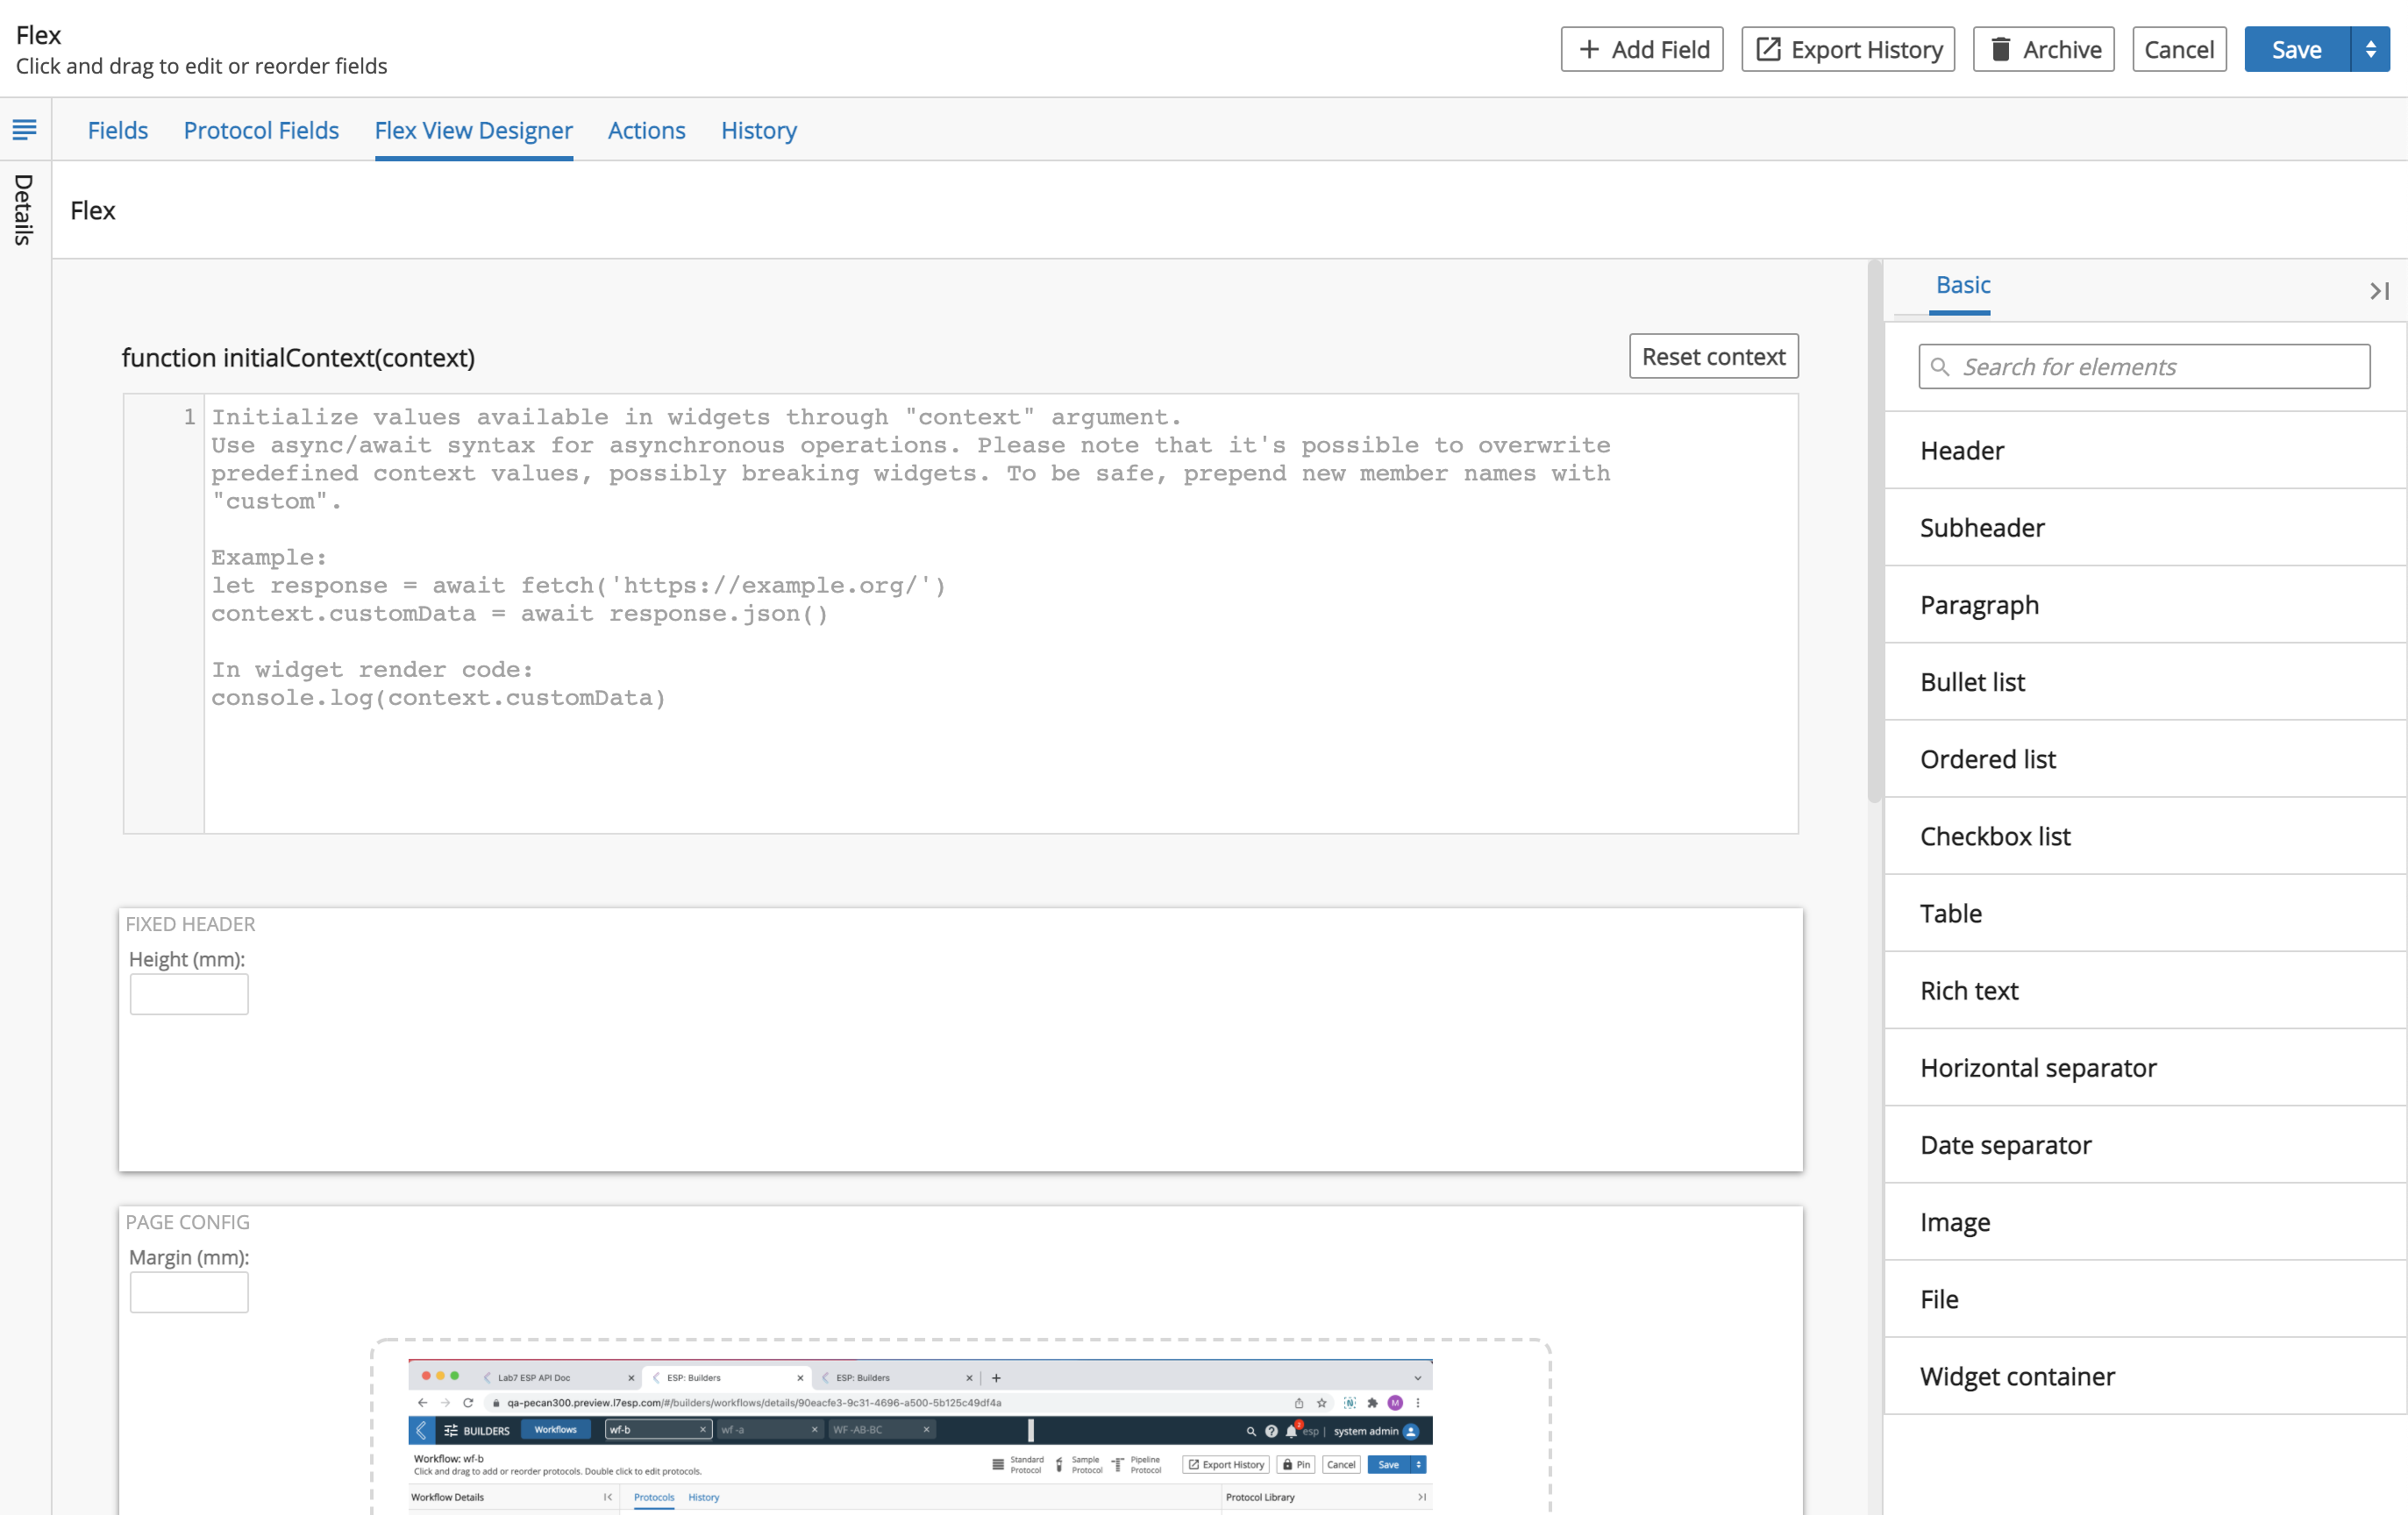
Flex View allows protocol authors to create entirely custom protocol views. These views can be used to create UI-based reports, interactive charts, or any other custom view required for a protocol. Each flex view consists of a one or more "Widgets" to display, which can be displayed in one of three "zones": the fixed header, the main page, or the fixed footer. Each widget, including custom widgets, has access to a shared context object to allow widgets to interact with each other. For instance, a protocol author can set up a table that interacts with a chart so that the chart displays the data for the selected row(s) of the table. When viewing the Flex View in LIMS, the view can be printed to PDF using the L7|ESP PDF service.
Configuration
To add a flex view to the protocol, in the protocol builder, click the "Flex View" tab. The tab displays fields for "initialContext", "Fixed Header", "Page Config", and "Fixed Footer". On the right-hand side is the widget palette, which defaults to the "Basic" widgets. The fields are explained below.
Page Config
This is the main body of the flex view. Widgets may be dragged here and configured. For instance, the header widget can be dragged in and the header text input. Note that some widgets, such as Rich text, have a dedicated "edit" mode vs. "render" mode. The active mode can be toggled by clicking on the lock icon that appears when hovering over the widget. Once added to the page Config, the order of widgets can be adjusted by clicking in an empty area within the widget and dragging it up or down. An orange dotted line will appear where to indicate the target position of the widget as you drag.
initialContext
initialContext is a JavaScript code-block that allows a flex view to set properties of the shared context. This can be used, for instance, to set up a data holder for shared page state, or to fetch additional data (either from L7|ESP or a 3rd party) into the view that can be consumed by the widgets in the page. Initial context is not required for any out-of-box widgets but may be used by custom widgets developed for a particular implementation. The context has a number of properties that are available out-of-box, depending on the view or mode of render, as follows:
In L7|Master
protocolDefinition: A representation of the current state of the protocol being edited. Provides access to all protocol properties editable in the UI, the most useful of which for flex view is usuallycolumns- the list of Fields and Protocol Fields.
In LIMS
``clientLimsApi``: This is the same object as the
apiobject passed to change handlers and protocol on render handlers. It allows a flex view widget author to fully interact with the LIMS Worksheet state.tab: Information about the currently active LIMS tab/protocol. Note that using
clientLimsApito do data access and updates is usually preferable to using this object directly.worksheet: Information about the currently active LIMS worksheet. Note that using
clientLimsApito do data access and updates is usually preferable to using this object directly.protocolInstance: An object with properties from the protocol instance of the first row in LIMS. This property is provided for backwards compatibility with L7|ESP 2.4.1 - it should not be used for new implementations.
Widgets
Flex view relies on "widgets" for adding content to the view. L7|ESP comes with a pre-built set of widgets that you can take advantage of. It's also possible to add custom widgets. The pre-built widgets are detailed below.
Pre-built Widgets
Header: Add a header element to the flex view. Use: drop in the widget and type the header text.
Subheader: Add a Subheader element to the view. Use: drop in the widget and type the Subheader text.
Paragraph: Add a paragraph element to the view. Use: drop in the widget and type the paragraph text.
Bullet list: Add a bullet list to the view. Use: drop in the widget and input the first item. To add more items, press enter.
Ordered list: Add a numbered list to the view. Use: drop in the widget and input the first item. To add more items, press enter.
Checkbox list:** Add a checkbox list (such as a to-do list) to the view. Use: drop in the widget and input the first item. To add more items, press enter. Note: currently, the checked state of the items is uneditable by a user in LIMS - this widget is for display and/or printing purposes only at this time.
Table: Add a table to the view. Use: drop in the widget. The table starts with one row and one column. Right click to bring up the context menu to add additional rows and columns. Double click a cell or header to edit the table text. Note: although the context menu is still accessible from LIMS view, changes made are not persisted and cell values are not modifiable by the user. This table is intended for display purposes, only.
Rich text: Add a rich text editing widget to the view. Note: the editor is currently for flex view _authors_; editing is not available to users running the workflow in LIMS.
Horizontal separator: Add a horizontal line separator to the view.
Date separator: Add a date separator to the view. Note: the date is currently a static date, set at the time of protocol creation.
Image/File: Widgets for adding images and other types of files such as PDFs to the view. Currently supported file types: CSV/Excel, PDF, Flow Cytometry (
*.fcs), DNA Sequence (*.seq)), Word (*.doc,*.docx), Text (*.txt)Widget container: Allows for grouping of widgets, which in turn allows a group of widgets to be moved as a single unit.
Generic renderer: Allows for execution of arbitrary HTML and JavaScript. This is a form of custom widget specific to a single protocol. Note: requires the code authoring permission to see/use.
Custom Widgets
It is possible to create custom widgets and custom widget palettes. Doing so requires JavaScript programming. Contact your L7 representative for information on extending the available flex view widgets in your implementation.
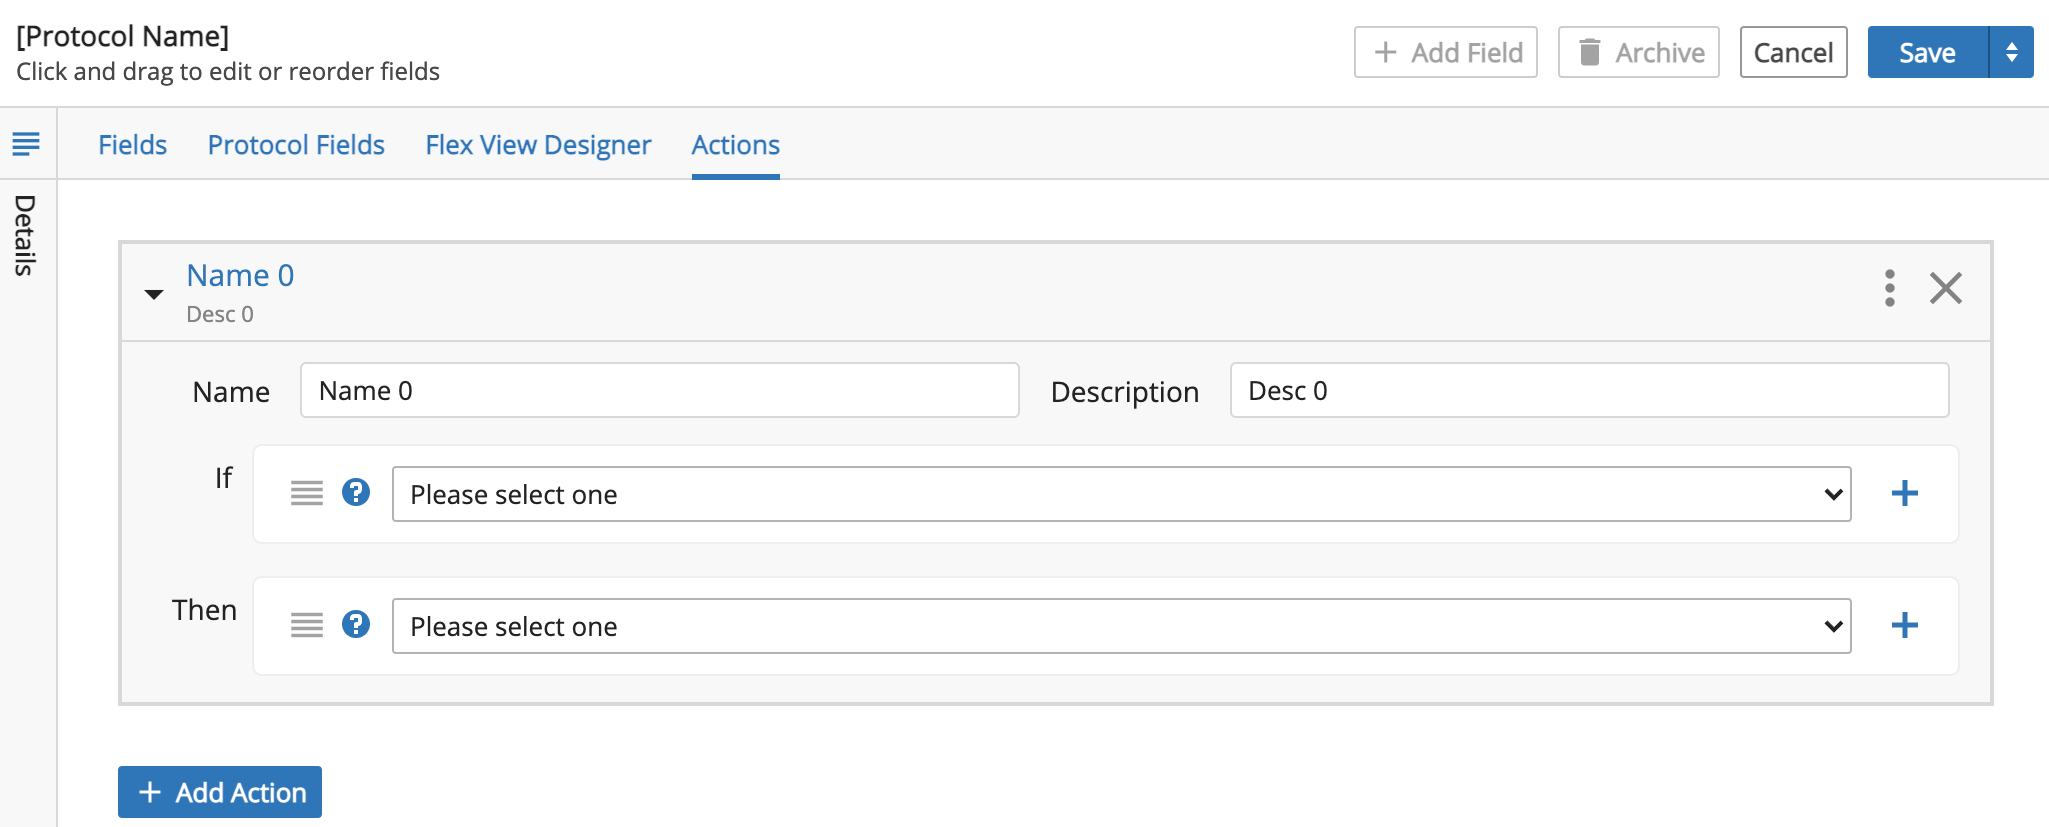
3.3.3. Protocol Actions
Protocol actions allow protocol authors to add behaviors to protocols that are executed when the protocol is saved.
Configuring Protocol Actions
Add an action by navigating to the Actions tab of the protocol builder and clicking the + Add Action button.
Each action has a name and description - these fields are used in error reporting and logging and are useful for documenting the intent of the action.
The condition or conditions are added in the "If" section of the action. The actions to perform, if the conditions are met, are defined in the "Then" section.
The available out-of-box conditions are:
All rows completed - Triggered in a protocol if all rows are complete, as long as one or more rows were completed during the save.
All rows match an expression - Triggered if all rows evaluate to true for the supplied expression. The expression is evaluated in LIMS context.
All rows rejected - Triggered in a protocol if all rows have been rejected during save.
Any row completed - Triggered in a protocol if any row is completed during the save.
Any row rejected - Triggered in a protocol if any row is rejected during the save.
Any rows match an expression - Triggered in a protocol if any rows match the expression. The expression is evaluated in LIMS context.
Only once - Triggered once for a given row match, see "Understanding Protocol Action Processing" for more information.
The available out-of-box actions are listed below. In this list, the "(EE)" means the value can contain expressions. Unless otherwise noted, those expression are evaluated in the Protocol Action Expression Context.
Archive Objects - Archives the objects associated with the completed Expression (EE).
Fail Samples - Fails samples associated with Protocol.
Notify Roles - Users in the specified roles receive an L7|ESP notification. It accepts the following parameters:
Roles - A case-sensitive list of role names. Control works like tags: type the name and hit enter to confirm.
Title - The notification title (EE)
Message - The notification message (EE)
Notify Users - The specified users receive an L7|ESP notification. It accepts the following parameters:
Users - A case-sensitive list of user names. Control works like tags: type the name and hit enter to confirm.
Title - The notification title (EE)
Message - The notification message (EE)
Notify Workgroups - Users in the specified Workgroups receive an L7|ESP notification. It accepts the following parameters:
Workgroups - A case-sensitive list of Workgroup names. Control works like tags: type the name and hit enter to confirm.
Title - The notification title (EE)
Message - The notification message (EE)
Start Workflow - Launches an Experiment using the specified Workflow for the condition-matching entities. It accepts the following parameters:
Workflow - Name of the Workflow to start (EE)
Project - Name of the Project to put the Experiment in (EE)
Experiment Name - Name of the Experiment to create (EE)
Tags - List of tags to add to the Experiment
Worksheet Name - Name of the LIMS Worksheet to create (EE). If this is empty, a Worksheet will _not_ be created. If it is not empty, all Entities from the newly-created Experiment will be added to the Worksheet.
Start Workflow Chain - Launches an Experiment using the specified Workflow Chain for the condition-matching entities. It accepts the following parameters:
Workflow Chain - Name of the Workflow Chain to start (EE)
Project - Name of the project to put the Experiment in (EE)
Experiment Name - Name of the Experiment to create (EE)
Tags - List of tags to add to the Experiment
Worksheet Name - Name of the LIMS Worksheet to create (EE). If this is empty, a Worksheet will _not_ be created. If it is not empty, all Entities from the newly-created Experiment will be added to the Worksheet.
Synchronize Field Value To Entity - Copies a value from LIMS to an Entity custom field. It accepts the following parameters:
Source Field - ID of the LIMS field to copy the value from
Target Field - ID of the Entity custom field to copy the value to
Tag Row Samples - Adds the specified tag(s) to the matching Entities. If the Entity is already tagged, no change occurs.
Untag Row Samples - Removes the specified tag(s) from the matching Entities. If the tag is not on the entity, no change occurs.
Understanding Protocol Action Processing
Each action has one or more conditions and actions that are triggered when all of the configured conditions for the action are met.
L7|ESP checks whether actions should be evaluated when:
Entities are added a Worksheet
Removed for a Worksheet
When a Worksheet is saved
When Worksheet entities are failed
When Worksheet entities are approved
Note
L7|ESP will only process actions for Worksheet protocols that started or ended "active" (has one or more actionable Entities). An actionable Entity is one that can be completed or failed. For each action, L7|ESP will evaluate every action condition against each row in the Worksheet protocol and collect the set of rows that pass all specified conditions. If one or more rows pass the condition, the action will be executed once against the set of all passing rows.
The following examples illustrate this concept.
Example 1
Setup:
Protocol Action Condition: "any row is completed"
Protocol Action: The action is "send a notification"
Scenario Starting Point: A Worksheet with 10 Entities is open with all ten active in the configured protocol.
When:
The user clicks "Complete" for the first Entities and saves. One Alert will be sent, with the first Entity as the "affected" Entities.
The user clicks "Complete" for the next 9 Entities and saves. One Alert will be sent for the remaining nine Entities as the "affected" Entities.
The user clicks "Uncomplete" for the first three entities and saves. Then the user clicks "Complete" again for the first three entities and saves again. One alert will be sent for those three entities.
Example 2
Setup:
Protocol Action Condition: "any row is completed" _and_ "Only Once"
The same as Example 1 for everything else.
When:
The user clicks "Complete" for the first Entities and saves. One Alert will be sent, with the first Entity as the "affected" Entities.
The user clicks "Complete" for the next 3 Entities and saves. One Alert will be sent for the these three Entities as the "affected" Entities because an alert has not yet been sent for any of these entities.
The user clicks "Uncomplete" for the first three entities and saves. Then the user clicks "Complete" again for the first three entities and saves again. No alert will be sent for those three entities because we already alerted for all three.
The user clicks "Uncomplete" for the fourth entity and saves. The the user clicks "Complete" for that entity again and clicks "Complete" for the remaining six entities. An alert will be sent for the remaining six entities but not for the "recompleted" samples since it was included in a previous alert.
Example 3
Setup:
Protocol Action Condition: "all rows complete"
Protocol Action: "send a notification"
A worksheet with 10 entities is open with 8 samples Complete and 2 Uncomplete
When:
The user clicks "Complete" for the 9th sample and saves, no notification is sent because all samples are not complete.
The user clicks "Complete" for the 10th sample and saves, one notification is sent for all samples in the sheet since all samples are now complete.
The user clicks "Complete" for one sample in the _next_ protocol: no notifications are sent because the initial and final state of the protocol with the action was inactive, so the actions were not checked.
The user clicks "Uncomplete" in the protocol for one sample: no notifications are sent because not all samples are complete, but the action _is_ checked since the final state of the protocol is "active"
The user clicks "Complete" for the sample uncompleted just before: a notification is sent for all samples since all samples are now complete (again).
Example 4
Setup:
Protocol Action Condition: "all rows complete" _and_ "Only Once"
Protocol Action: "send a notification"
A worksheet with 10 entities is open with 8 samples Complete and 2 Uncomplete
When:
The user clicks "Complete" for the 9th sample and saves, no notification is sent because all samples are not complete.
The user clicks "Complete" for the 10th sample and saves, one notification is sent for all samples in the sheet since all samples are now complete.
The user clicks "Complete" for one sample in the _next_ protocol: no notifications are sent because the initial and final state of the protocol with the action was inactive, so the actions were not checked.
The user clicks "Uncomplete" in the protocol for one sample: no notifications are sent because not all samples are complete, but the action _is_ checked since the final state of the protocol is "active"
The user clicks "Complete" for the sample uncompleted just before: no notifications are sent since a notification has previously been sent for all samples
Protocol Action Expression Context
Many protocol actions allow users to make use of L7|ESP expressions. Currently, the evaluation context for these expressions is slightly different from the regular LIMS context, so functions that depends on LIMS context may not be used, or may only be used by providing additional parameters (such as entity_uuids) that are not usually required for LIMS expressions.
However, the context provides a useful set of extra information for protocol actions:
affected_samples- A list of the names of entities that "matched" the conditions. For instance, for a rule "any sample completed" and action "send user notification", the message might say:Completed samples {{", ".join(affected_samples)}} in workflow "{{ workflow }}", protocol "{{ protocol }}".
affected_rows- Likeaffected_samples, but a list of LIMS row objects instead of entity names. This is for advanced use-cases where you need to access specific protocol field data.
tab_rows- All rows in the active protocol.
tab_samples- List of entity names for all entities in the active protocol.
completed_samples- List of entity names for all rows that were completed during this Worksheet save
uncompleted_samples- List of entity names for all rows that were uncompleted during this Worksheet save
failed_samples- List of entity names for all rows that were failed in this request
unfailed_samples- List of entity names for all rows that were unfailed in this request. Note, in L7|ESP 3.0, this list will always be empty.
approved_samples- List of entity names for all rows that were approved in this request.
unapproved_samples- List of entity names for all rows that were unapproved in this request (rows are unapproved if data is modified post-approval).
added_samples- List of entity names for rows that were added to the Worksheet in this request
removed_samples- List of entity names for rows that were removed from the Worksheet in this request
sheet- Worksheet name
workflow- Workflow name
protocol- Active protocol name
active_user- Name of the user who initiated the request.
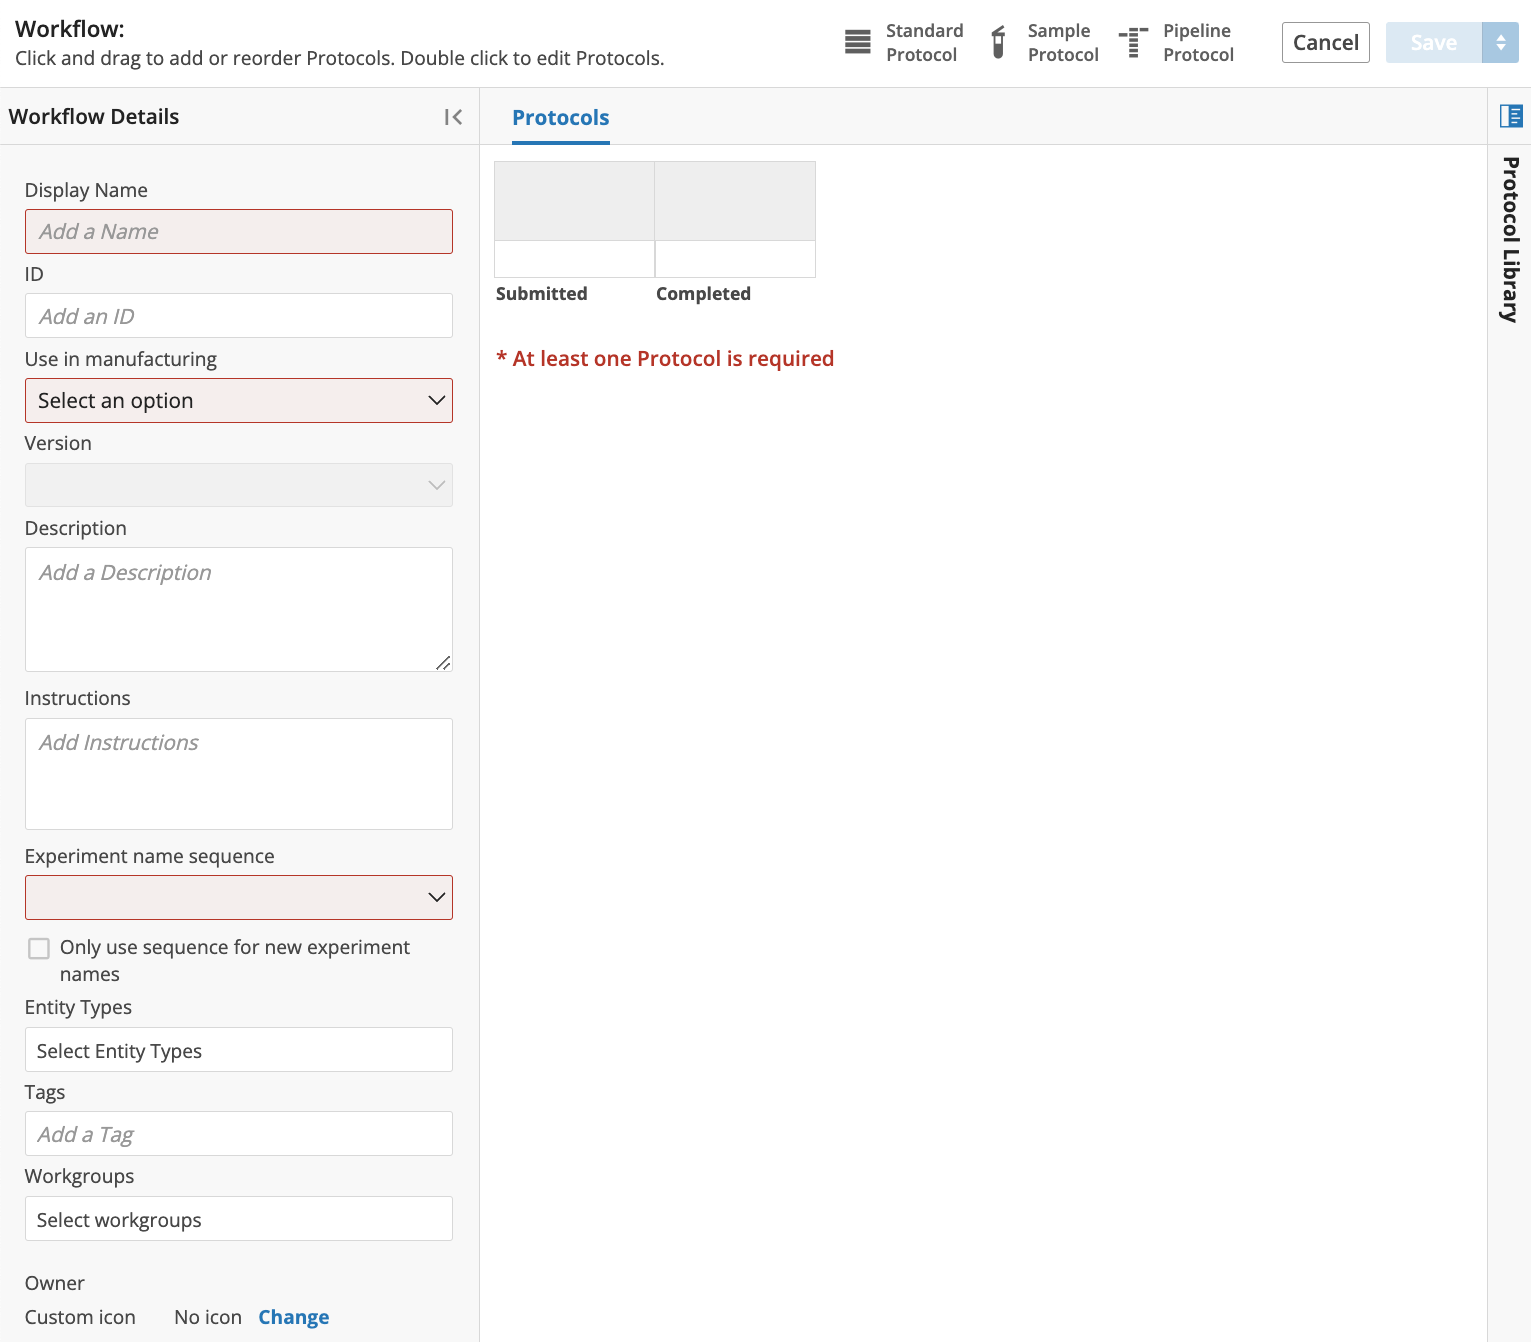
3.3.4. Manage Workflows
A Workflow is an ordered sequence of two or more Protocols. Workflows allow you to define the order that the Protocols are performed/executed when processing Entities.
Create New Workflow
Click the L7|Master app. Click Workflows from the Processes menu to access the Workflows page.

Click + New Workflow.

Enter information for the new Workflow:
Enter the Display Name of the new Workflow. Selected an option for Use in manufacturing.
Optional: Enter an ID, enter a Description, enter one or more Tags, enter Instructions, and designate the Entity Type(s) allowed for this Workflow.
Select an Experiment Name Sequence. If None is selected, then a user can enter an Experiment Name of their choice when creating a new Experiment. If an Experiment Name Sequence is selected, then an Experiment Name is automatically generated in the format of the specified Experiment Name Sequence.
Add Protocol(s) to the Workflow by either creating new Protocol(s) using the + Create New Protocol button or by clicking and dragging existing Protocol(s) from the Protocol list on the right to the Builder panel (in between the Submitted and Completed boxes). You can rearrange the order of the Protocols in the Builder panel by clicking and dragging the Protocols. Depending on the Protocol, you may have the option to create a Data Link - refer to the Create Data Link section below for more information.
Note
If you select an existing Protocol, you can make changes to that Protocol directly from this page by clicking on a Protocol from the Protocol list on the right.
Save the new Workflow.
Edit Workflow
Click the L7|Master app. Click Workflows from the Processes menu to access the Workflows page.
Click the Name of a Workflow.
Edit the desired information (e.g., Display Name; Description; Tags; Instructions; Entity Types; Experiment Name Sequence, Protocols).
Save the updated Workflow.
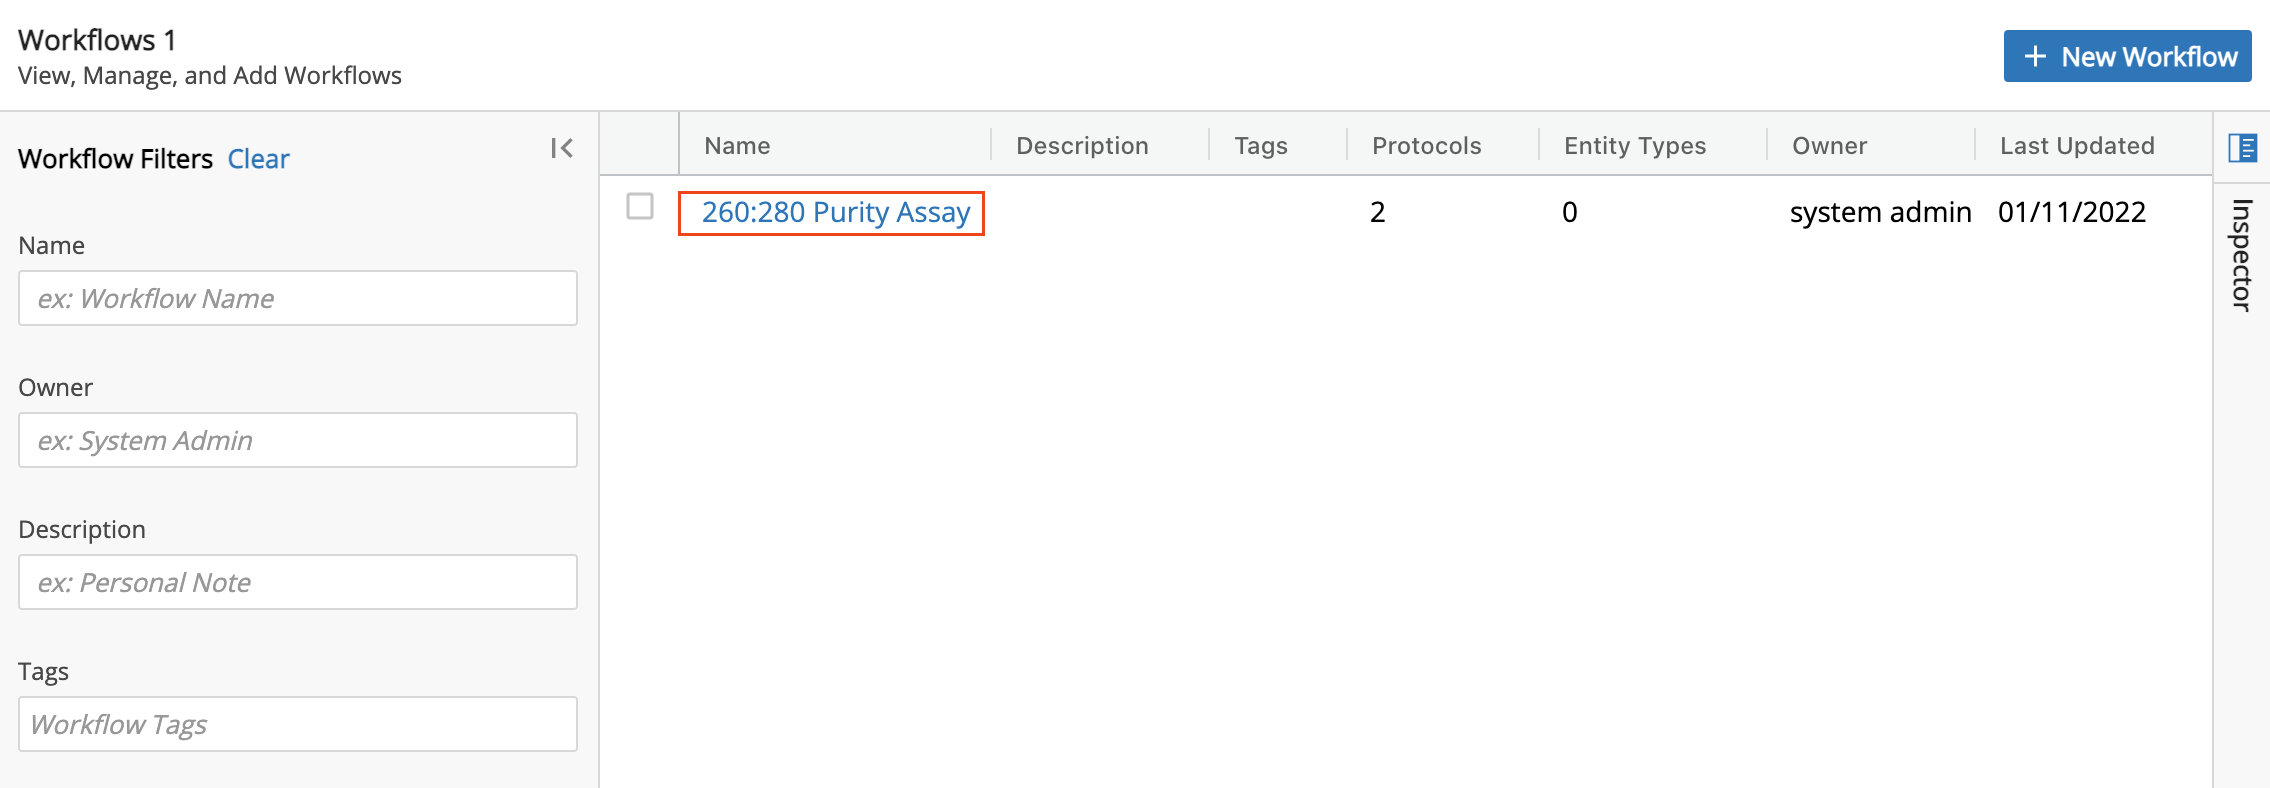
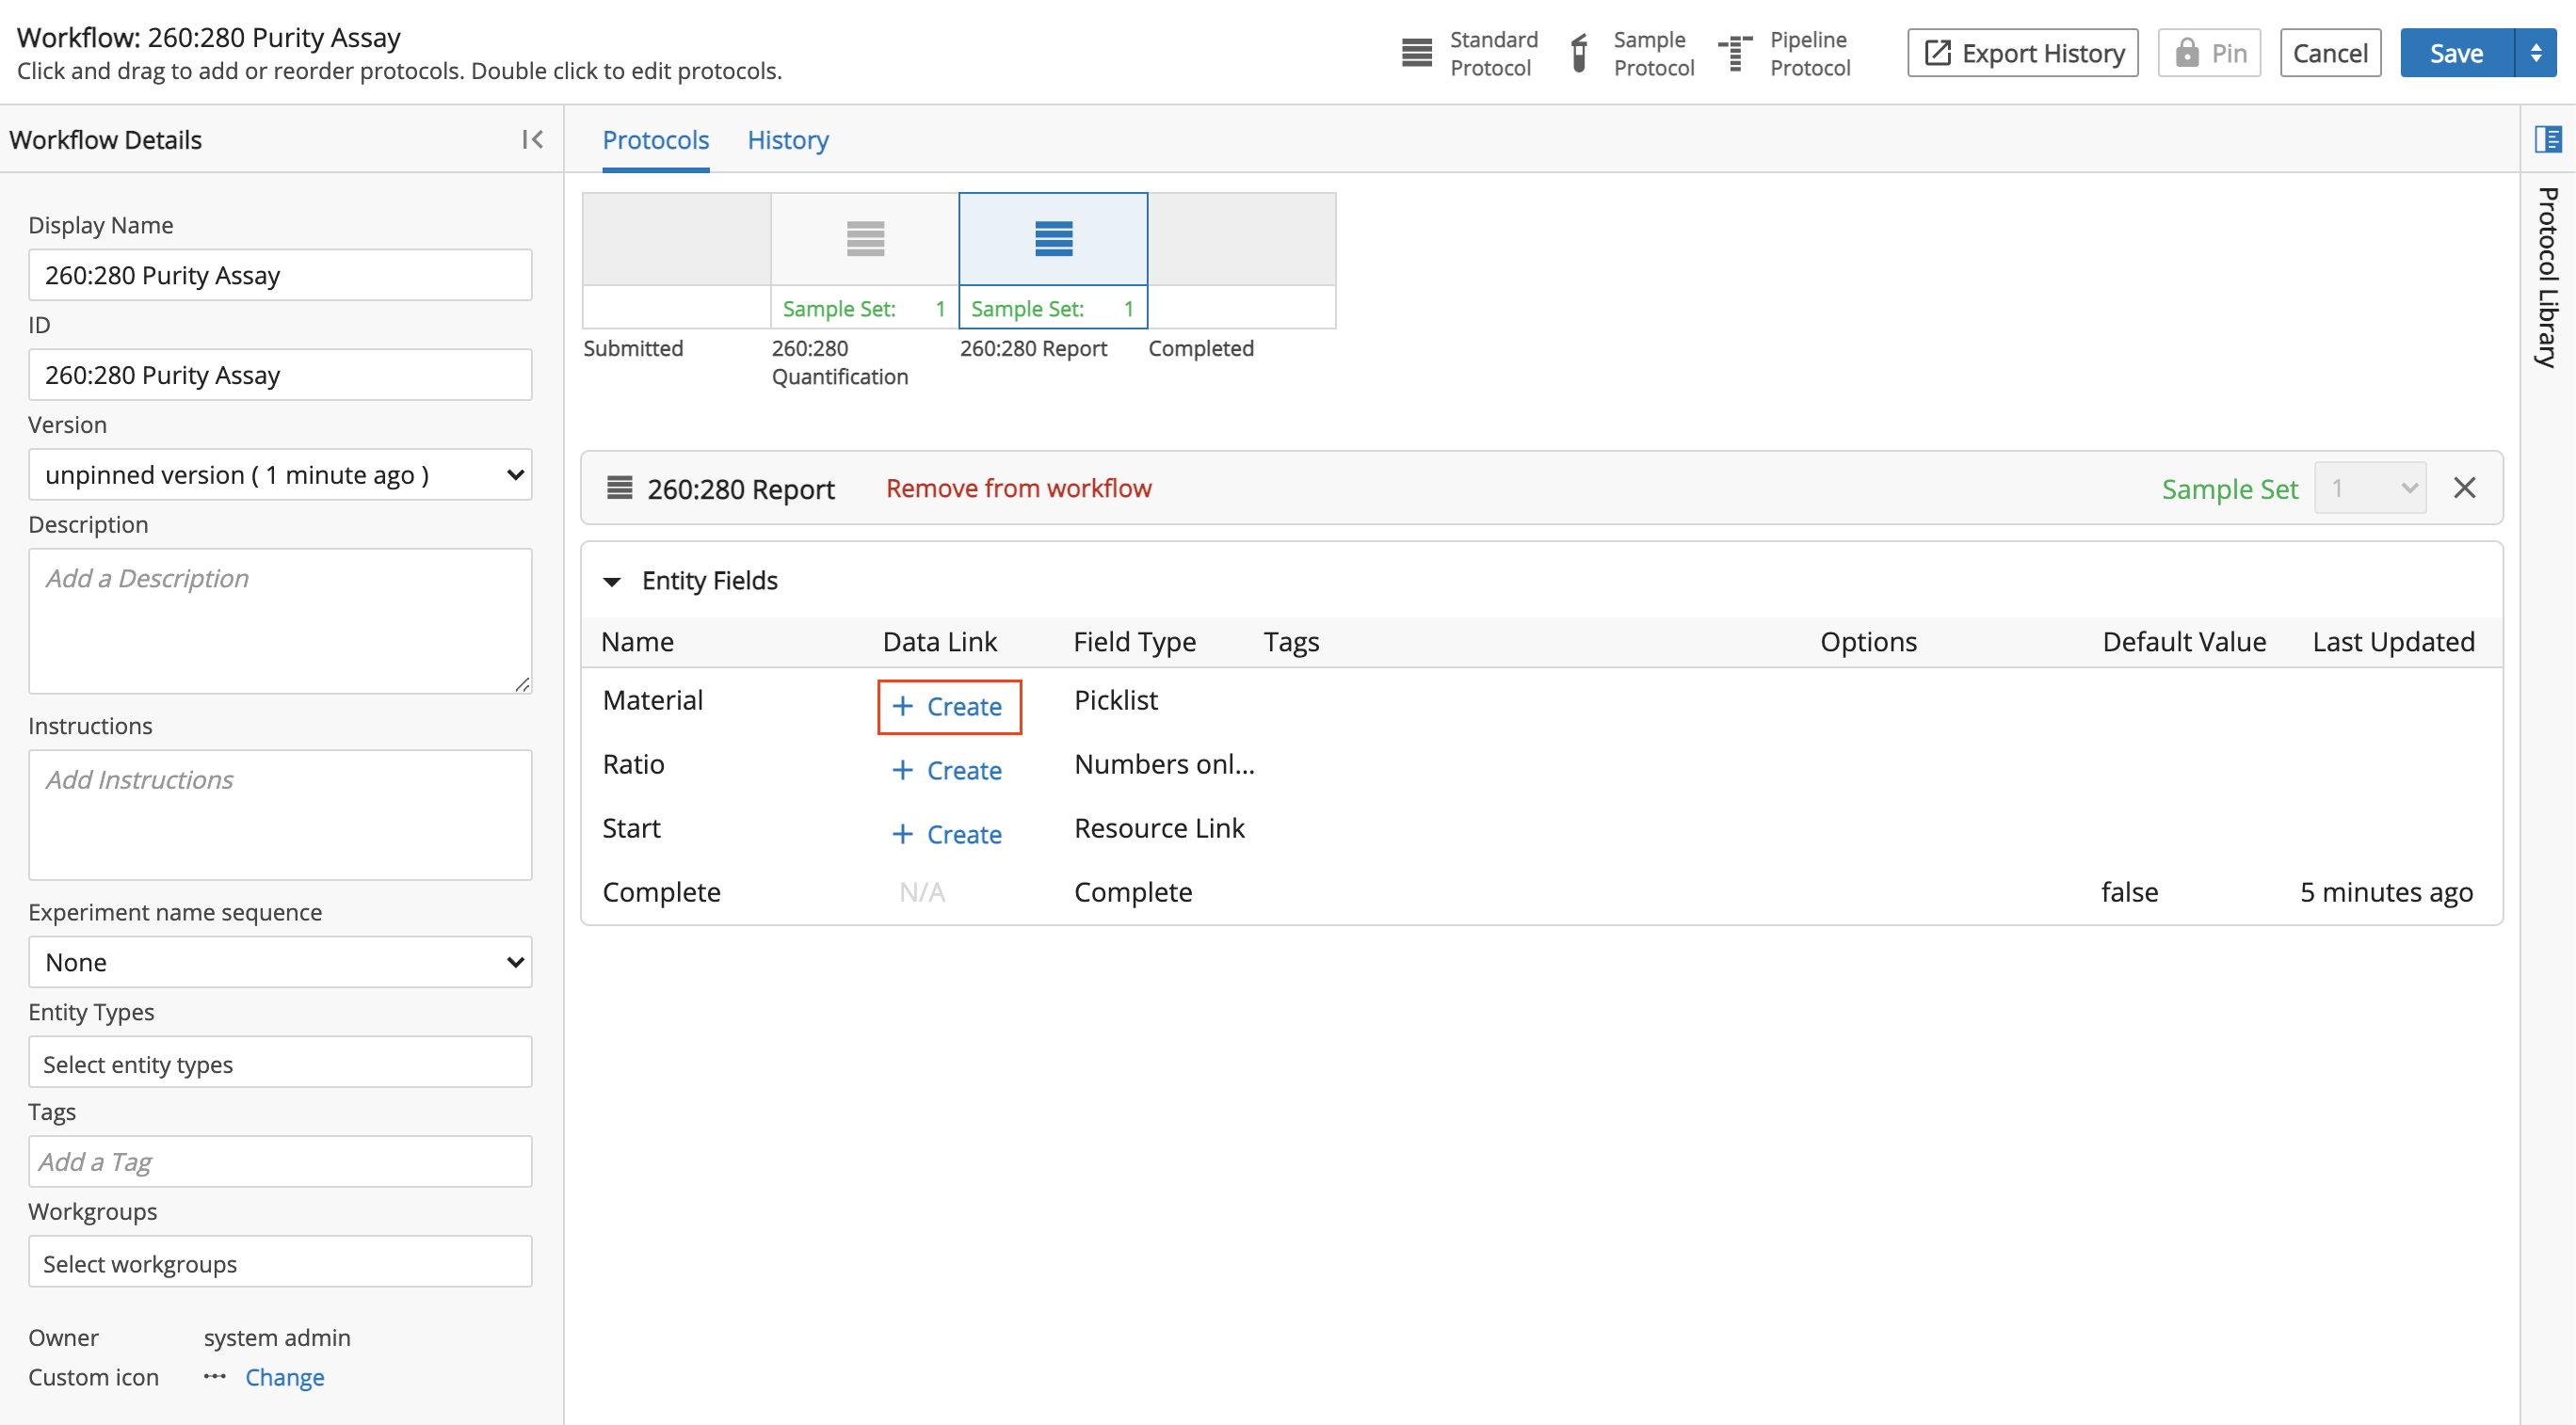
Create Data Link
Data Linking is useful for feeding data from one Protocol to another Protocol automatically. In the example below, a Workflow will be updated to automatically populate a Pipeline Protocol with the information/values that are entered in a Standard Protocol.
Click the Name of the Workflow.
Click the 260:280 Report Protocol box.
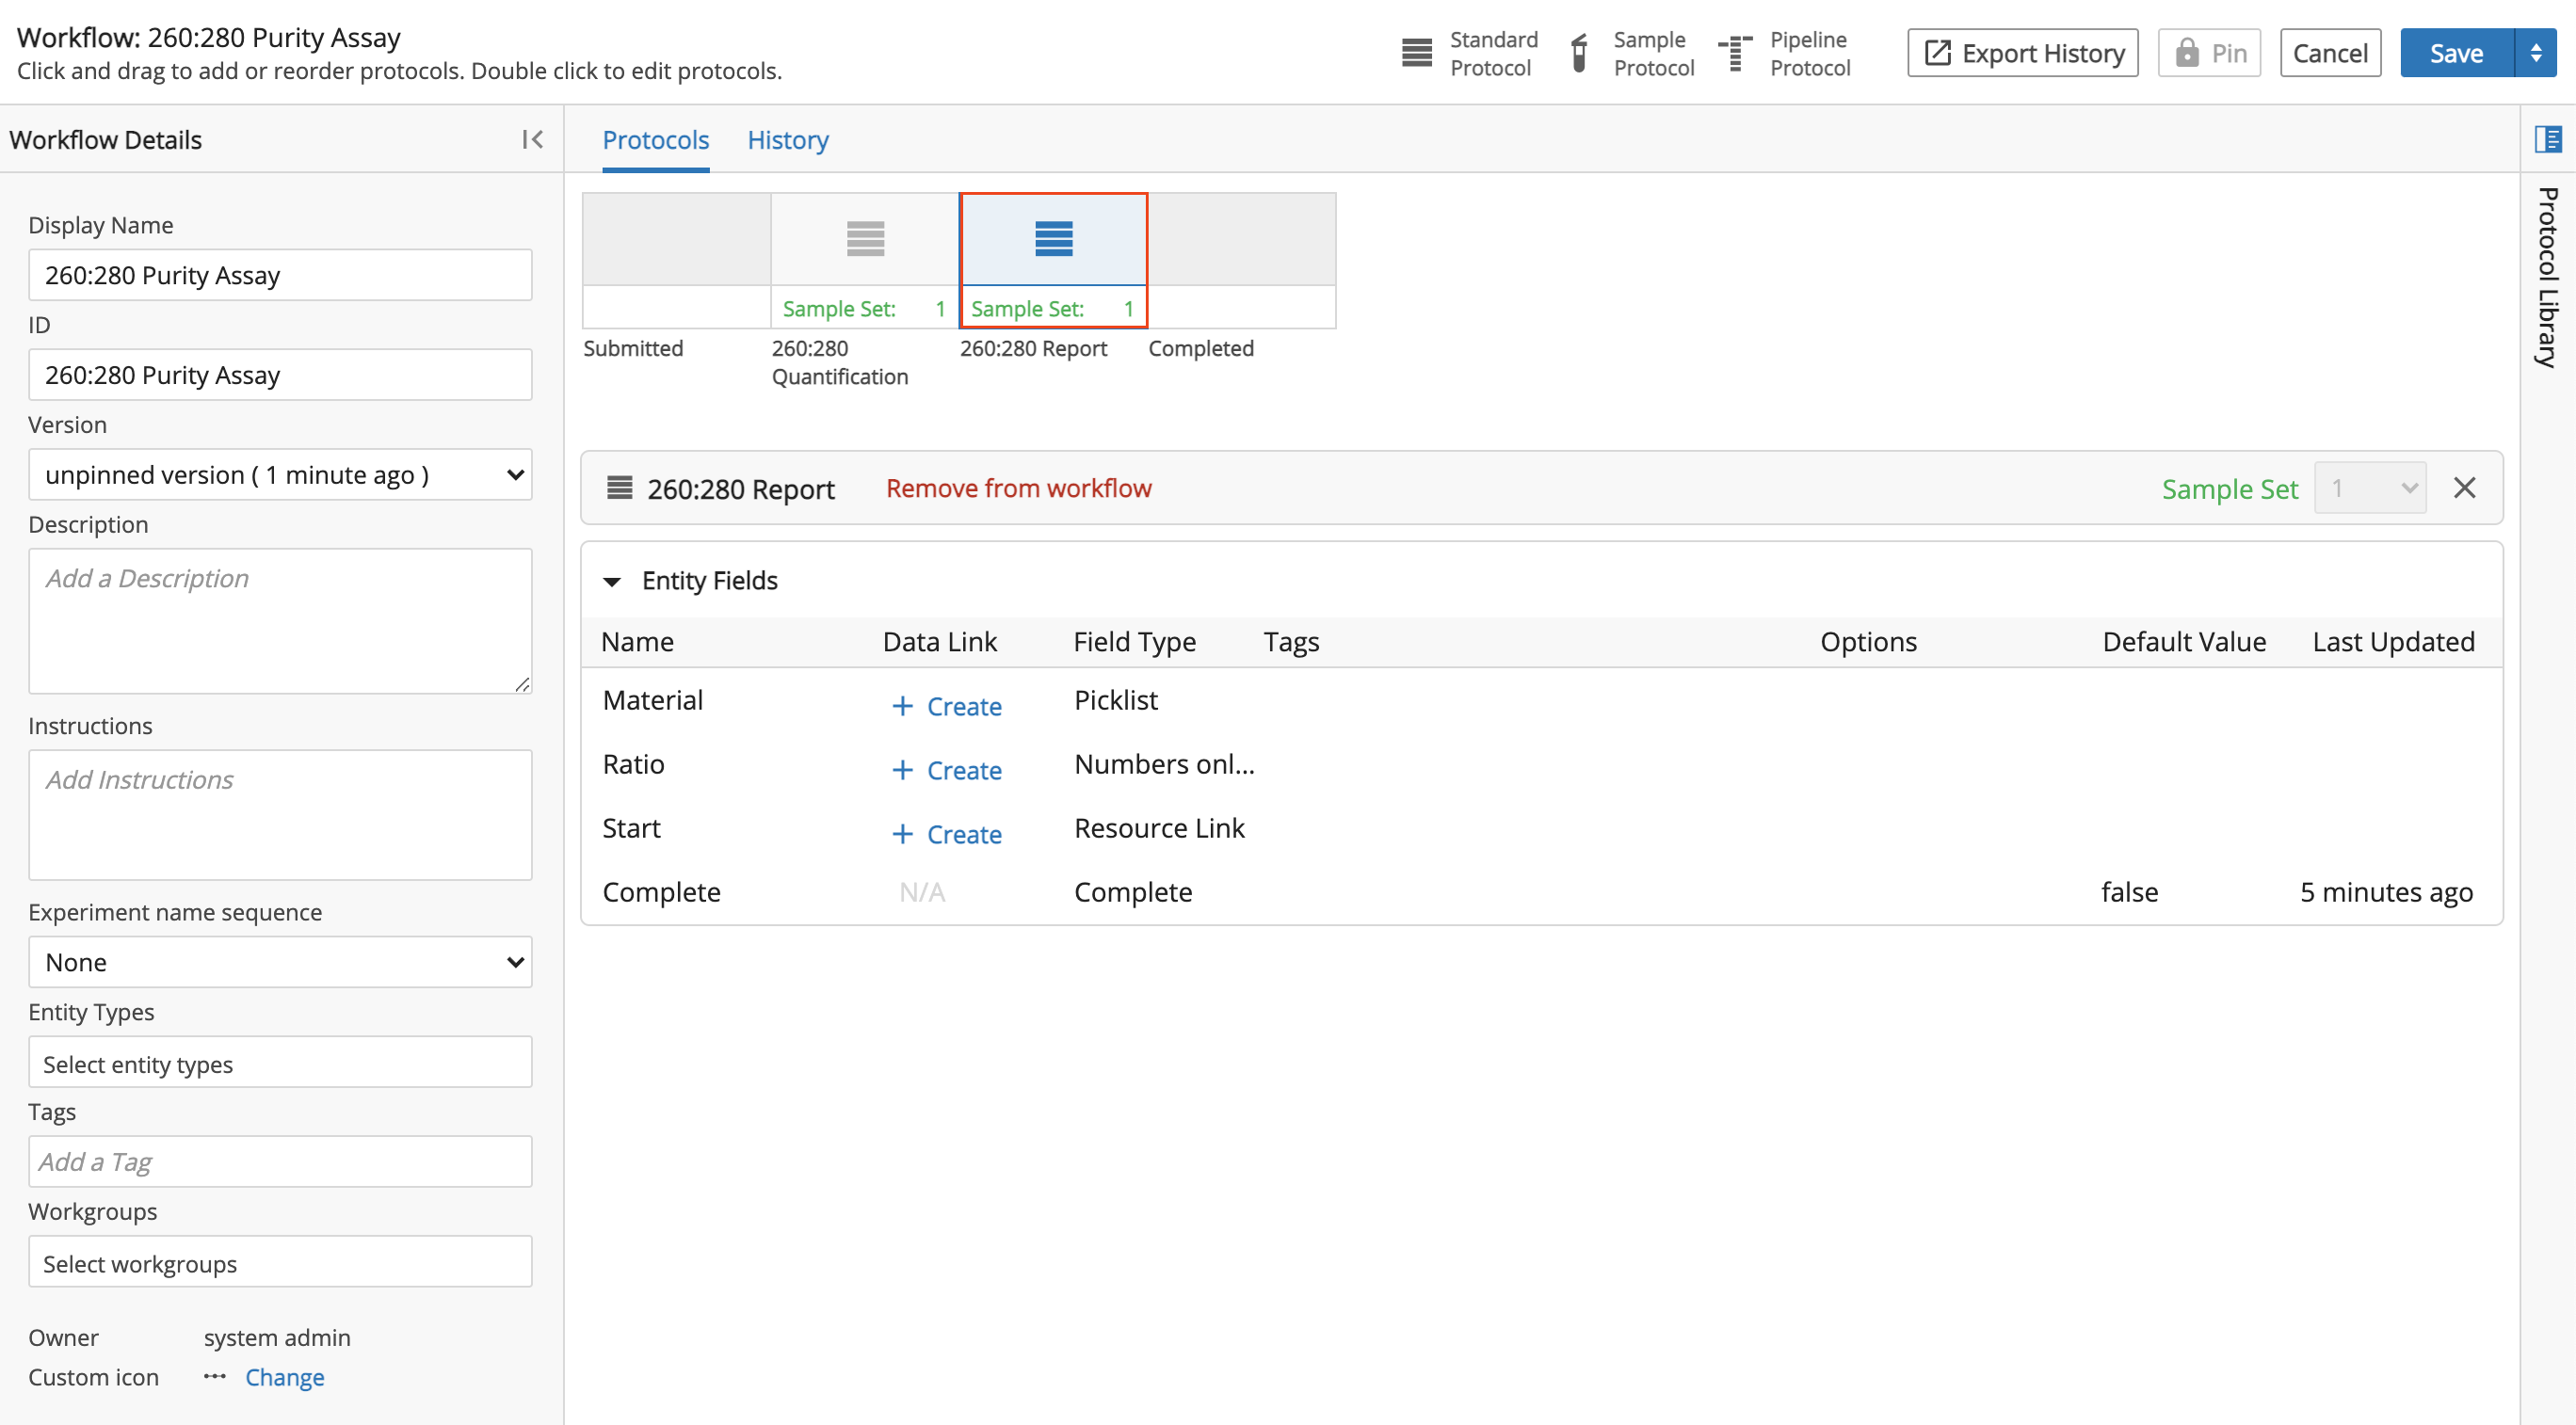
On the material row, click + Create to create a Data Link to connect the values in this Protocol to the values entered in the 260:280 Quantification Protocol.
In the Create Data Link dialog, select 260:280 Quantification as the Protocol. Select Complete as the Field (the selected field is where the data will be linked). Click Add Below to generate an L7|ESP Expression based on the Protocol and Field selected. Optional: You can further customize the Data Link by editing the generated L7|ESP Expression. Click Save.
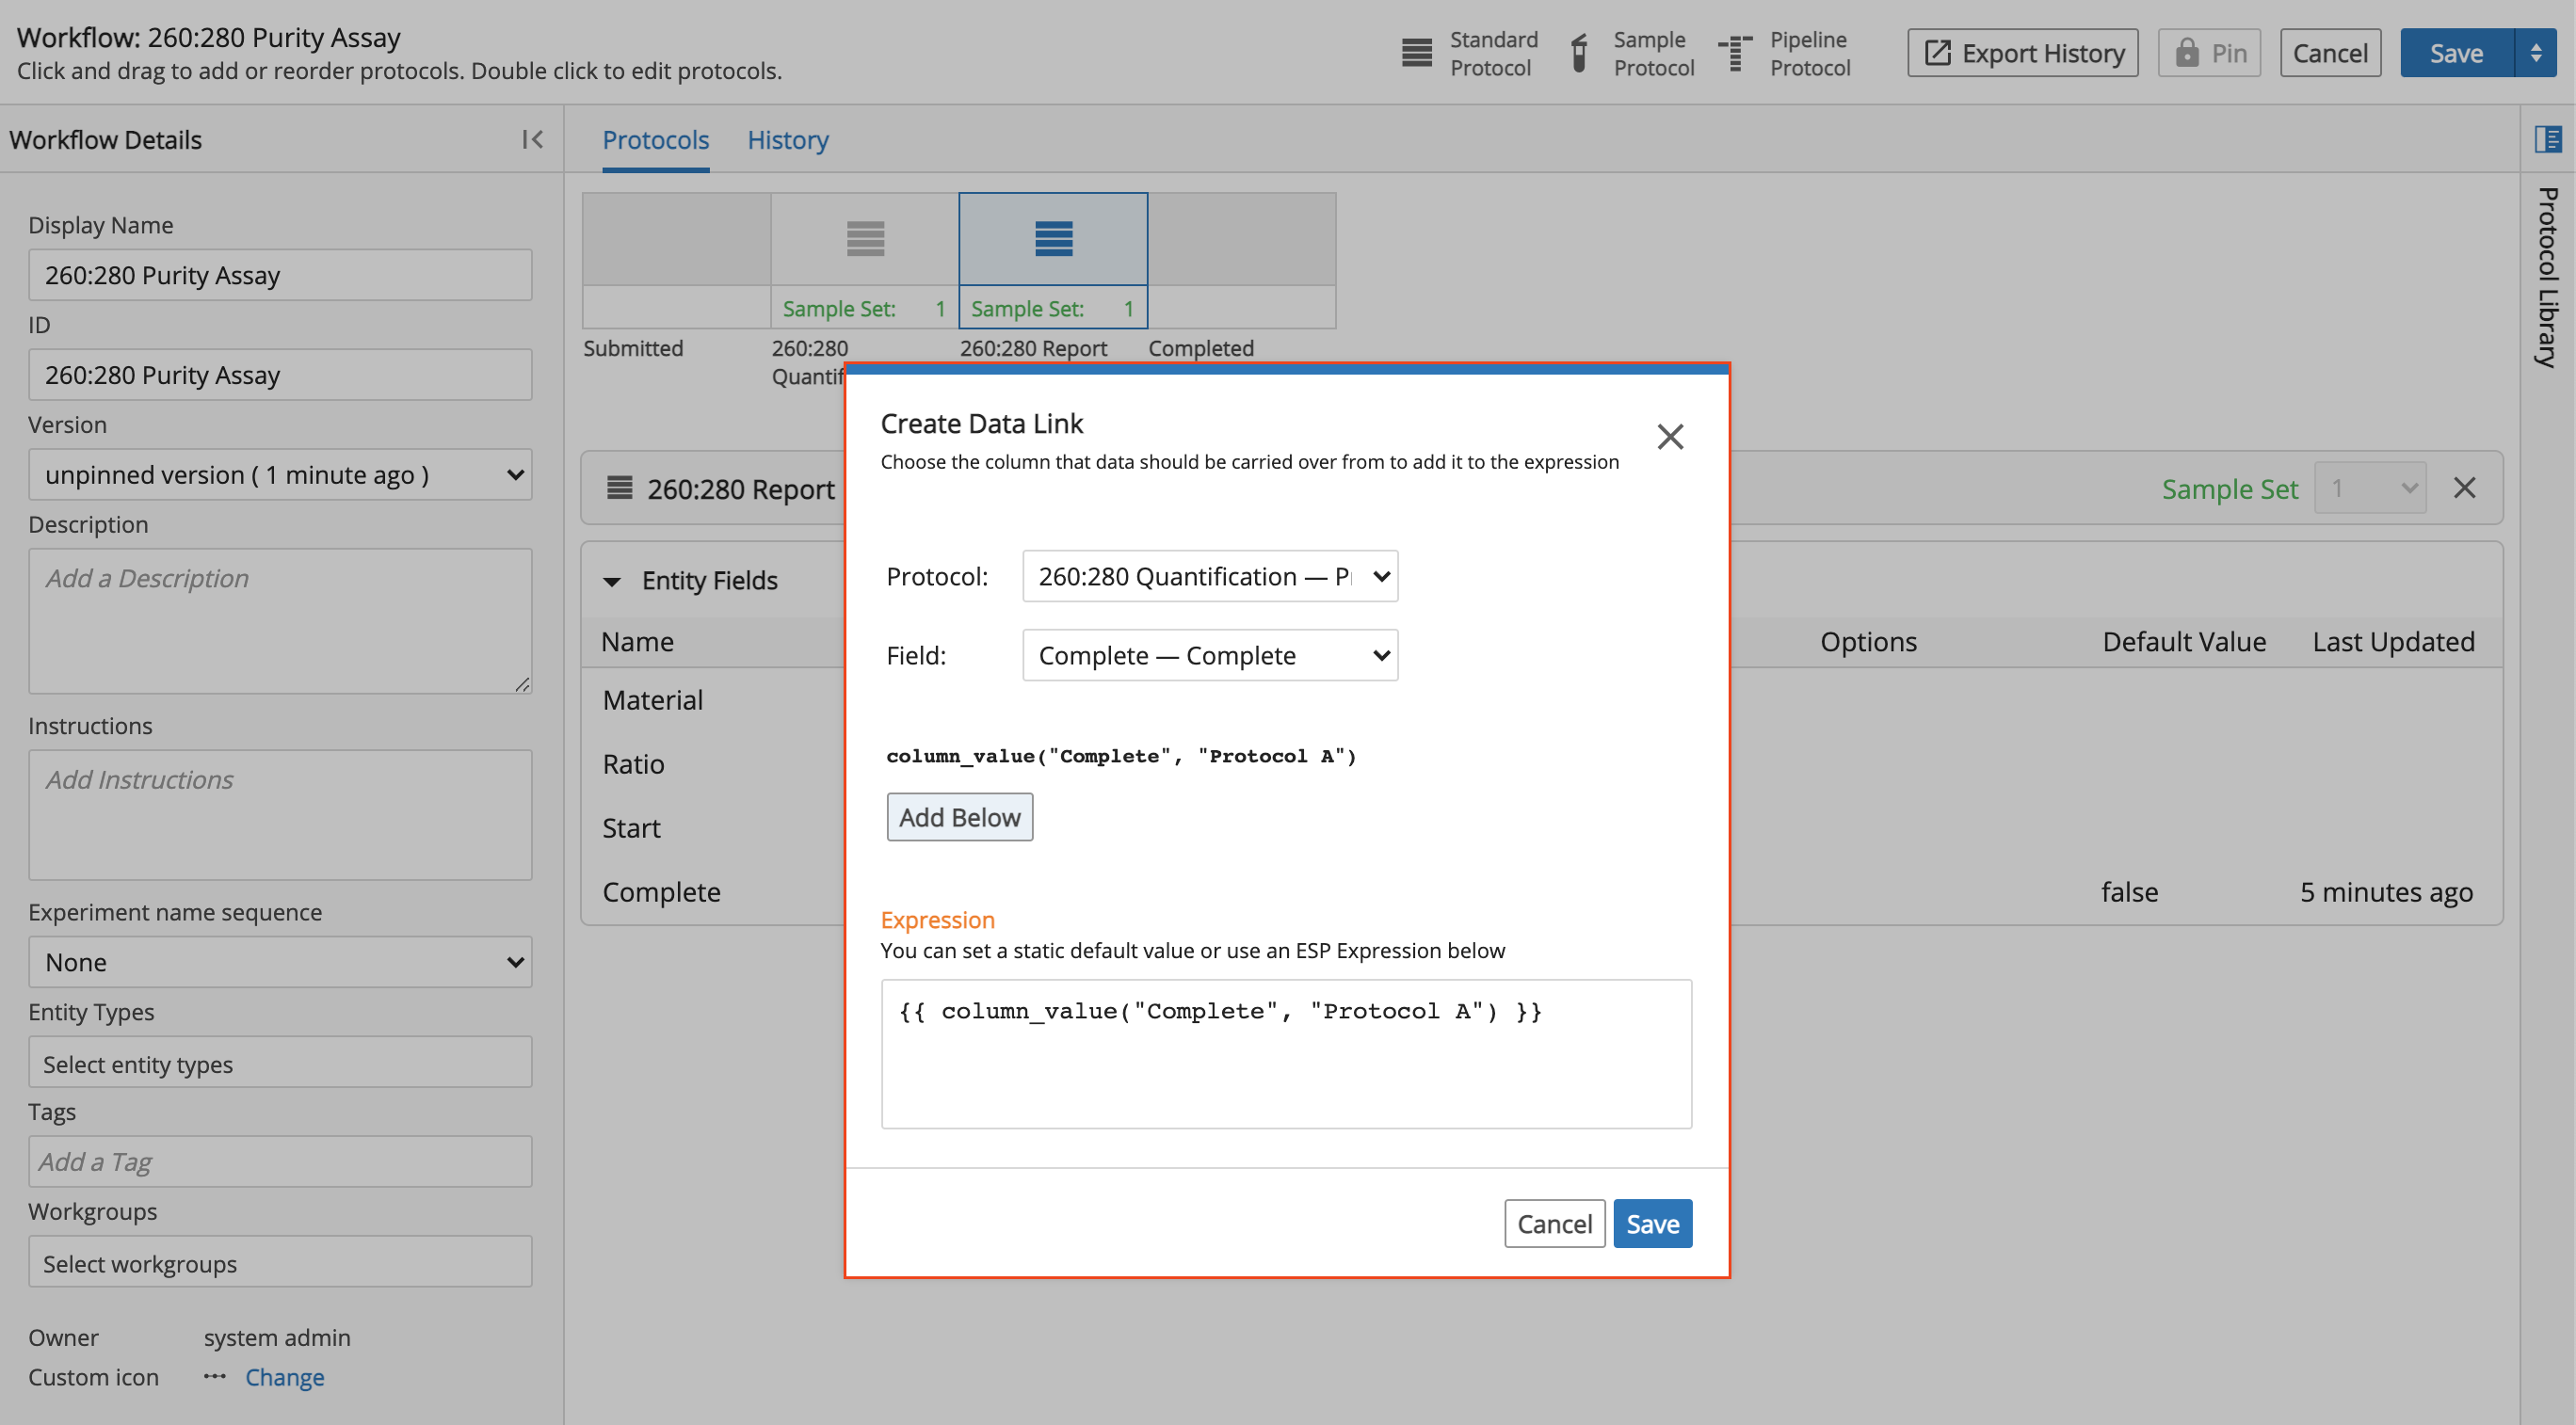
Hint
Note that the L7|ESP Expression Language previously used to create parameters when setting up the Pipeline can also be used in other parts of L7|ESP. In this case, you can set the value of the
materialcolumn to be an Expression that references a value in another Protocol.
On the ratio bar, click + Create.
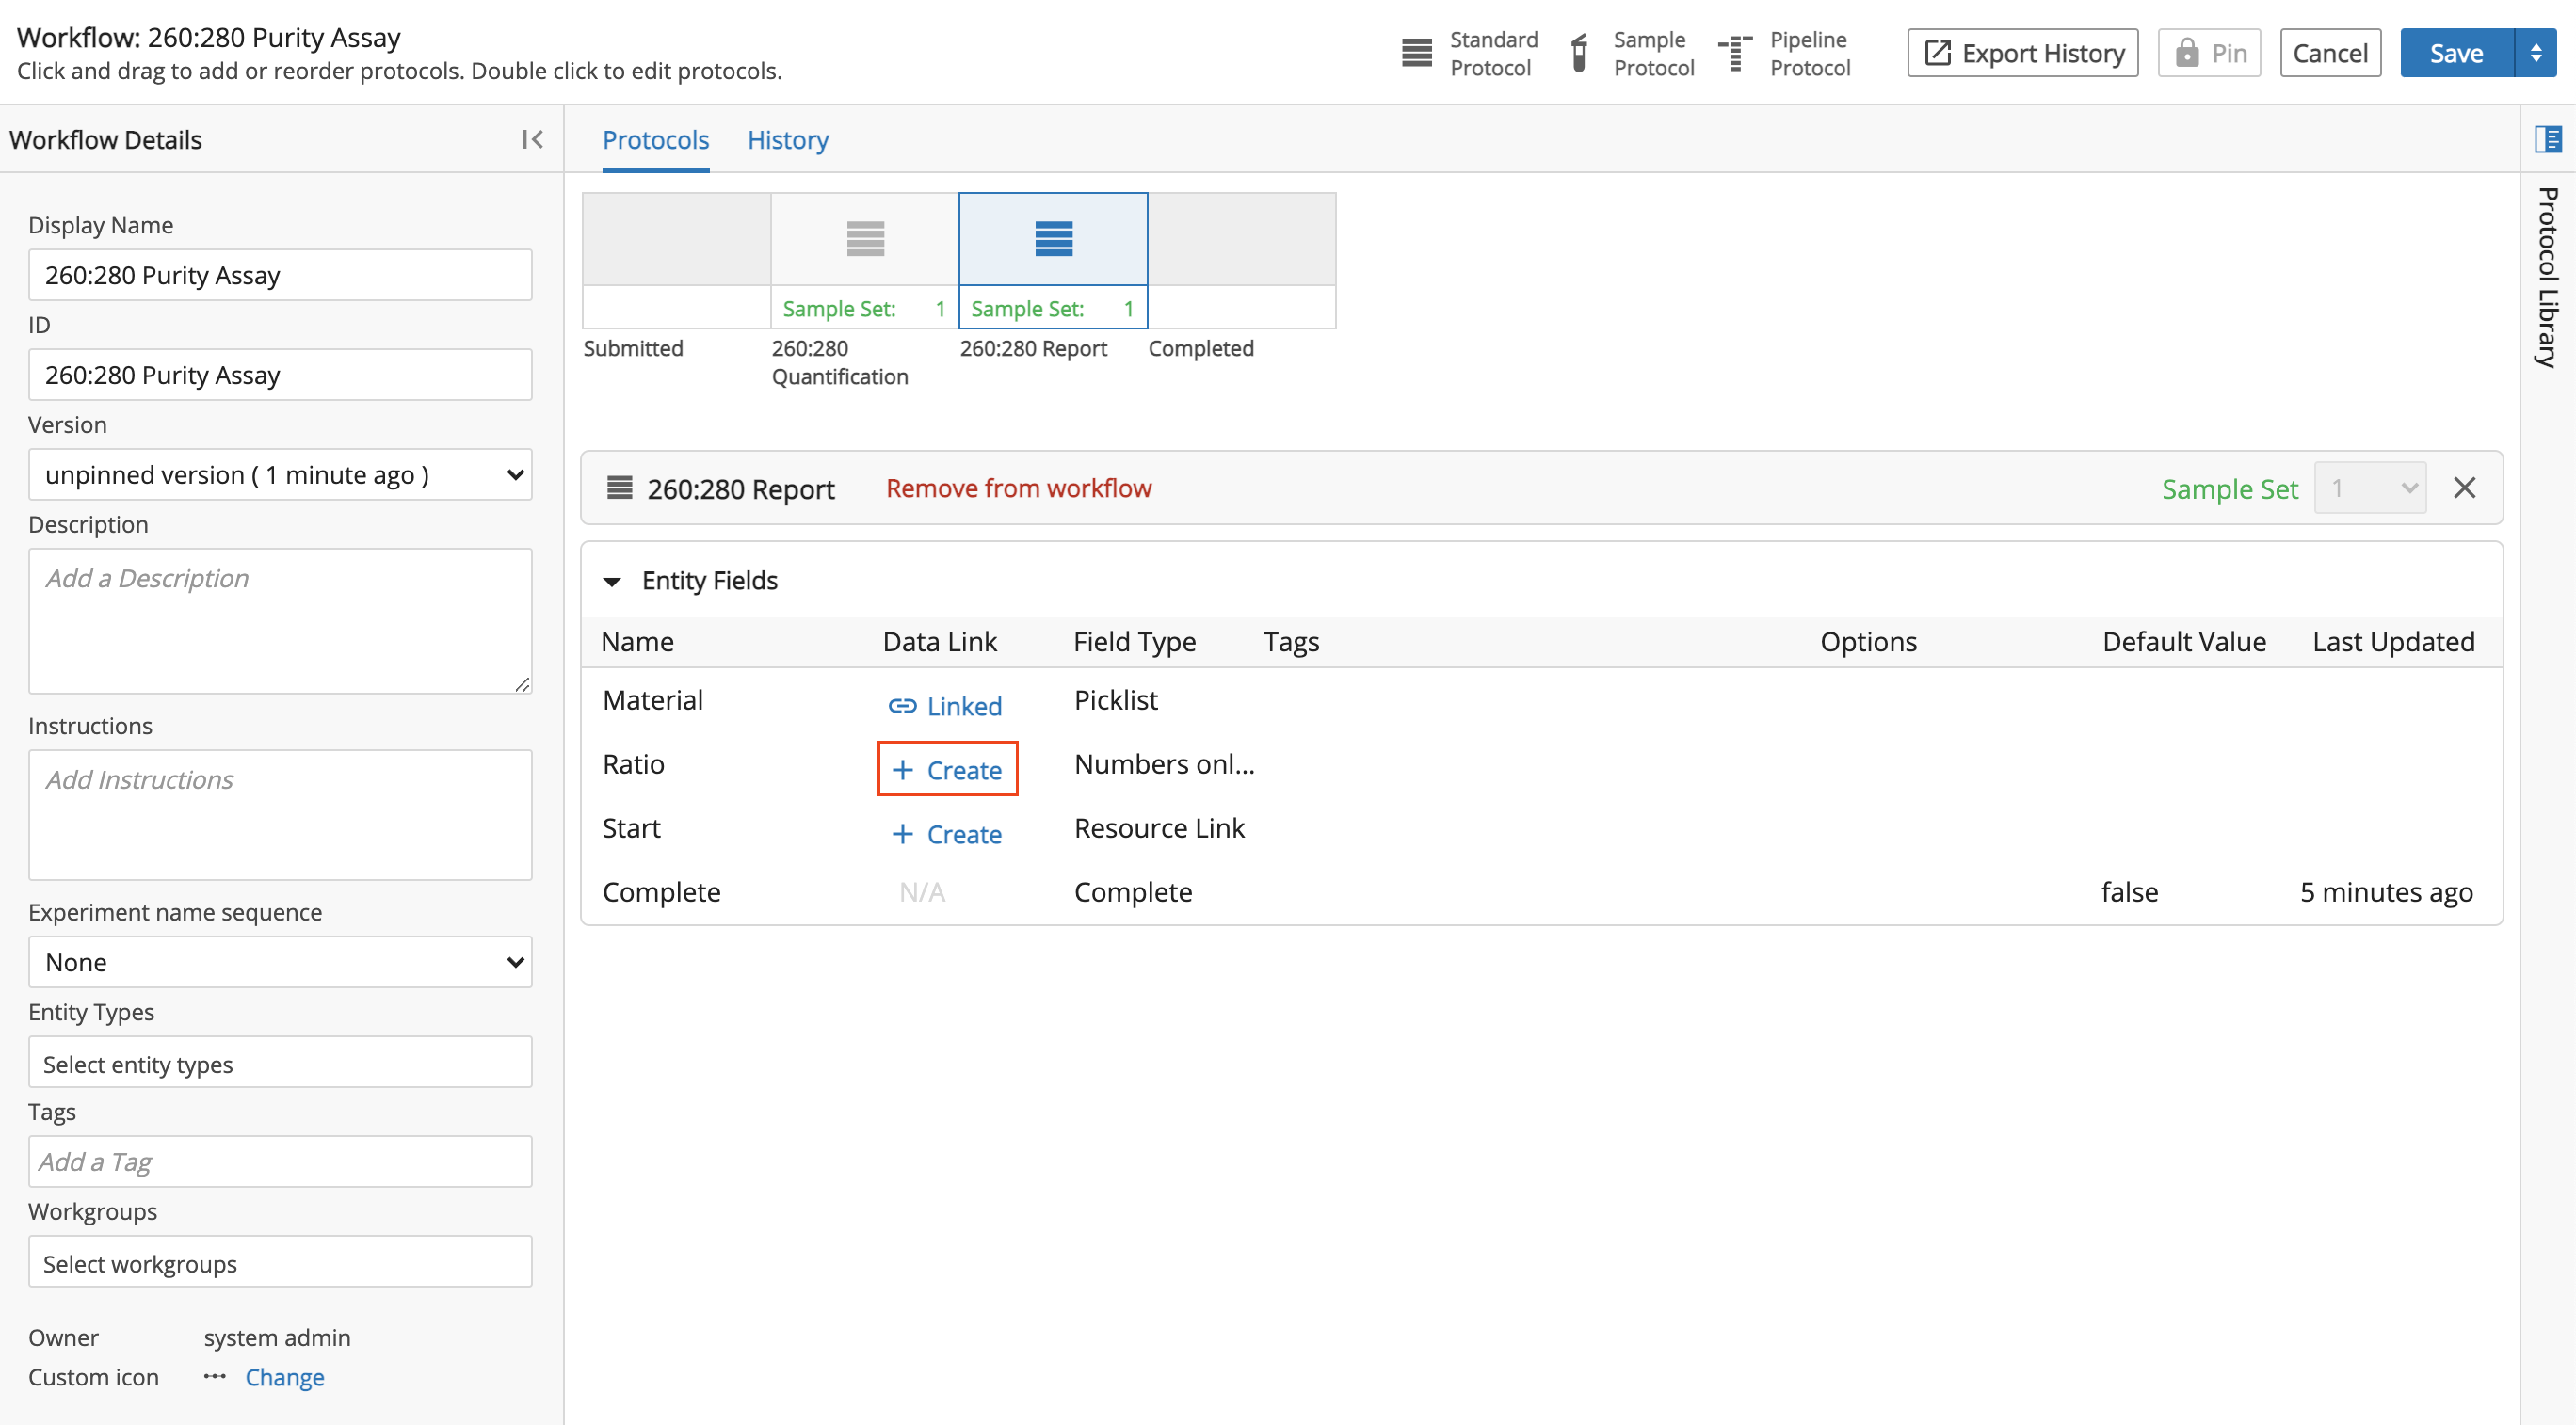
In the Create Data Link dialog, select 260:280 Report as the Protocol. Select Material as the Field. Click Add Below. Click Save.
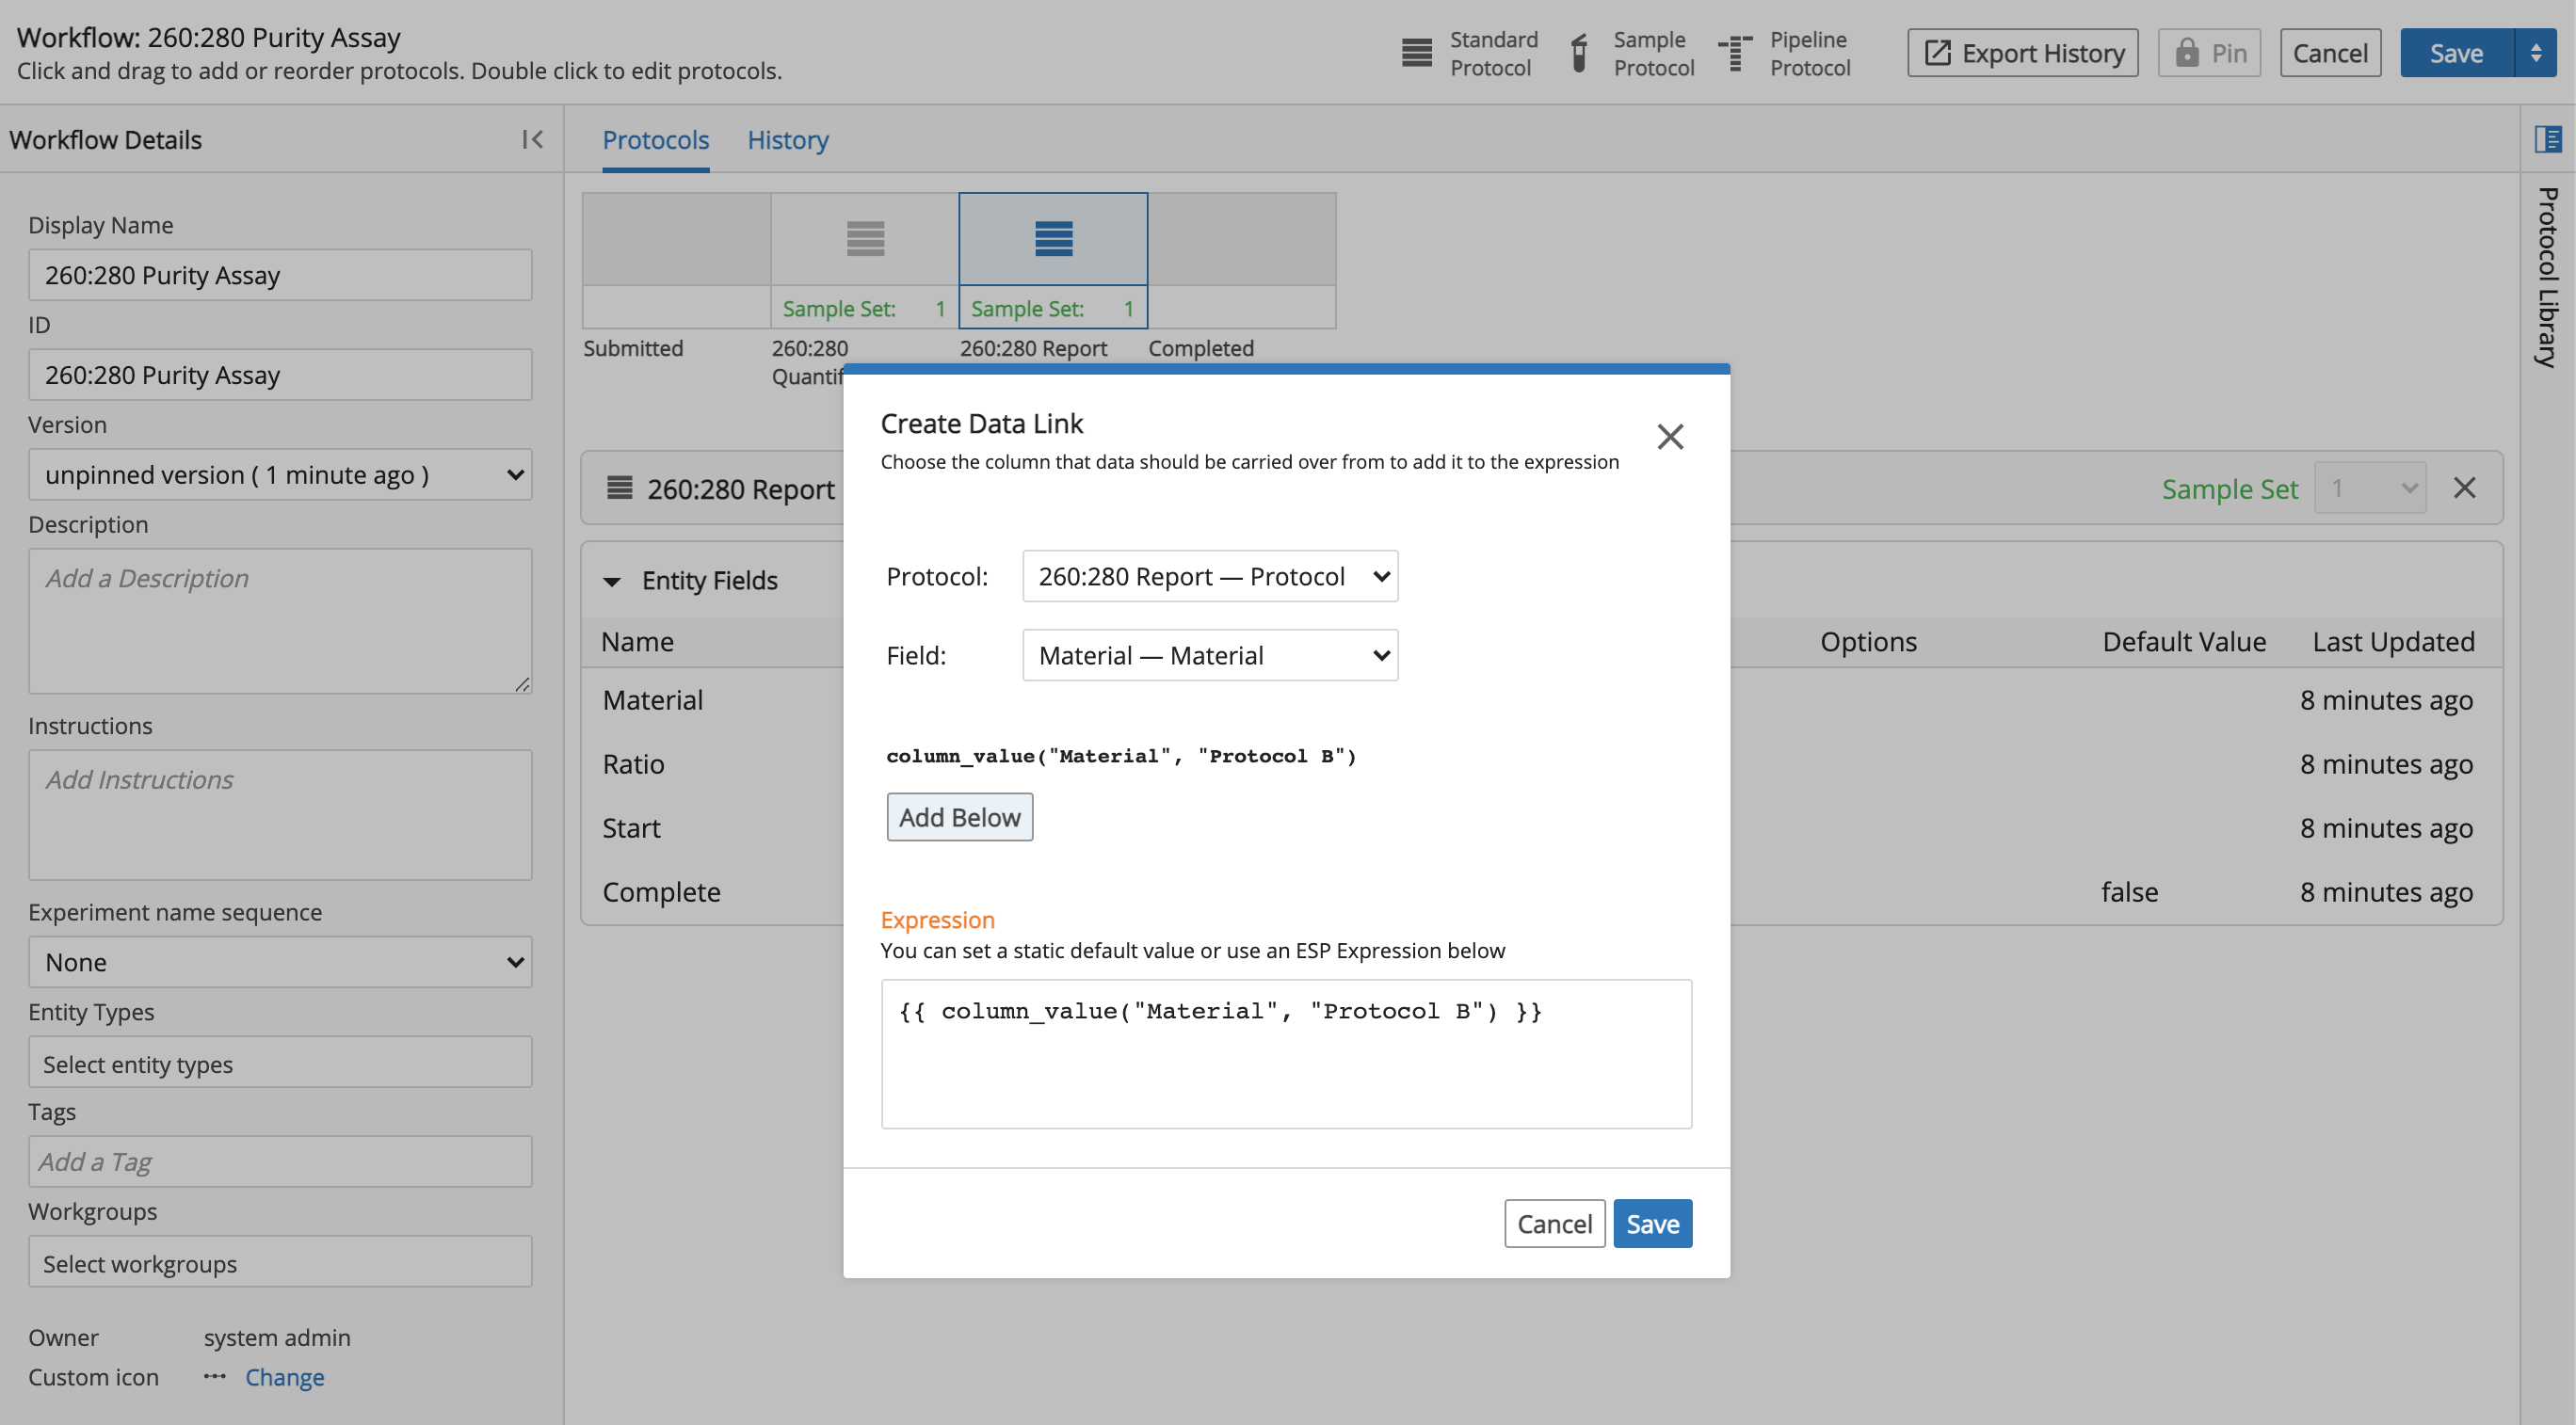
Observe that the Data Link now shows two Linked. Click Save to save the updated Workflow.

3.3.5. Manage Workflow Chains
A Workflow Chain is an ordered sequence of two or more Workflows, representing a business process.
Create New Workflow Chain
Click the L7|Master app. Click Workflow Chains from the Processes menu to access the Workflow Chains page.
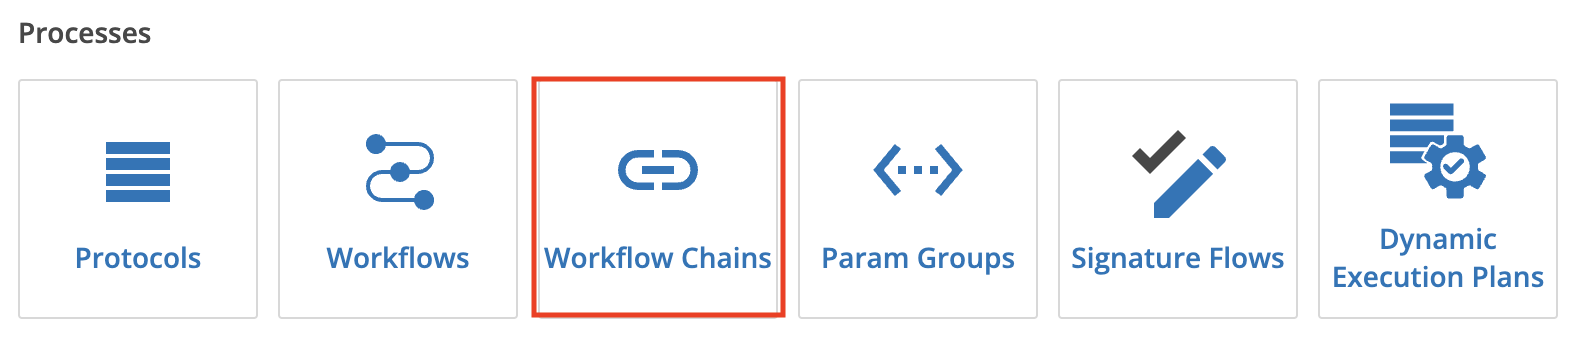
Click + New Workflow Chain.
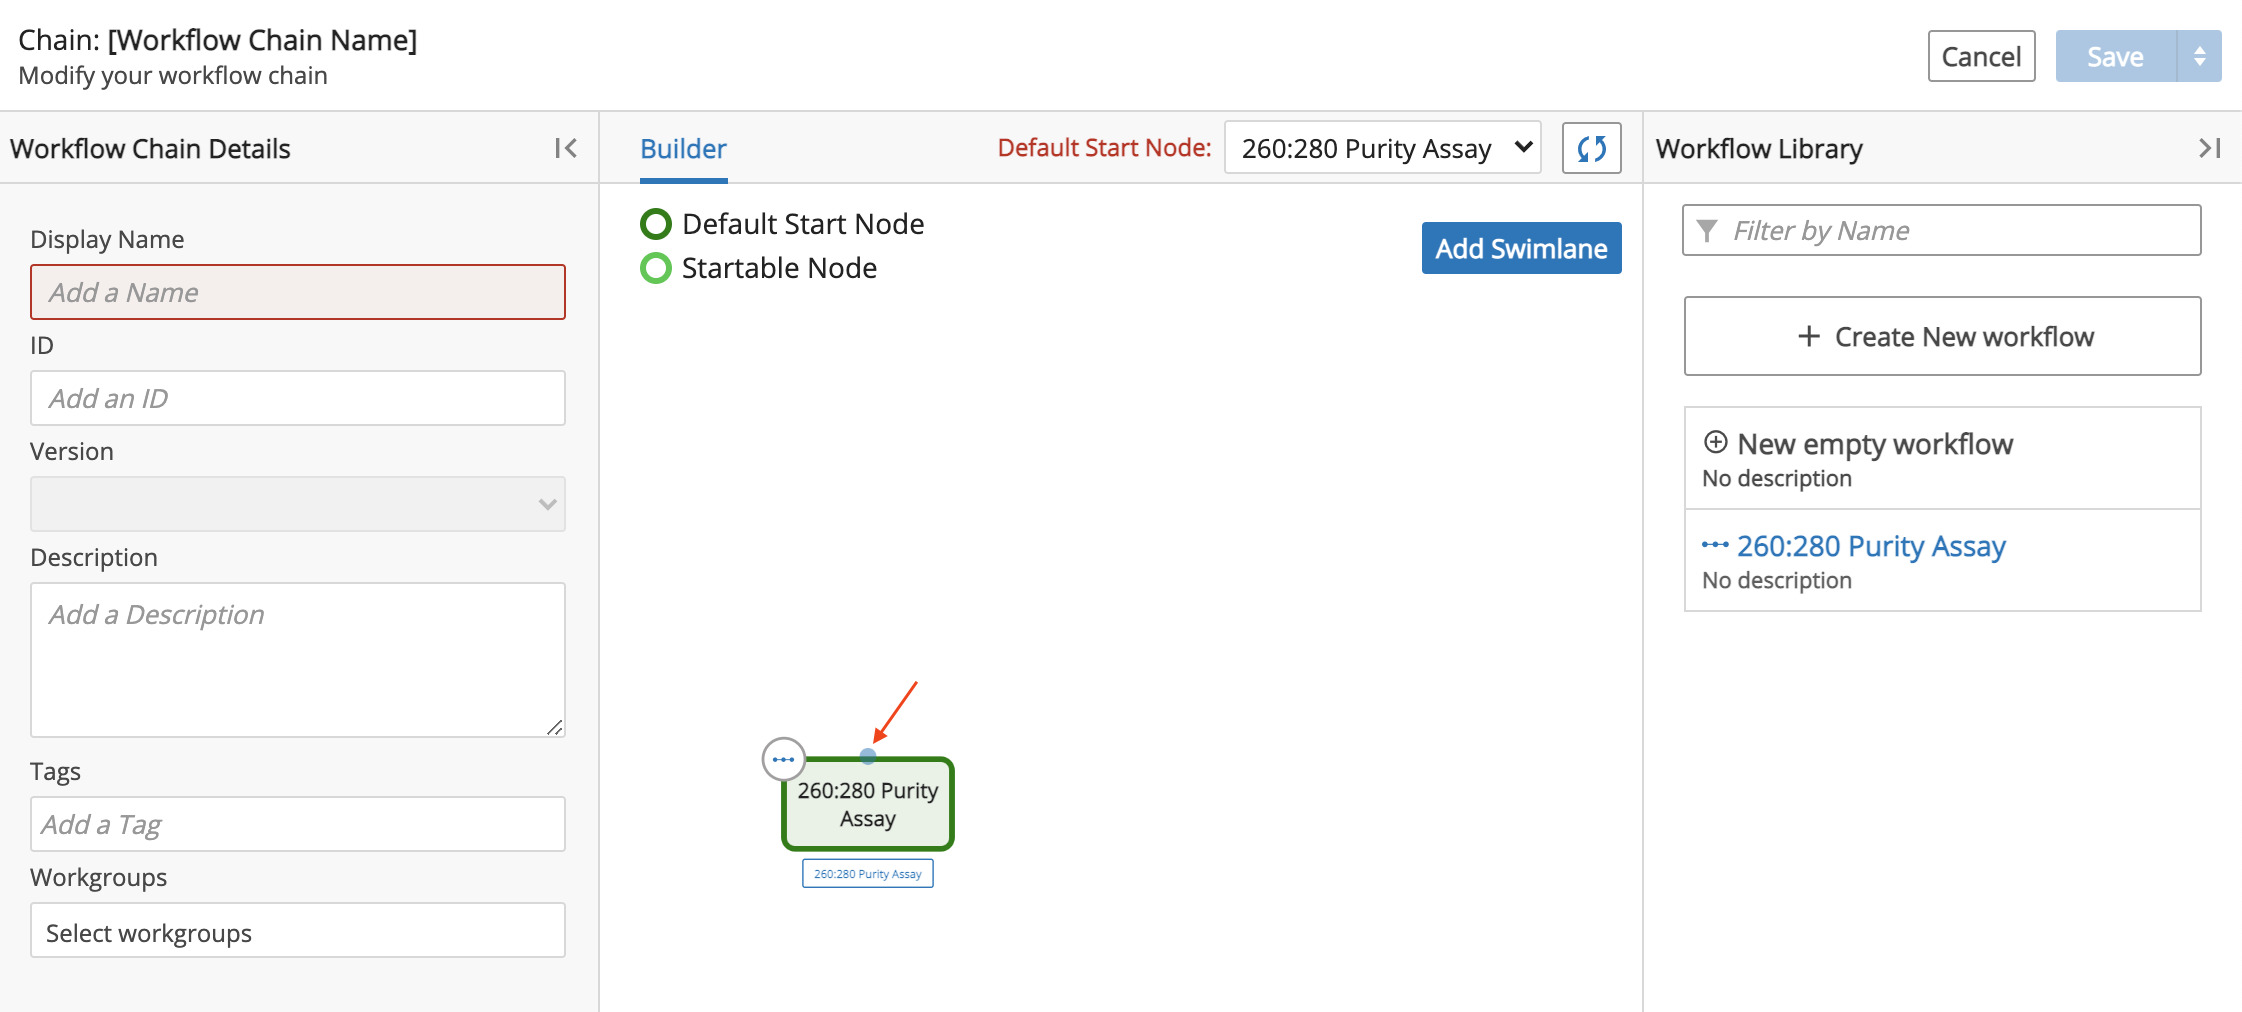
Enter a Display Name for the Workflow Chain and select an option under Use in manufacturing.
Optional: Enter an ID, enter a Description, enter one or more Tag(s) and or select a Workgroup(s).
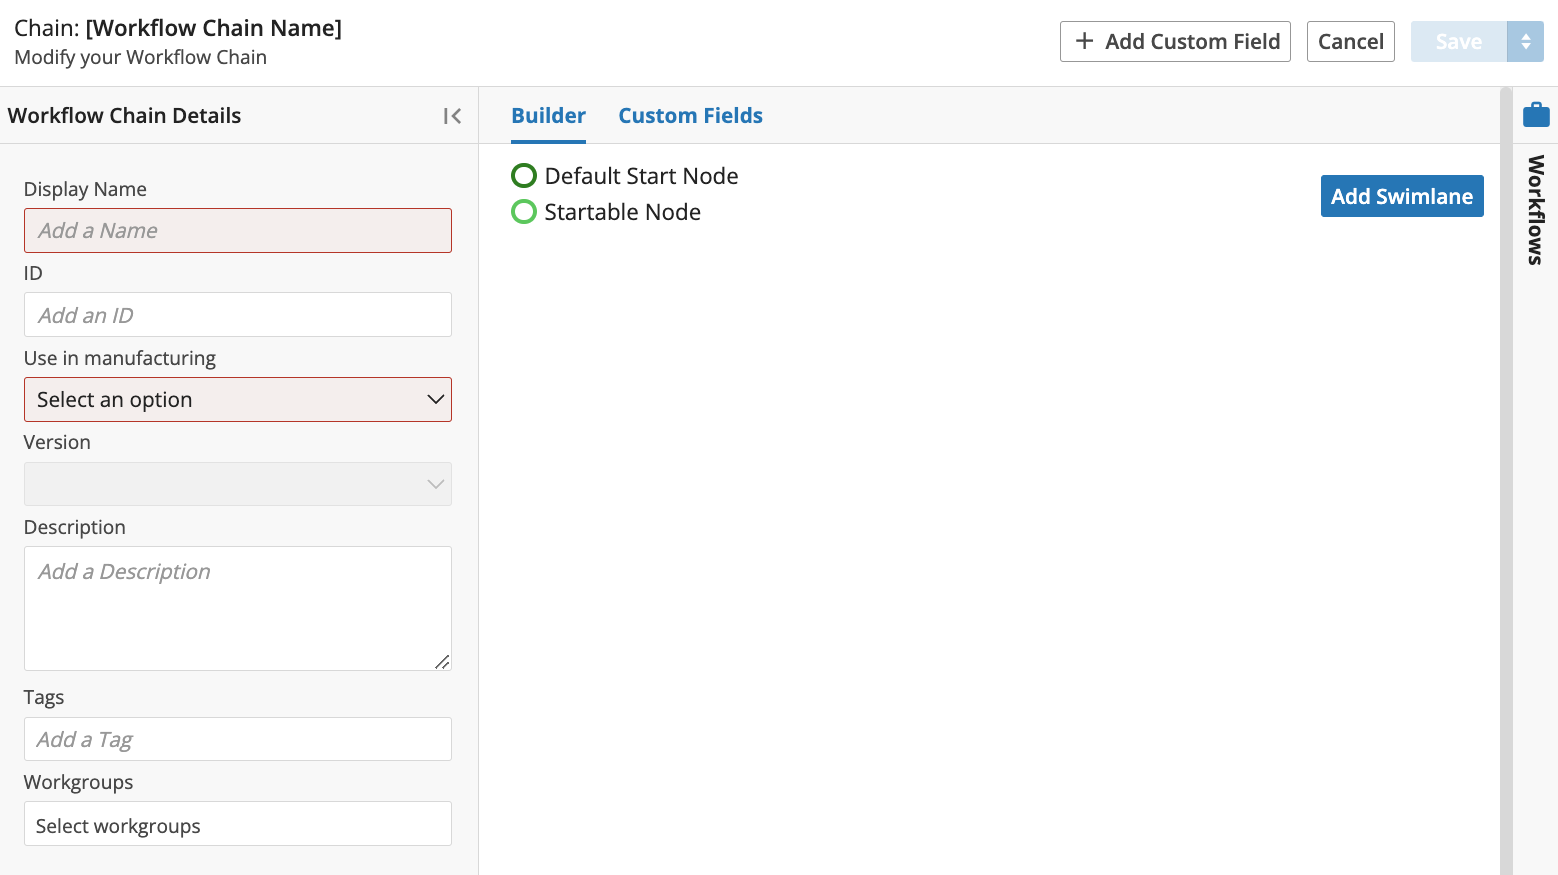
Drag a desired Workflow from the Workflow Library and drop anywhere in the Builder panel.
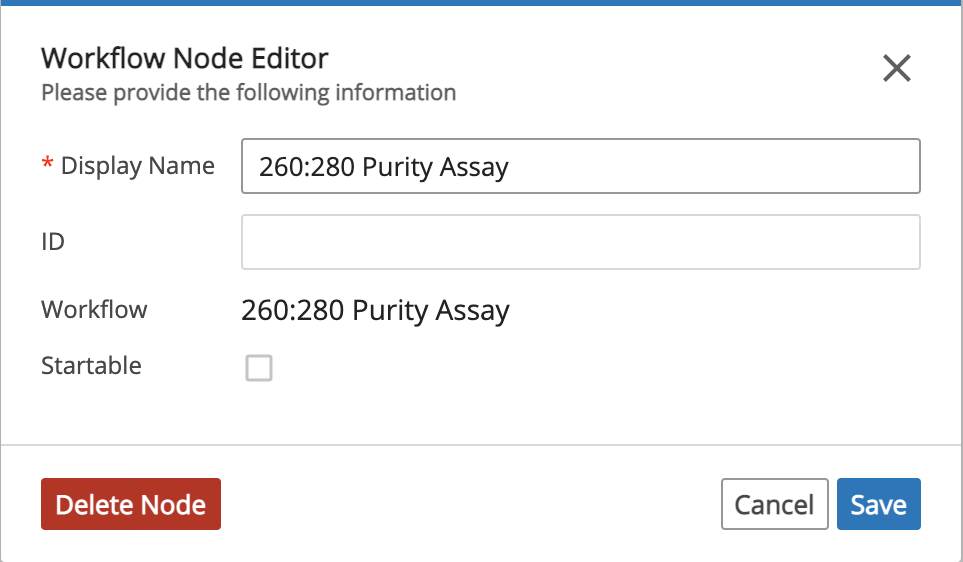
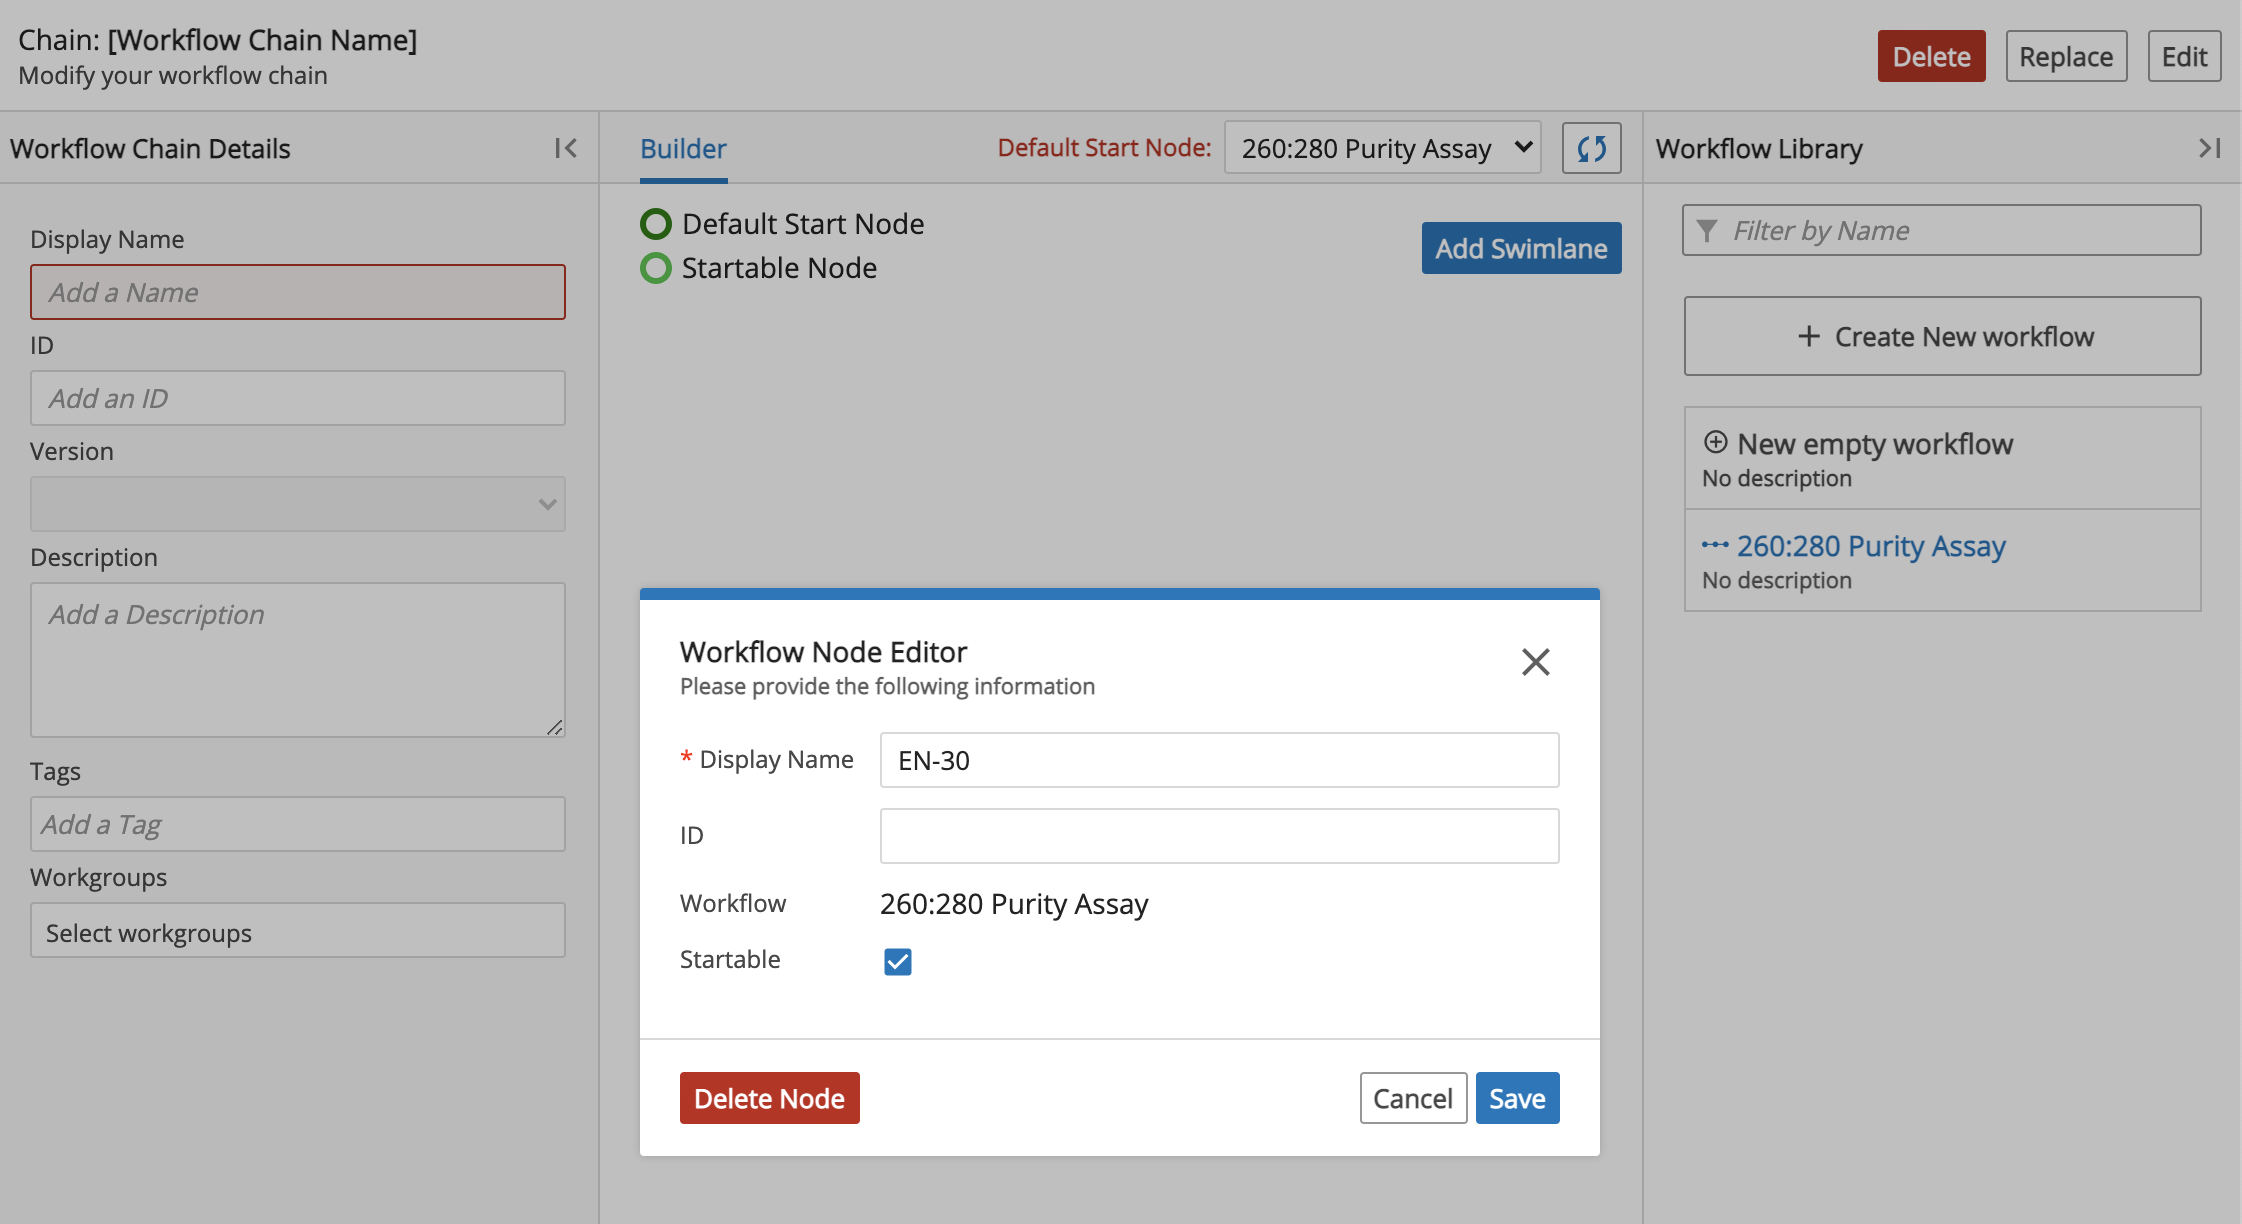
Once the Workflow is dropped, the Workflow Node Editor dialog appears. Optional: Update the Workflow Name and/or check Startable. Click Save.
Observe that the drag and dropped Workflow appears as a node.

Hover your mouse over the node. Observe that a small blue circle appears in the top - center of the node. Click this small blue circle to access the Rapid Add Node dialog.
The Rapid Add Node dialog allows you to quickly add another Workflow from a drop-down list of Workflows (as opposed to dragging and dropping a Workflow). Select the desired Workflow and click Save.

Drag the new Workflow anywhere until you can view both Workflows. Observe that an arrow connecting the two Workflows is automatically created. This arrow indicates the sequence of the Workflow Chain.
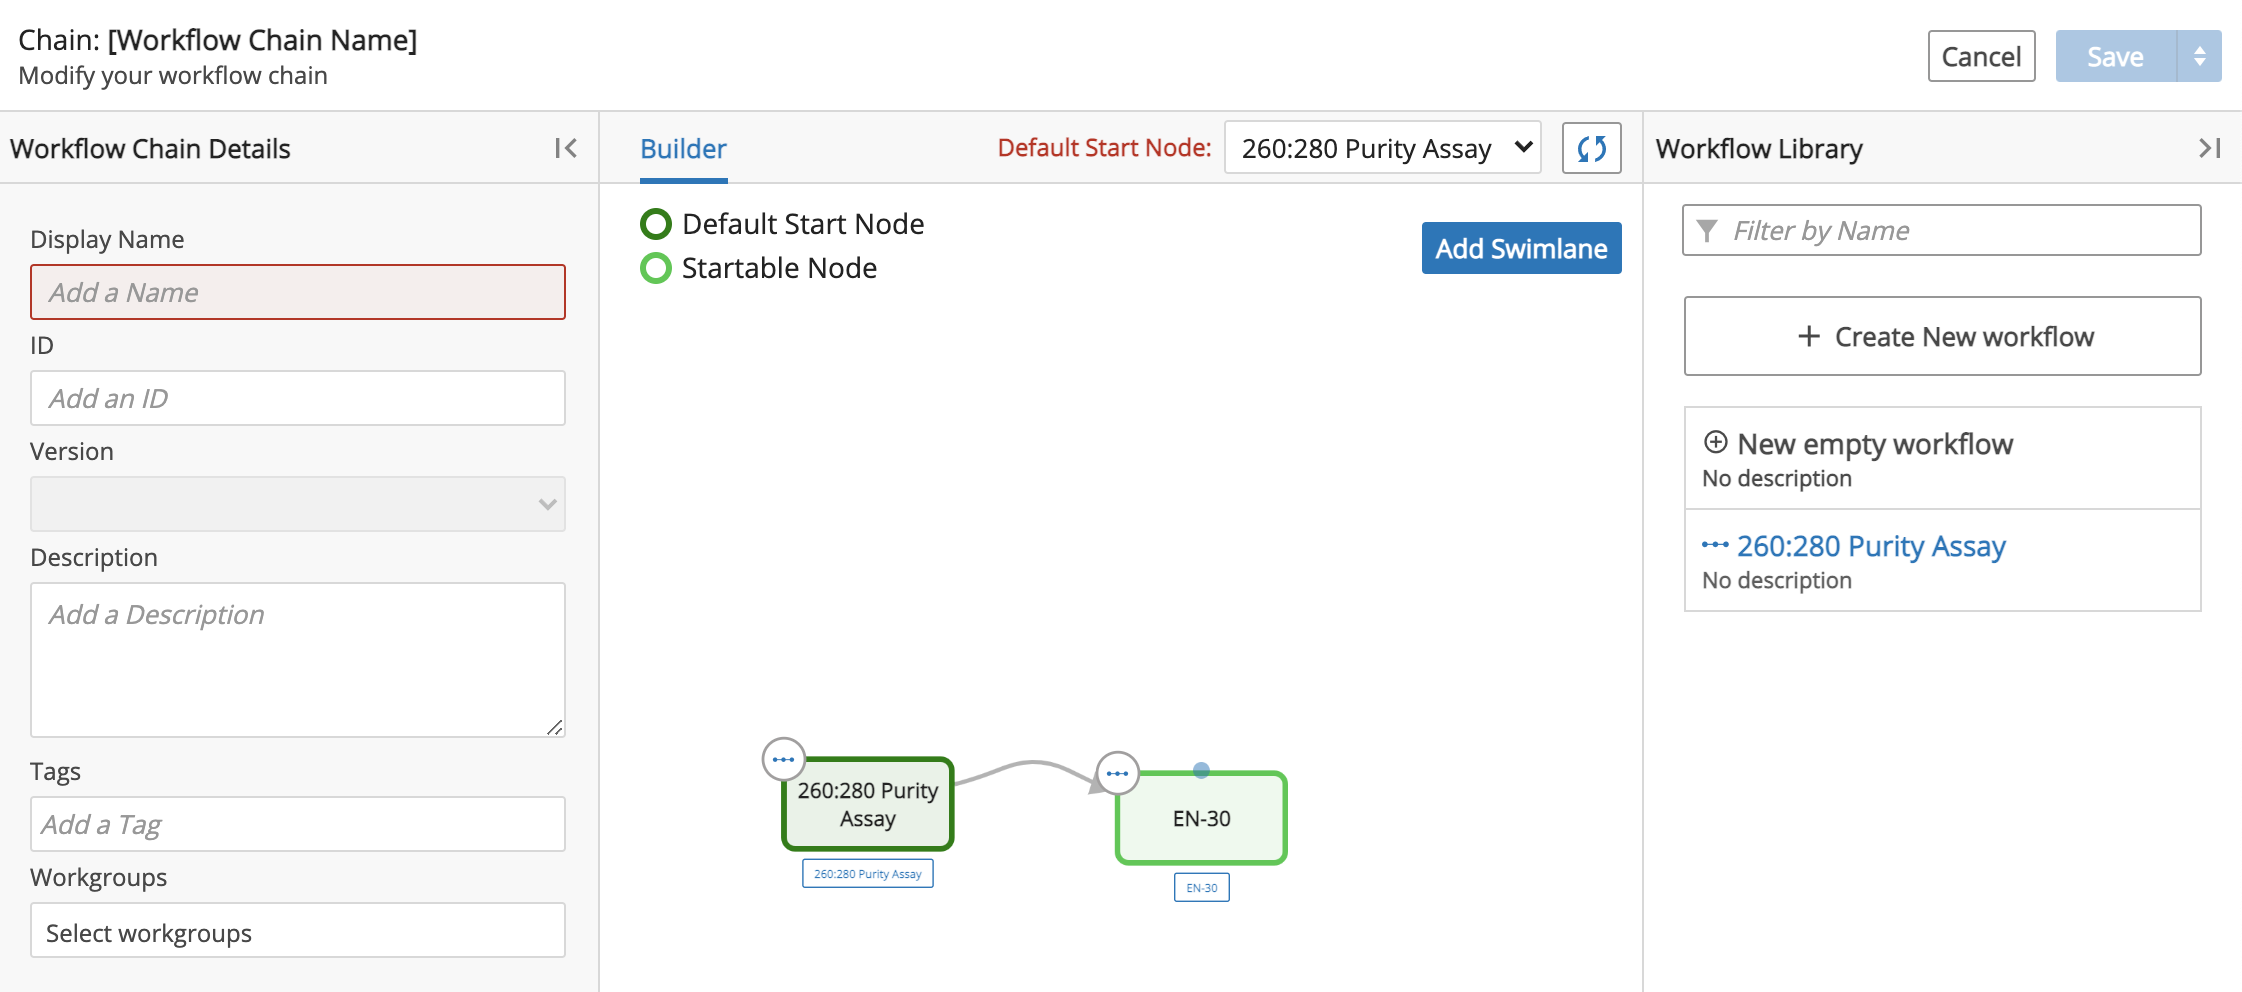
Note
Your Workflow positioning is not preserved; it is automatically rendered upon Saving. L7|ESP must be able to distinguish the initial (first) node or the Workflow Chain cannot be saved. Additionally, duplicated node names are not allowed.
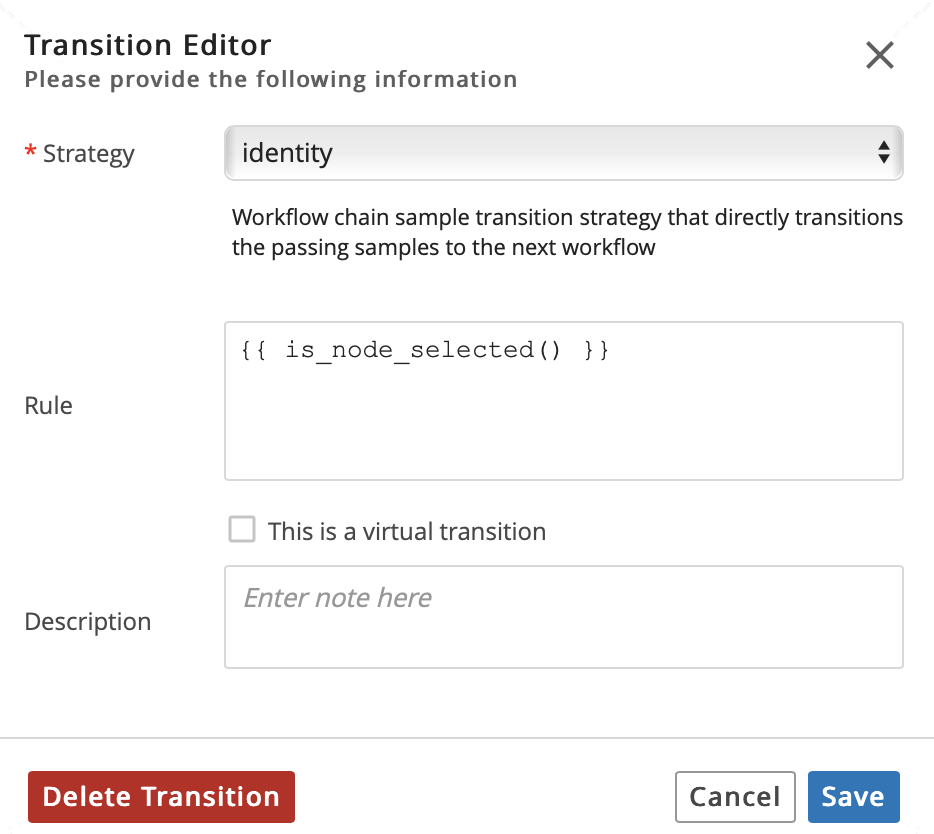
Click the arrow to access the Transition Editor dialog. Fill out the Transition Editor dialog:
Select a Strategy. A description for each Strategy is available above the Rule field. Note that Admins can create and define new Strategies.
Optional: Enter a Rule (i.e., custom expression). For information on creating custom expressions, refer to L7|ESP Expression Language.
Optional: Enter a Description.
Check whether the transition will be Virtual.
Click Save to save the transition information.
Hint
You can update the Name of a node or Delete a node by clicking the node's blue circle to access the Workflow Node Editor.
Edit Workflow Chain
Click the L7|Master app. Click Workflow Chains from the Processes menu to access the Workflow Chains page.
Click the Name of a Workflow Chain.
Edit the desired information (e.g., Display Name, Description, Tags, Workflows and Transitions between Workflows).
Save the updated Workflow Chain.
3.3.6. Manage Param Groups
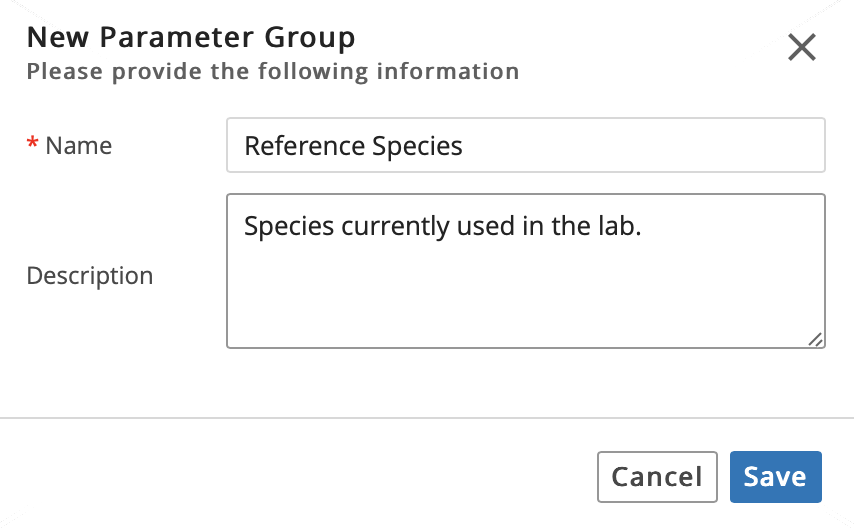
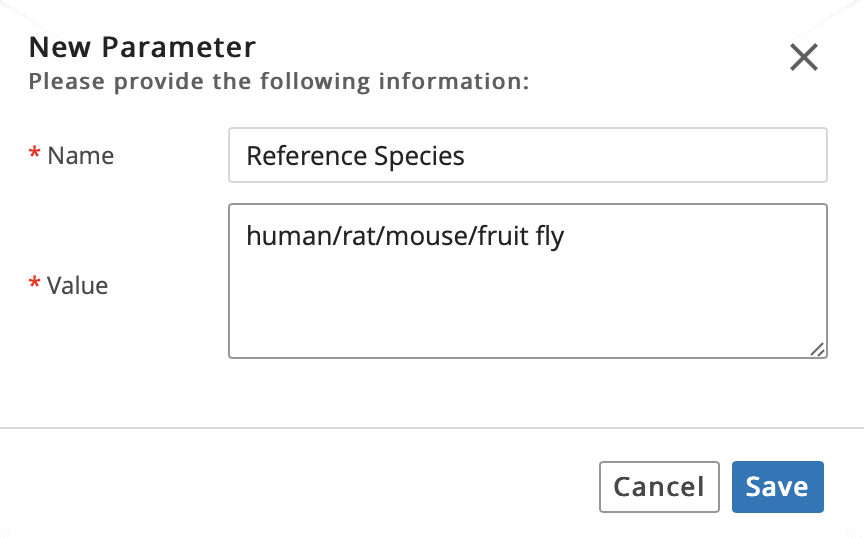
A Param Group (i.e., Parameter Group) is a predefined collection of key-value pairs. Param Groups provide a single place to store values that can be used elsewhere in L7|ESP. For example, if human, rat, and mouse are the only reference species used in your lab, then you can create a Param Group called Reference Species, which is the key, and add human, rat, and mouse as the associated values. This is useful because it allows you to select a reference species when processing Entities rather than type/enter a reference species, eliminating potential errors and saving time.
The values for a Parameter can be either scalar values or lists:
Production References

Reference Root:    /data/references
Reference Species: ['Human', 'Rat', 'Mouse', 'Fruitfly']
Human Versions:    [36, 37, 38]
Scalar Parameter Values are serialized as strings, so no special formatting is required to store them. List Parameter Values are serialized as JSON lists. When using List Parameters, use quotes for values that are strings, and valid numeric values for numbers.
Param Groups can also be used to support multiple instances of L7|ESP at your site. For example, if you have separate Development, Testing, Acceptance and Production (DTAP) environments of L7|ESP, then they can store all the paths used by Tasks in a Param Group, and set the values based on which instance is being used.
Test References

Reference Root:    /test/data/references
Reference Species: ['Human', 'Rat', 'Mouse', 'Fruitfly']
Human Versions:    [36, 37, 38]
Values in Param Groups are accessed using the param API call in an L7|ESP Expression:
{{ param("Group Name", "Key") }}
The expression is replaced with the value for the Key in the Group:
{{ param("Production References", "Reference Root") }} # --> /data/references
Create New Param Group
Click the L7|Master app. Click Param Groups from the Processes menu to access the Param Groups page.

Click + New Param Group.

Enter a Name for the new Param Group. Optional: Enter a Description for the Param Group. Click Save.
Optional: Enter one or more Tag(s).
Click + Add Parameter.
Enter a Name and associated Values for the Param Group. Use a slash or comma between the Values.
Save the new Param Group.
Edit Param Group
Click the L7|Master app. Click Param Groups from the Processes menu to access the Param Groups page.
Click the Name of the Param Group to edit.
Edit the desired information (e.g., Name; Description; Tag(s); Parameters (Names and Values)). You can also archive the Param Group by clicking Archive.
Save the updated Param Group.
3.3.7. Manage Signature Flows
Signature Flows are an Approval type used as an additional capability for signatures beyond what can be done with Approvals and Acknowledgement types.
3.3.8. Create New Signature Flows
Click the L7|Master app. Click Signature Flows from the Processes menu to access the Signature Flows page.
Click + New Signature Flow.
Enter a Name, Accept Reasons, and Reject Reasons.
Optional: Enter a Description and enter one or more Tag(s).
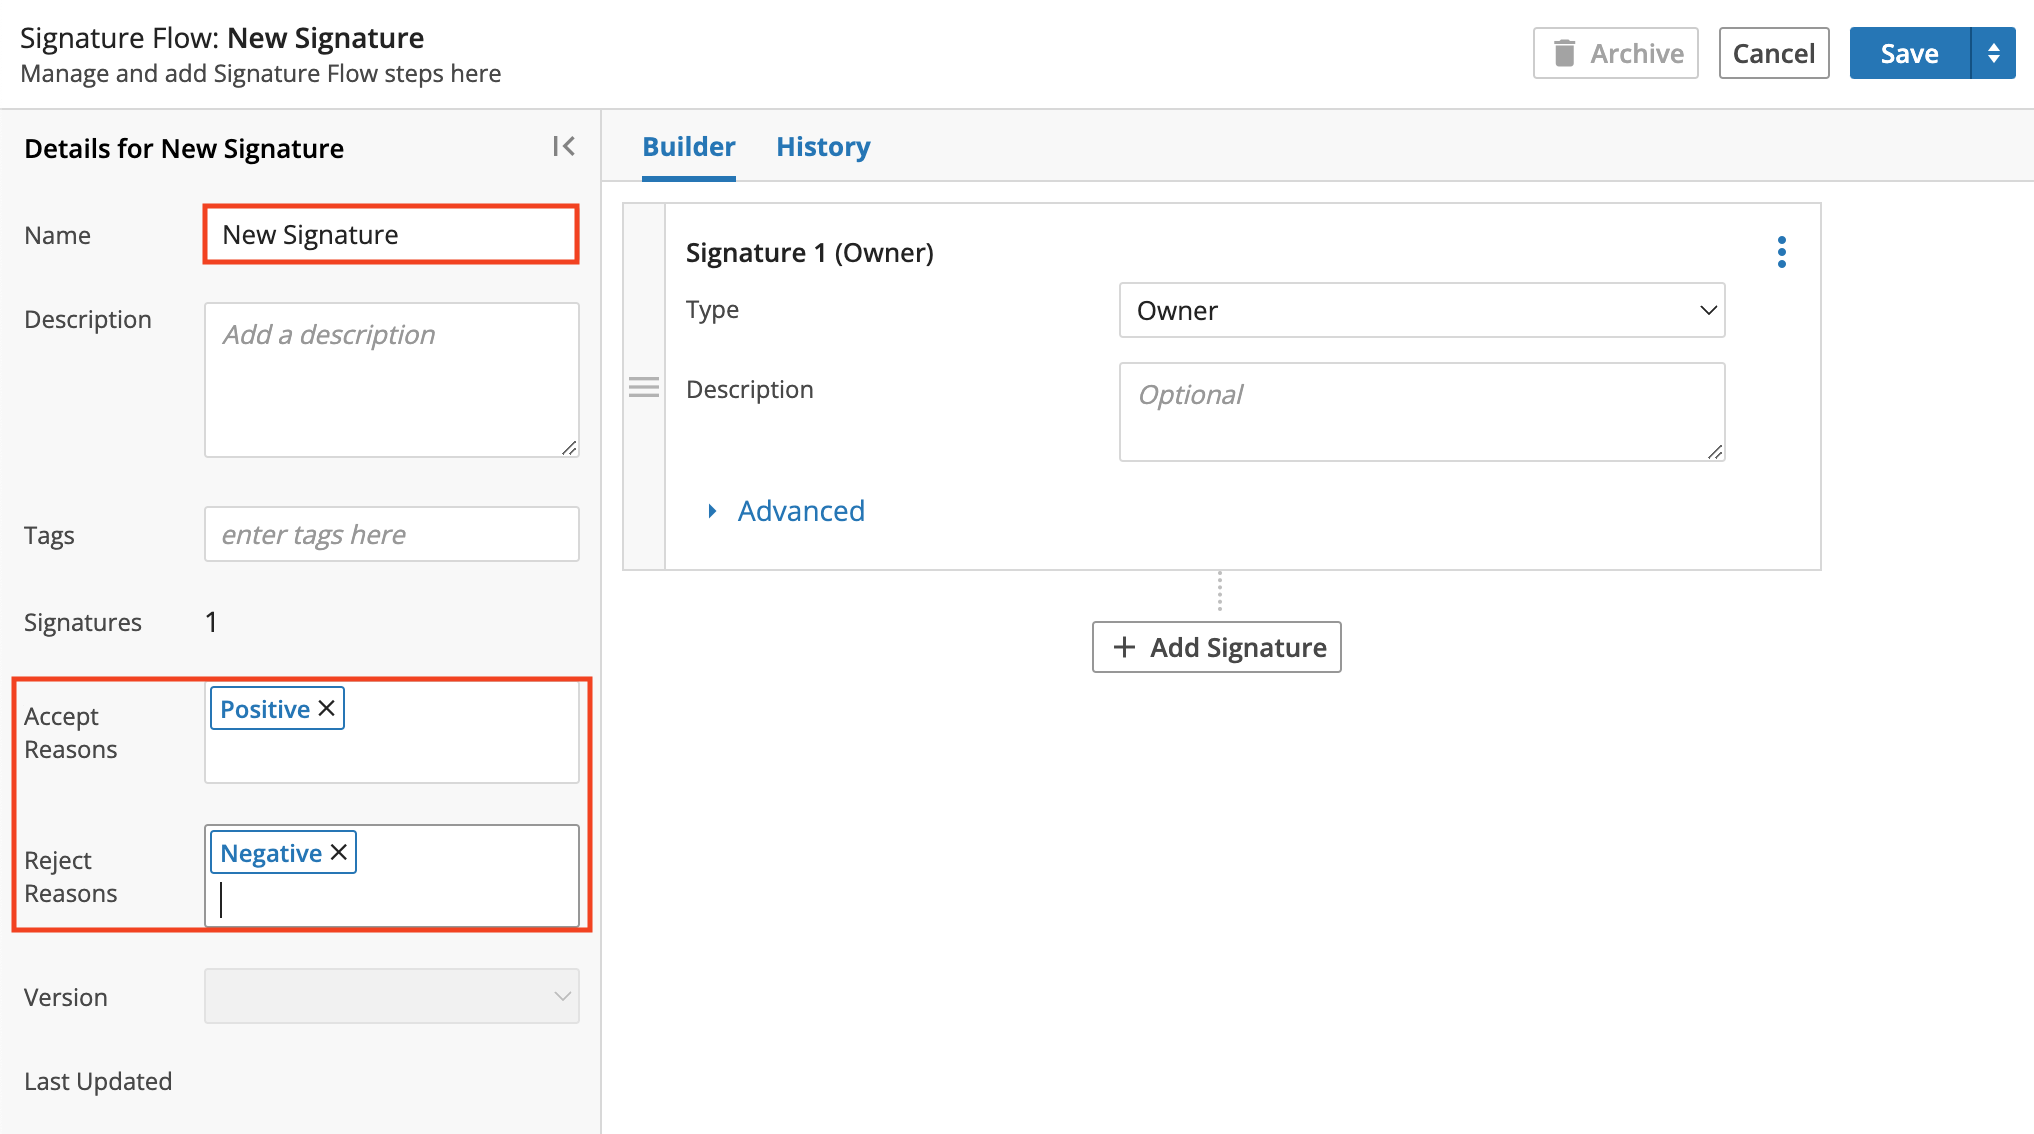
In the Builder section, Signature Flows can be created and customized.
Select Type as Owner, User, Role, or Workgroup. Type defaults to Owner.
Optional: Enter a Description and complete the fields under Advanced.
Clicking on Add Signature will add additional Signatures to the Signature Flow that can be customized individually.
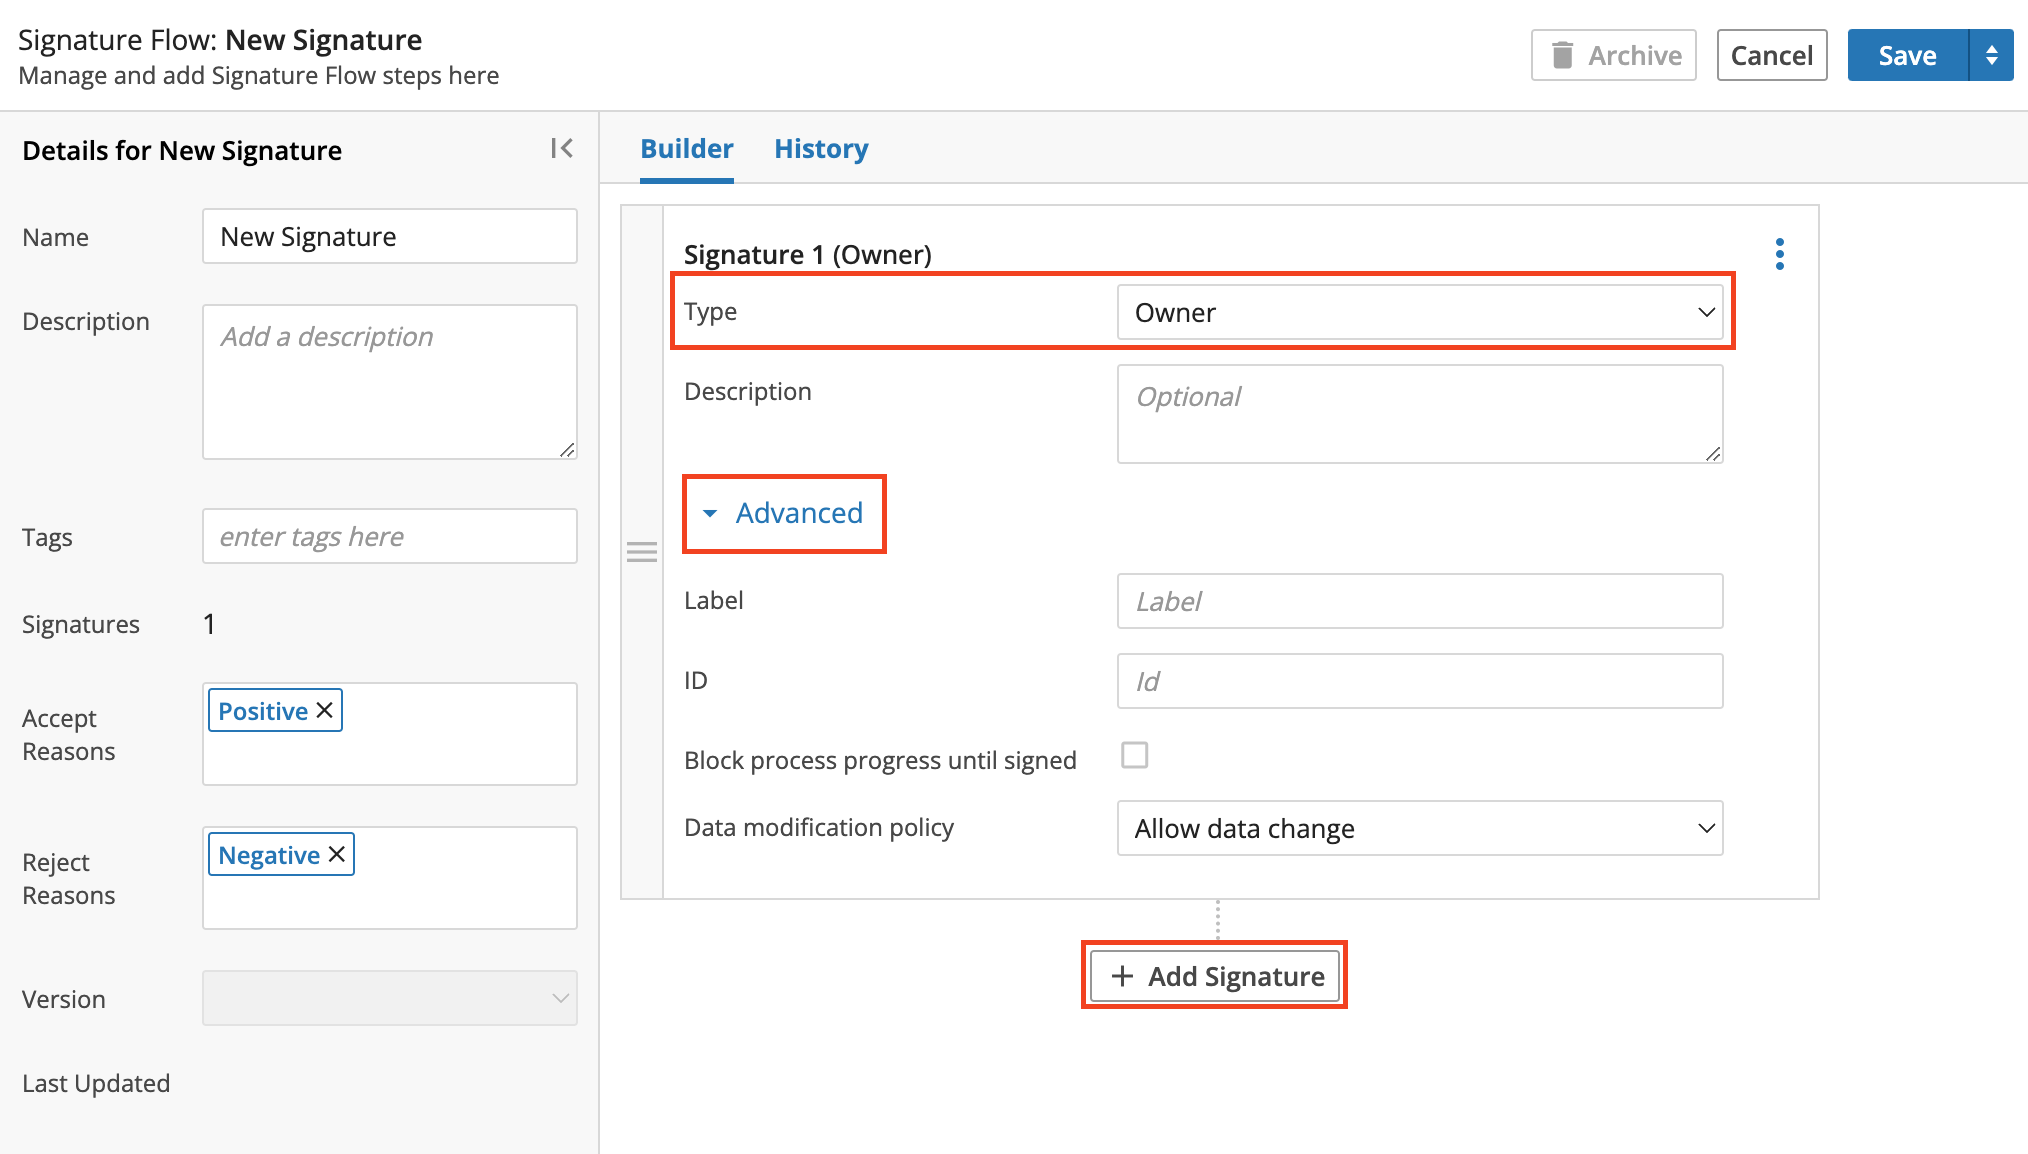
Once all needed signatures are added to the Signature Flow, click Save.
The Signature Flow history can be viewed under the History tab of the Signature Flow's Details page.
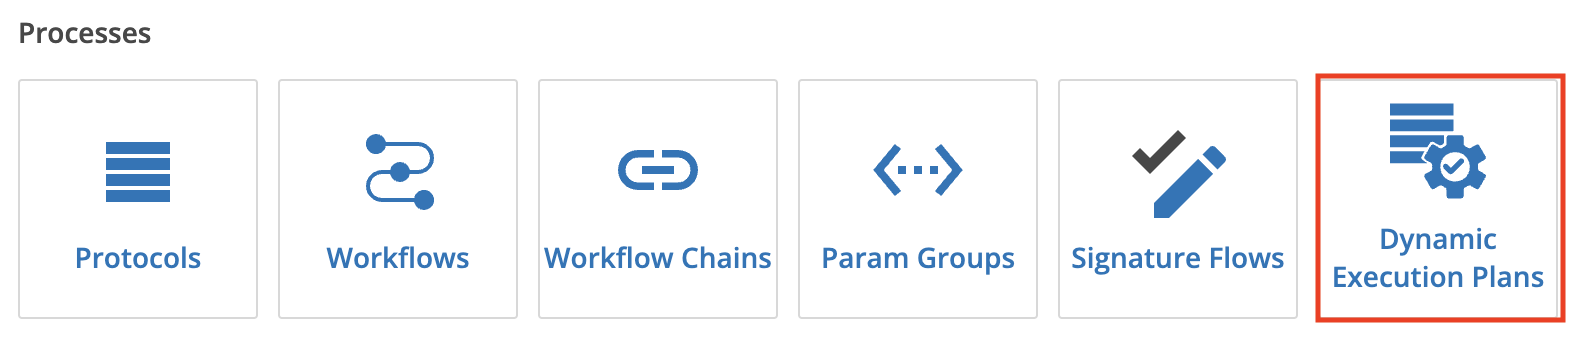
3.3.9. Manage Dynamic Execution Plans
Dynamic Execution Plans is a feature intended to support MES, DOE, and many other use-cases in instances that require the same processes used to create related-but-different outputs where specific parameters of the process differ. For example, in the use-case that different tolerances are required for the same production of a drug, the Dynamic Execution Plan can help eliminate the need to duplicate copies of the Workflow Chain, Workflows, Protocols, etc. and instead creates a single process definition with different parameters of the process.
3.3.10. Create New Dynamic Execution Plan
Click the L7|Master app. Click Dynamic Execution Plans from the Processes menu to access Dynamic Execution Plans page.
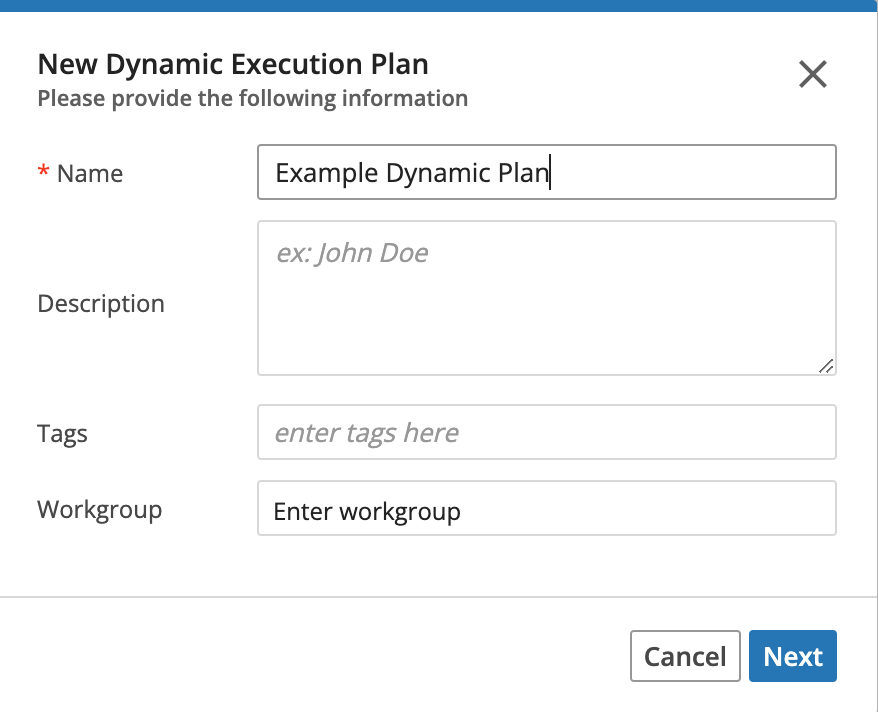
Click + New Plan.
Enter a Name.
Optional: Enter a Description, enter one or more Tag(s), and/or select a Workgroup.
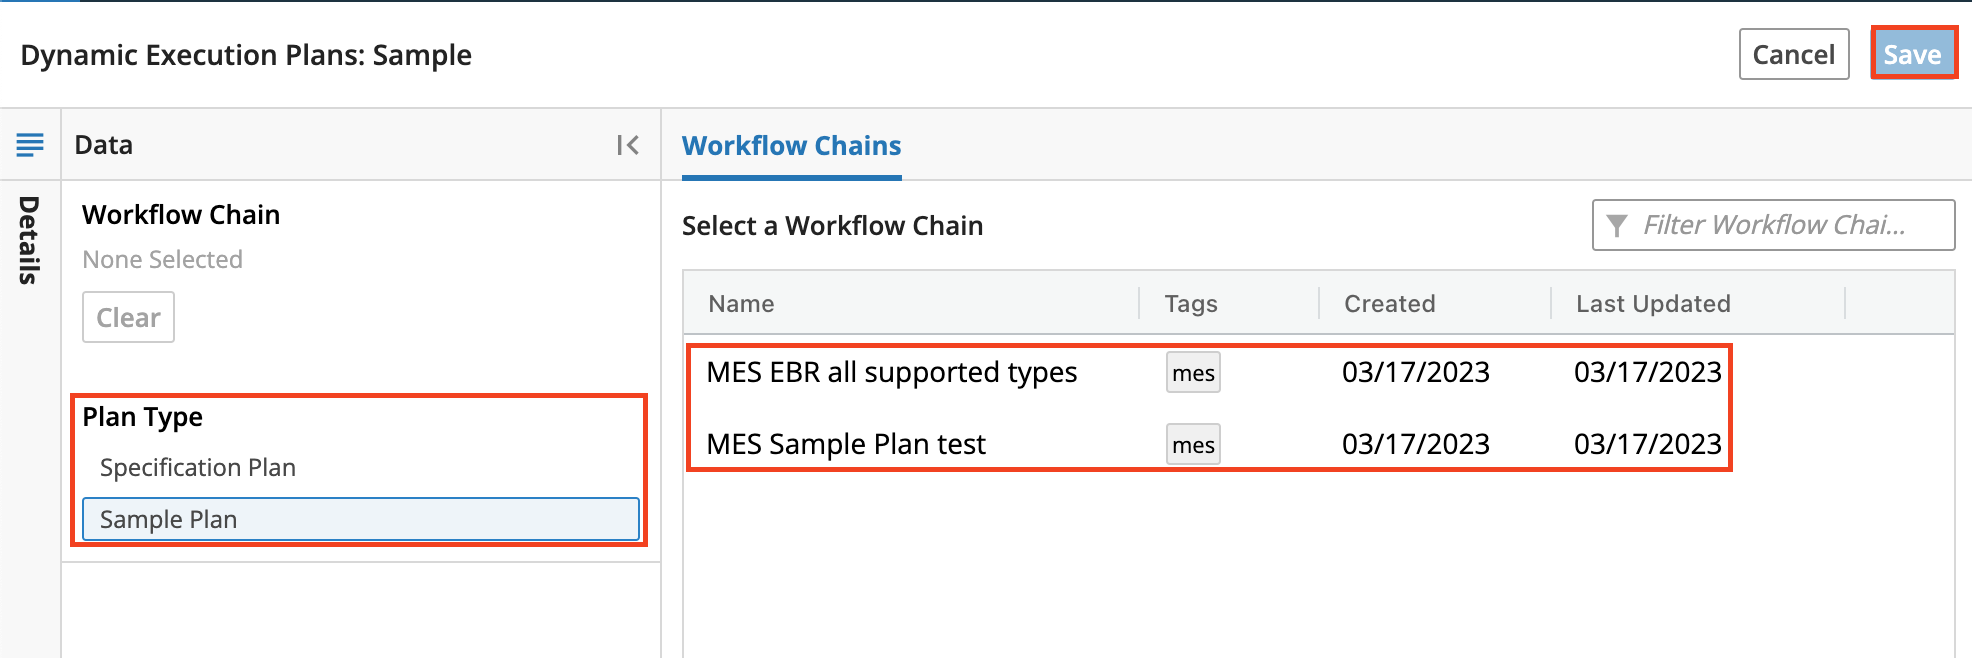
In the Dynamic Execution Plan's page, a Plan type and Workflow Chain can be selected.
Specification Plan type includes only numeric fields that have the "Specification" value set.
Sample Plan type includes only "Sample Point" fields.
Once a Plan Type is selected, applicable Workflow Chains are shown under Select a Workflow Chain and one can be selected.
Click Save
Once saved, the Dynamic Execution Plan's page will have Fields available to select and add to the Sample Plan.
Within the Inspector pane, the Workflow's values can be edited and customized.

Click Save to complete the new Dynamic Execution Plan.
3.4. Manage Extensions
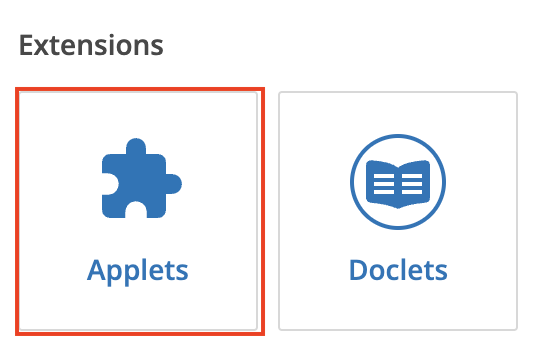
The sections to follow provide instructions for how to manage extensions (i.e., Applets and Doclets) in L7|ESP.
3.4.1. Manage Applets
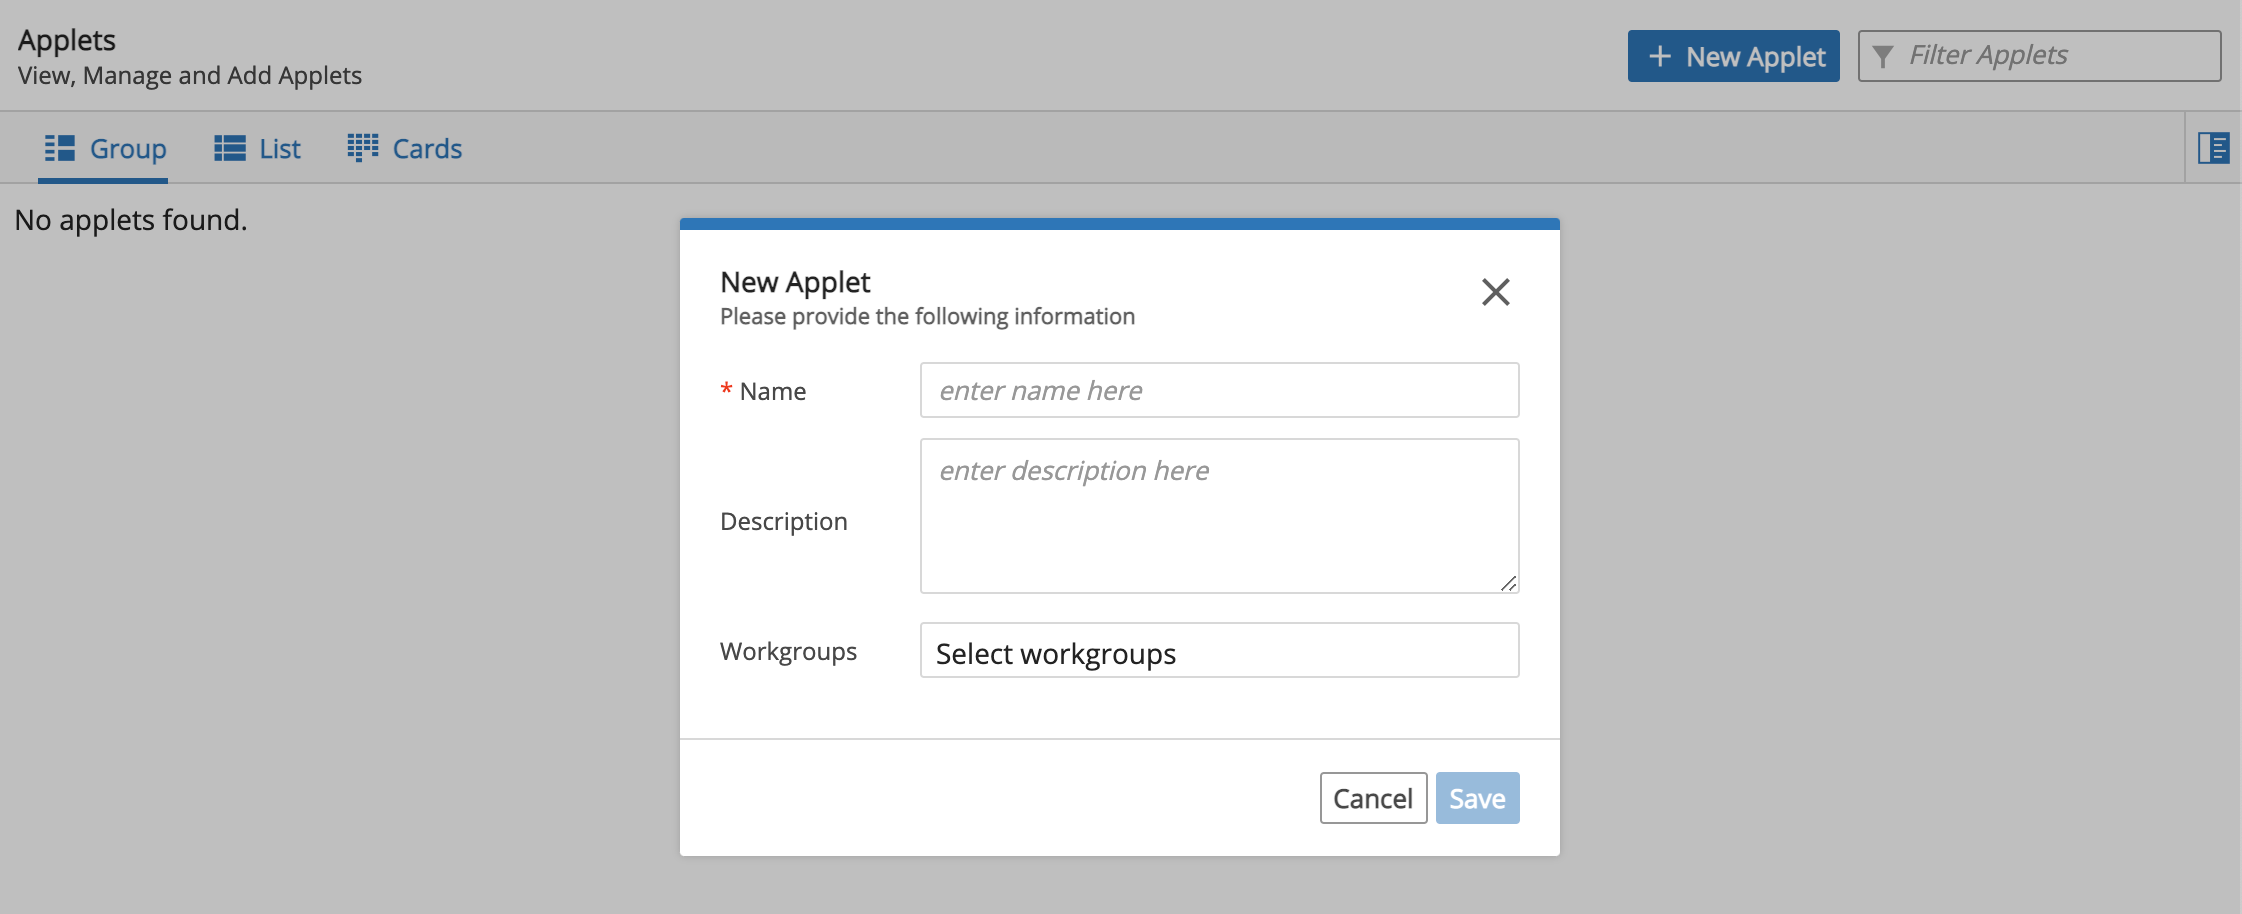
Create New Applet
Click the L7|Master app. Click Applets from the Extensions menu to access the Applets page.
Click + New Applet.

Enter information for the new Applet:
Enter the Name of the Applet.
Optional: Enter a Description.
Optional: Select a Workgroup(s).
Click Save.
Click the Edit tab and fill out the Code Editor as appropriate for the Applet. Click the View tab to view rendered code.
Save the new Applet.
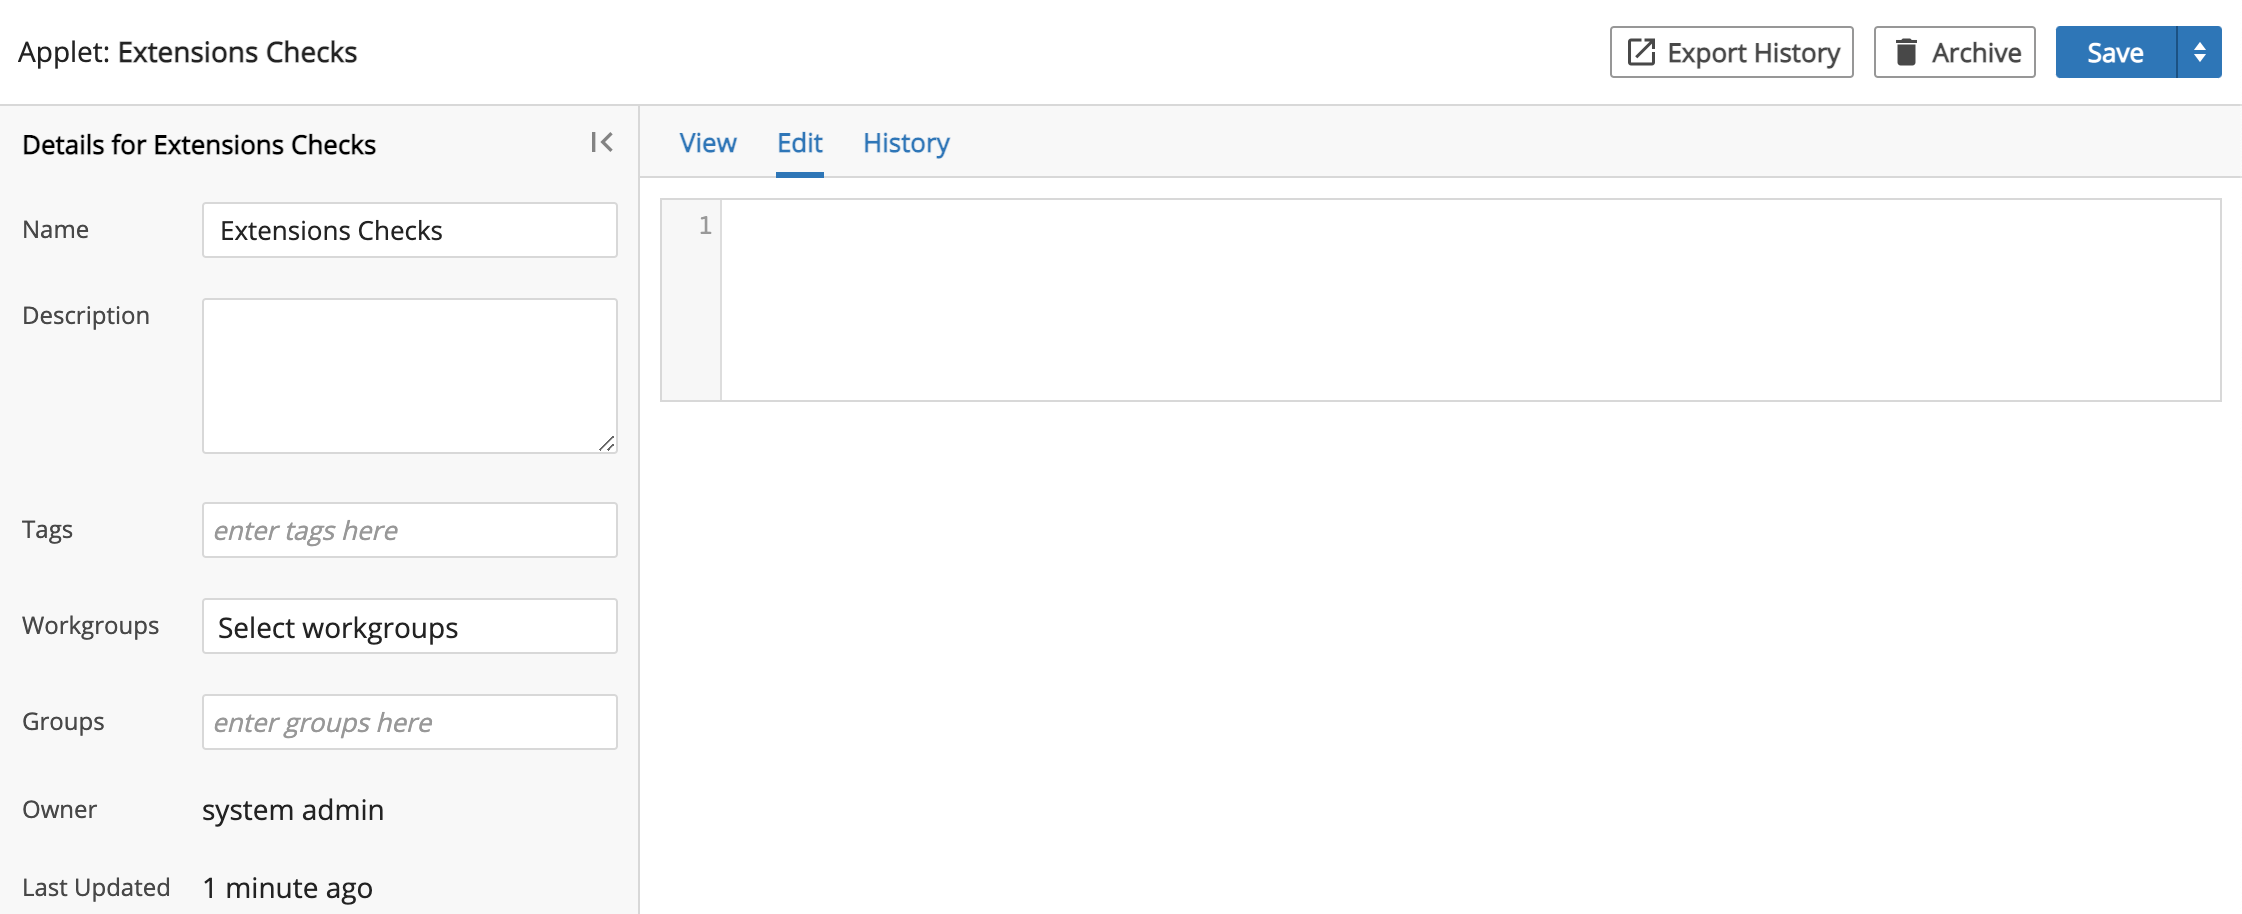
Edit Applet
Click the L7|Master app. Click Applets from the Extensions menu to access the Applets page.
Click the Name of an Applet.
Edit the desired information (e.g., Name, Description, Tags, Groups, Code Editor). You can also archive the Applet by clicking Archive.
Save the updated Applet.
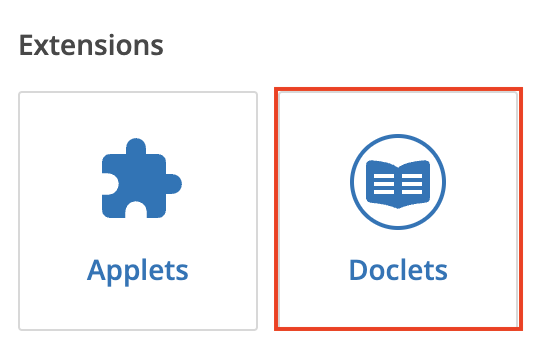
3.4.2. Manage Doclets
Create New Doclet
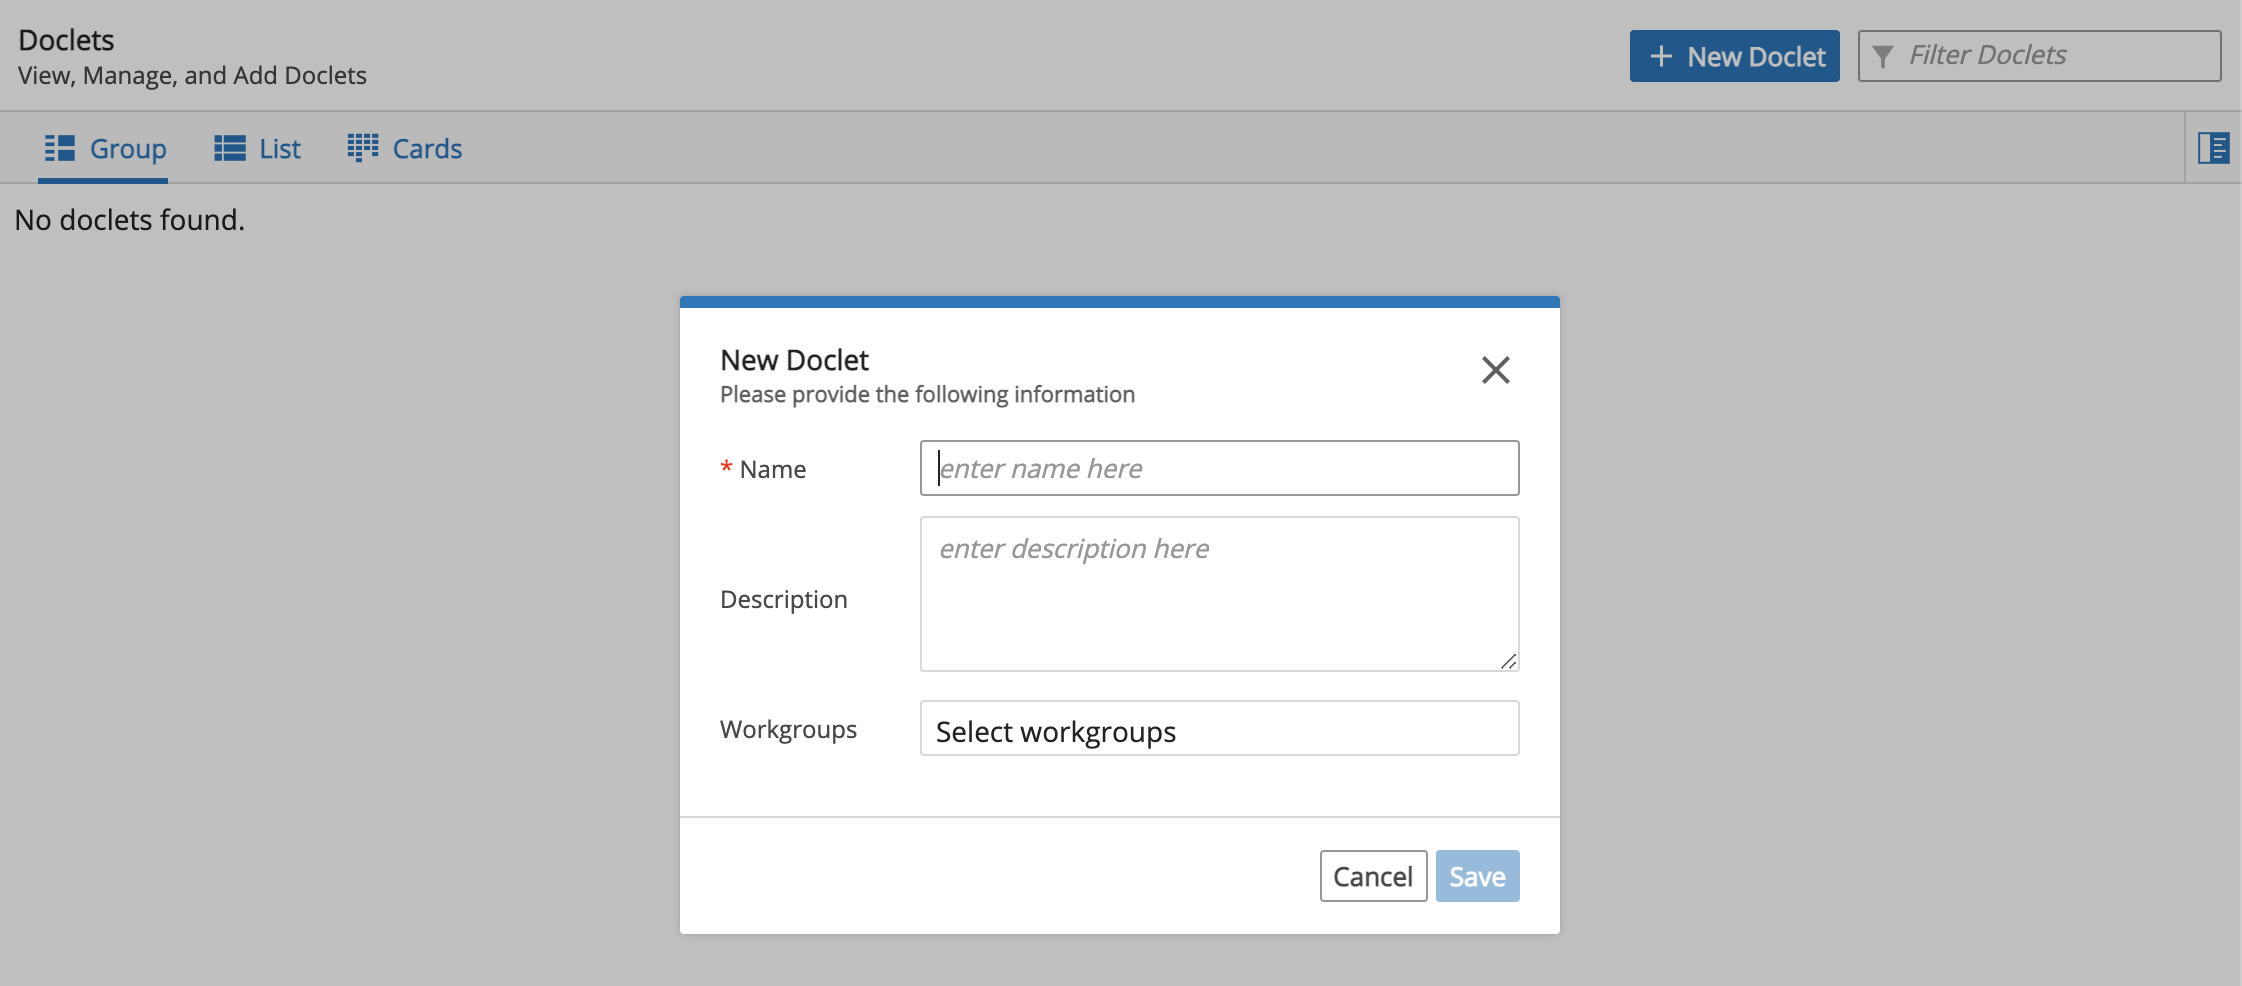
Click the L7|Master app. Click Doclets from the Extensions menu to access the Doclets page.
Click + New Doclets.

Enter information for the new Doclet:
Enter the Name of the Applet.
Optional: Enter a Description.
Optional: Select a Workgroup(s).
Click Save.
Click the Edit tab and fill out the Code Editor as appropriate for the Doclet. Click the View tab to view rendered code.
Save the new Doclet.
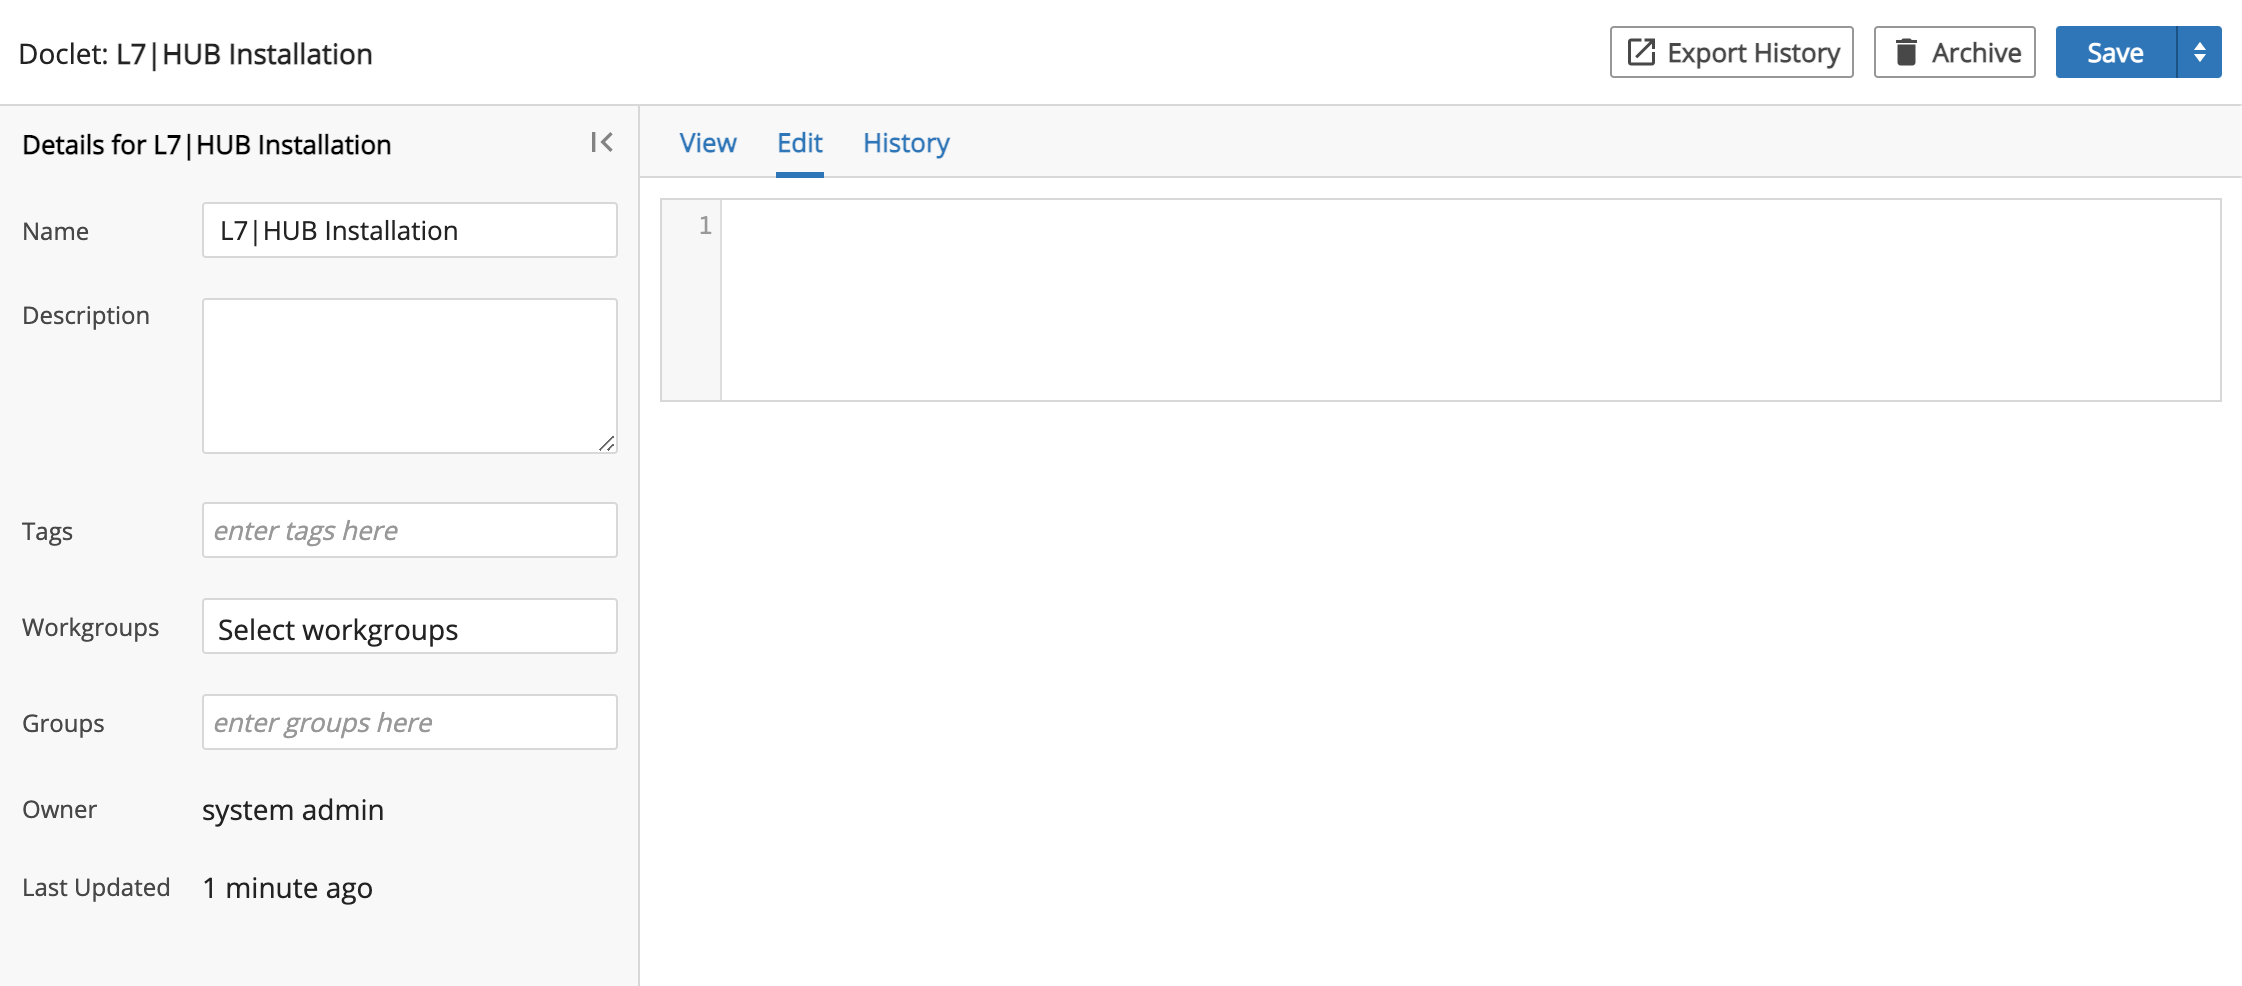
Edit Doclet
Click the L7|Master app. Click Doclets from the Data menu to access the Doclets page.
Click the Name of a Doclet.
Edit the desired information (e.g., Name, Description, Tags, Groups, Code Editor). You can also archive the Doclet by clicking Archive.
Save the updated Doclet.
3.5. Manage Tasks and Pipelines
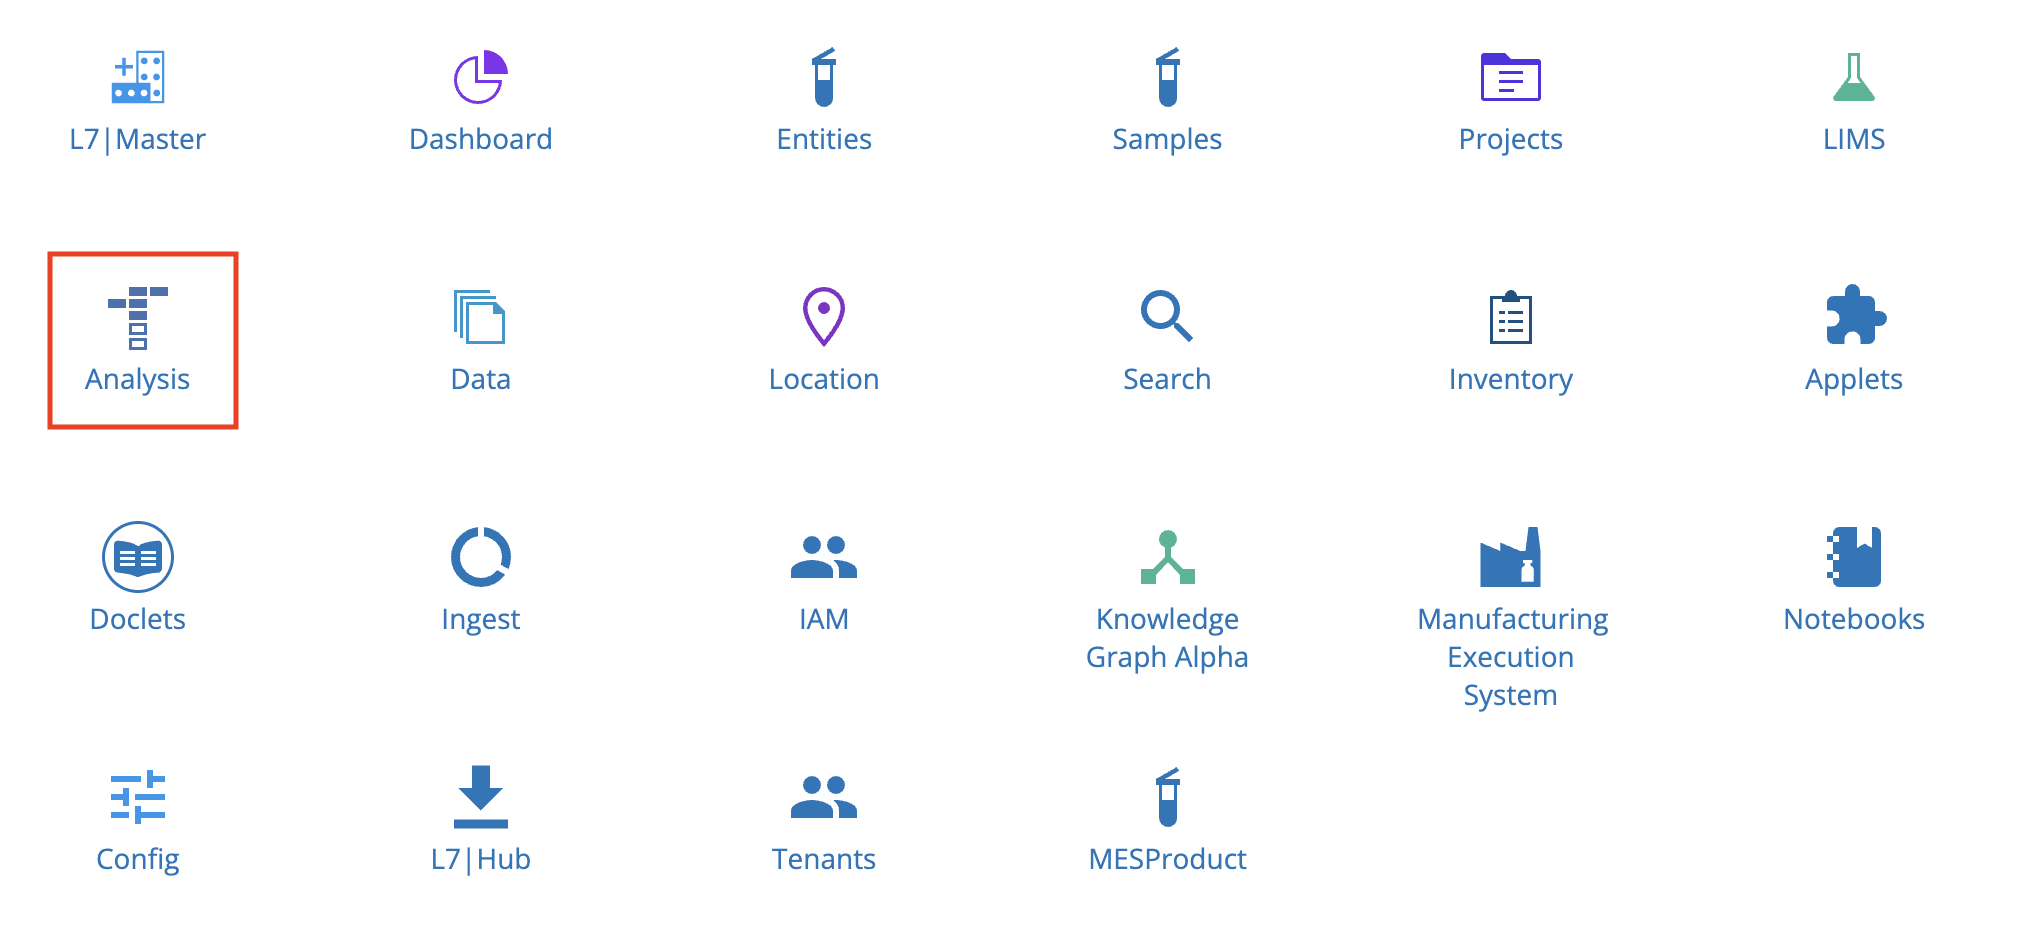
To build and execute Pipelines, open the Analysis app. The Analysis app is designed primarily for bioinformaticians and software developers and includes a number of tools and views catered for working with compute resources and command lines.
3.5.1. Monitor
Pipelines are the main abstraction for computational Workflows and are built by linking a series of Tasks together in a Task Graph, configurable in the Pipeline Builder. Every time a Pipeline is executed, a new Pipeline Instance is created. The Monitor tab displays information about active and completed Pipeline Instances.
L7|ESP uses a Task Graph model for Pipeline execution. In a Task Graph, each node in the Pipeline is a Task that is executed when its dependencies have completed execution. Tasks in the Task Graph can execute in series or parallel. In general, Pipeline Engines can use a data-flow graph or a task graph to manage dependencies, and determine when a Task can be launched. Data flow graphs are useful for showing the flow of data through a Pipeline, but often require an additional level of instrumentation to build and execute. Because most bioinformatics Pipelines start as simple combinations of shell scripts, L7|ESP uses the task graph model to simplify porting and development and to give bioinformaticians low-level control of their Pipelines.
Click the Analysis app.
Observe that the Monitor tab displays information in List view and Cards view.

3.5.2. List View
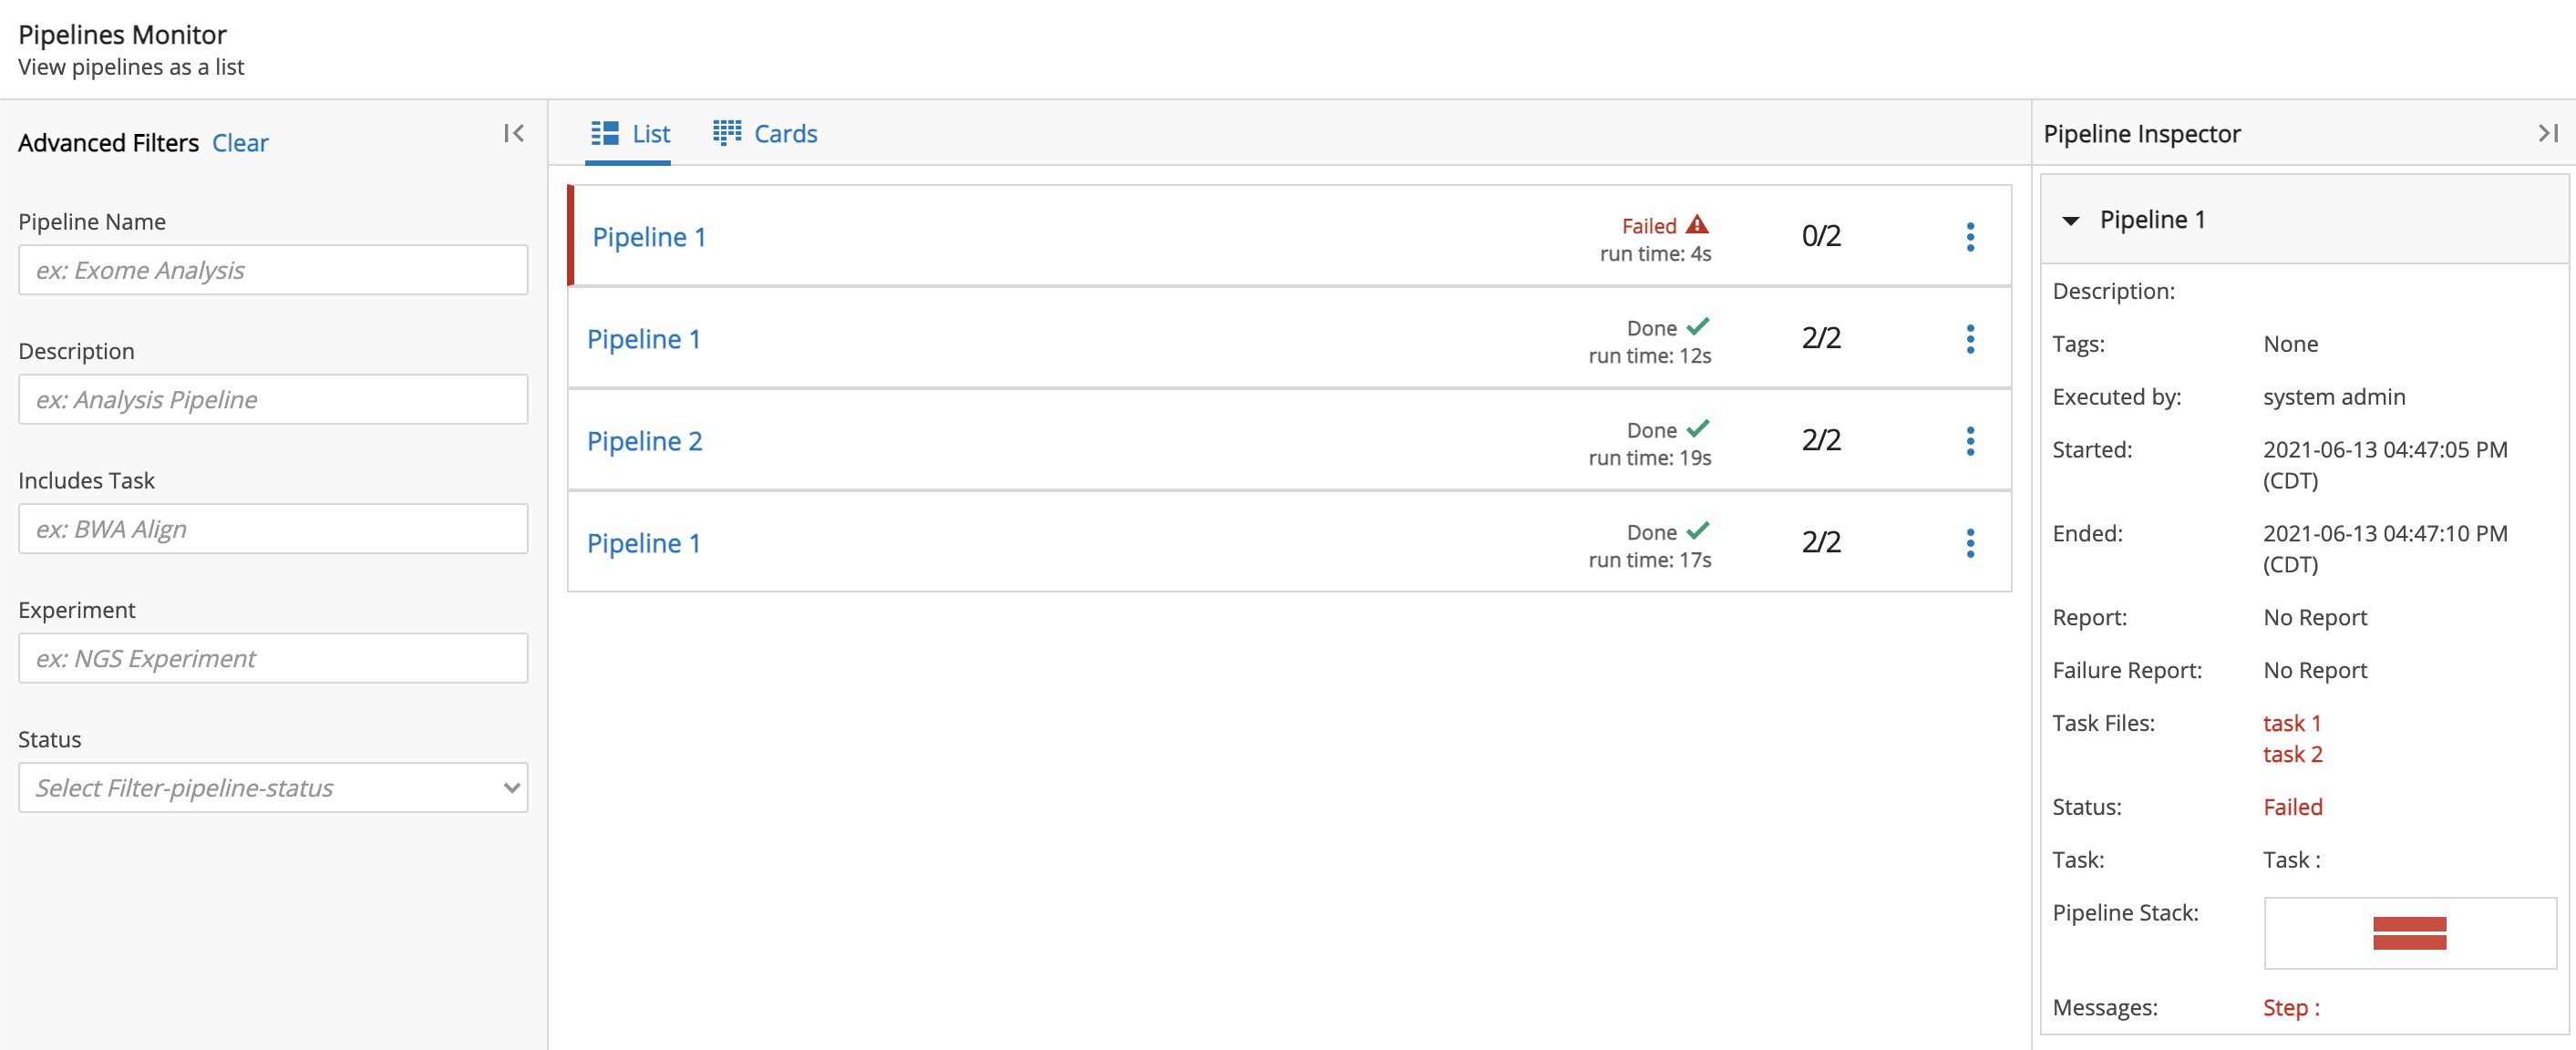
In List view, each Pipeline Instance is displayed as a row consisting of the Pipeline name, status, run time, and number of Tasks completed out of the total number of Tasks required.
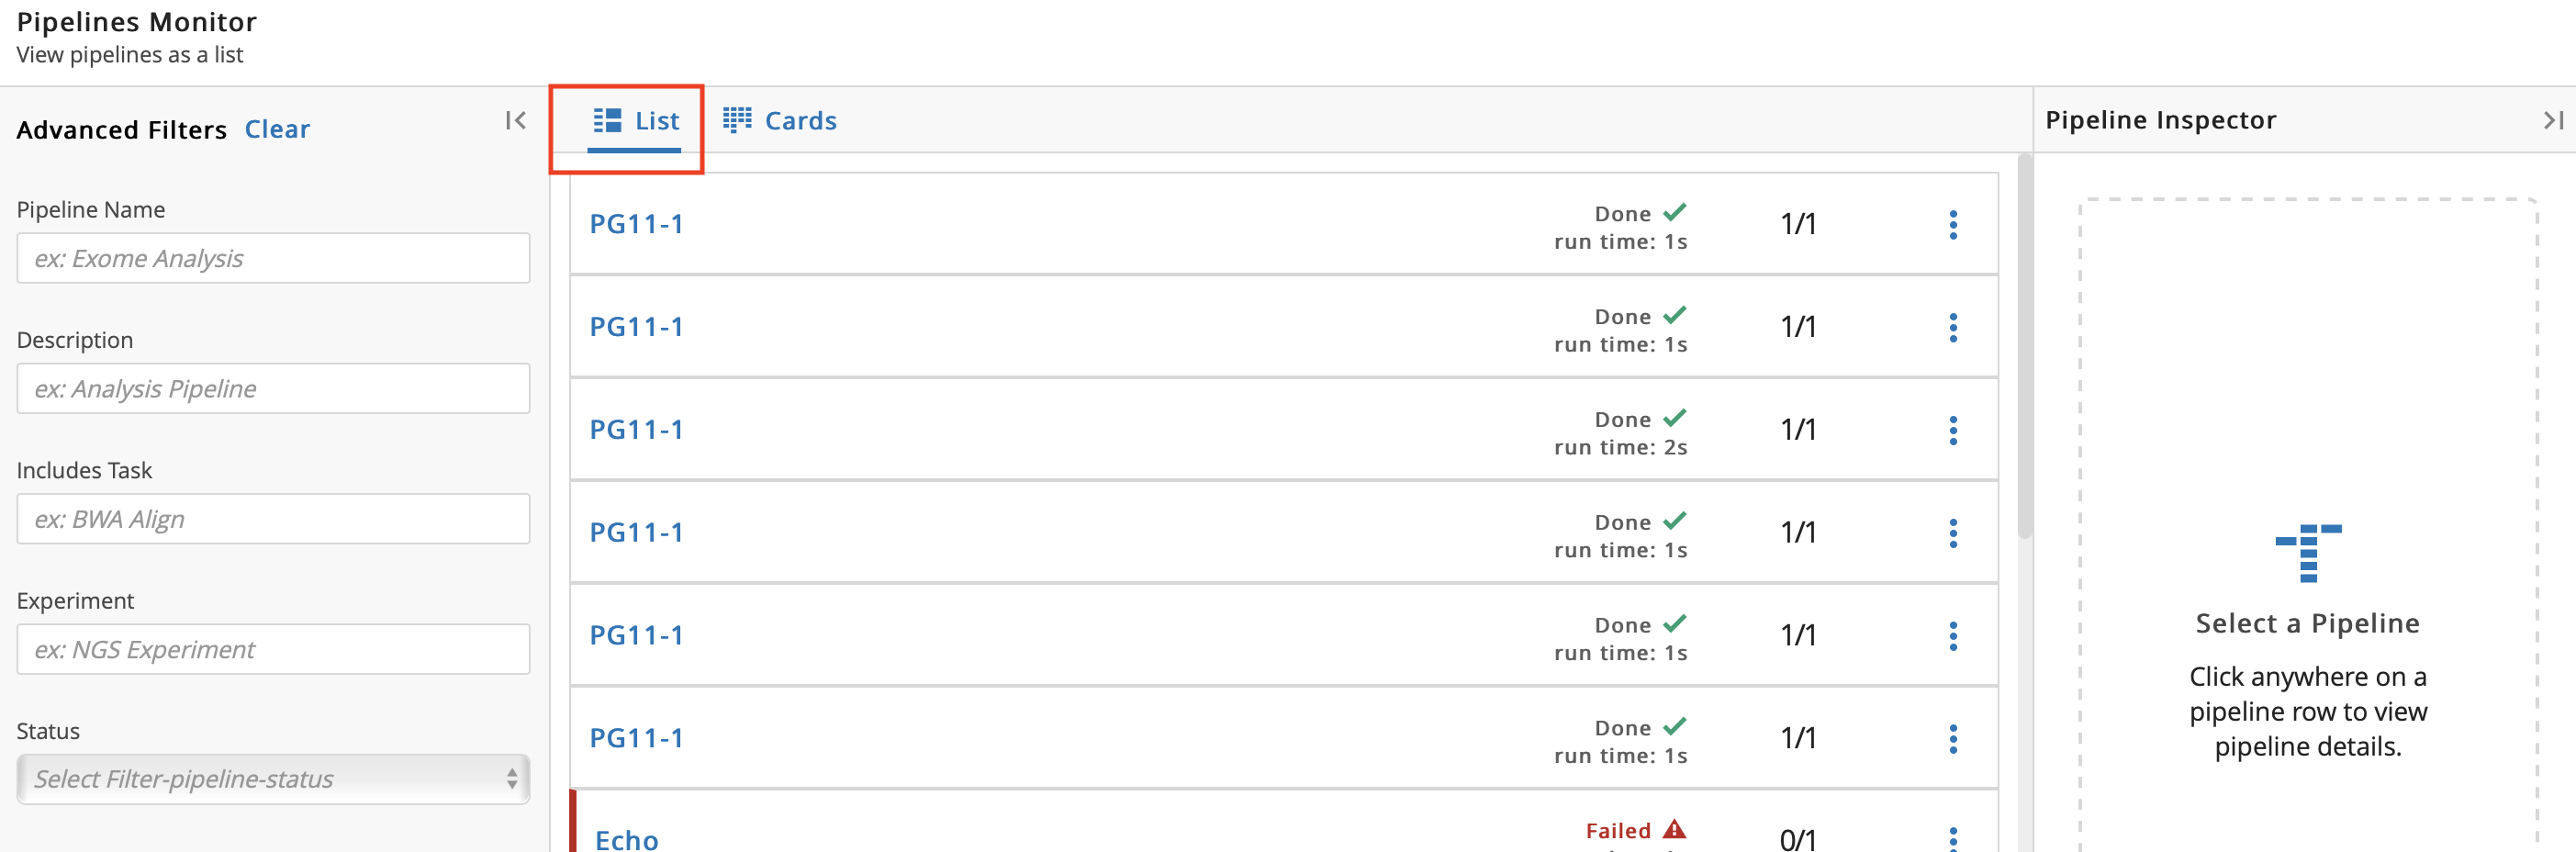
Click a row to view details of that Pipeline Instance in the Inspector. If a Report is available, a link will be provided in the sidebar. STDOUT is displayed in real-time below the Pipeline status.
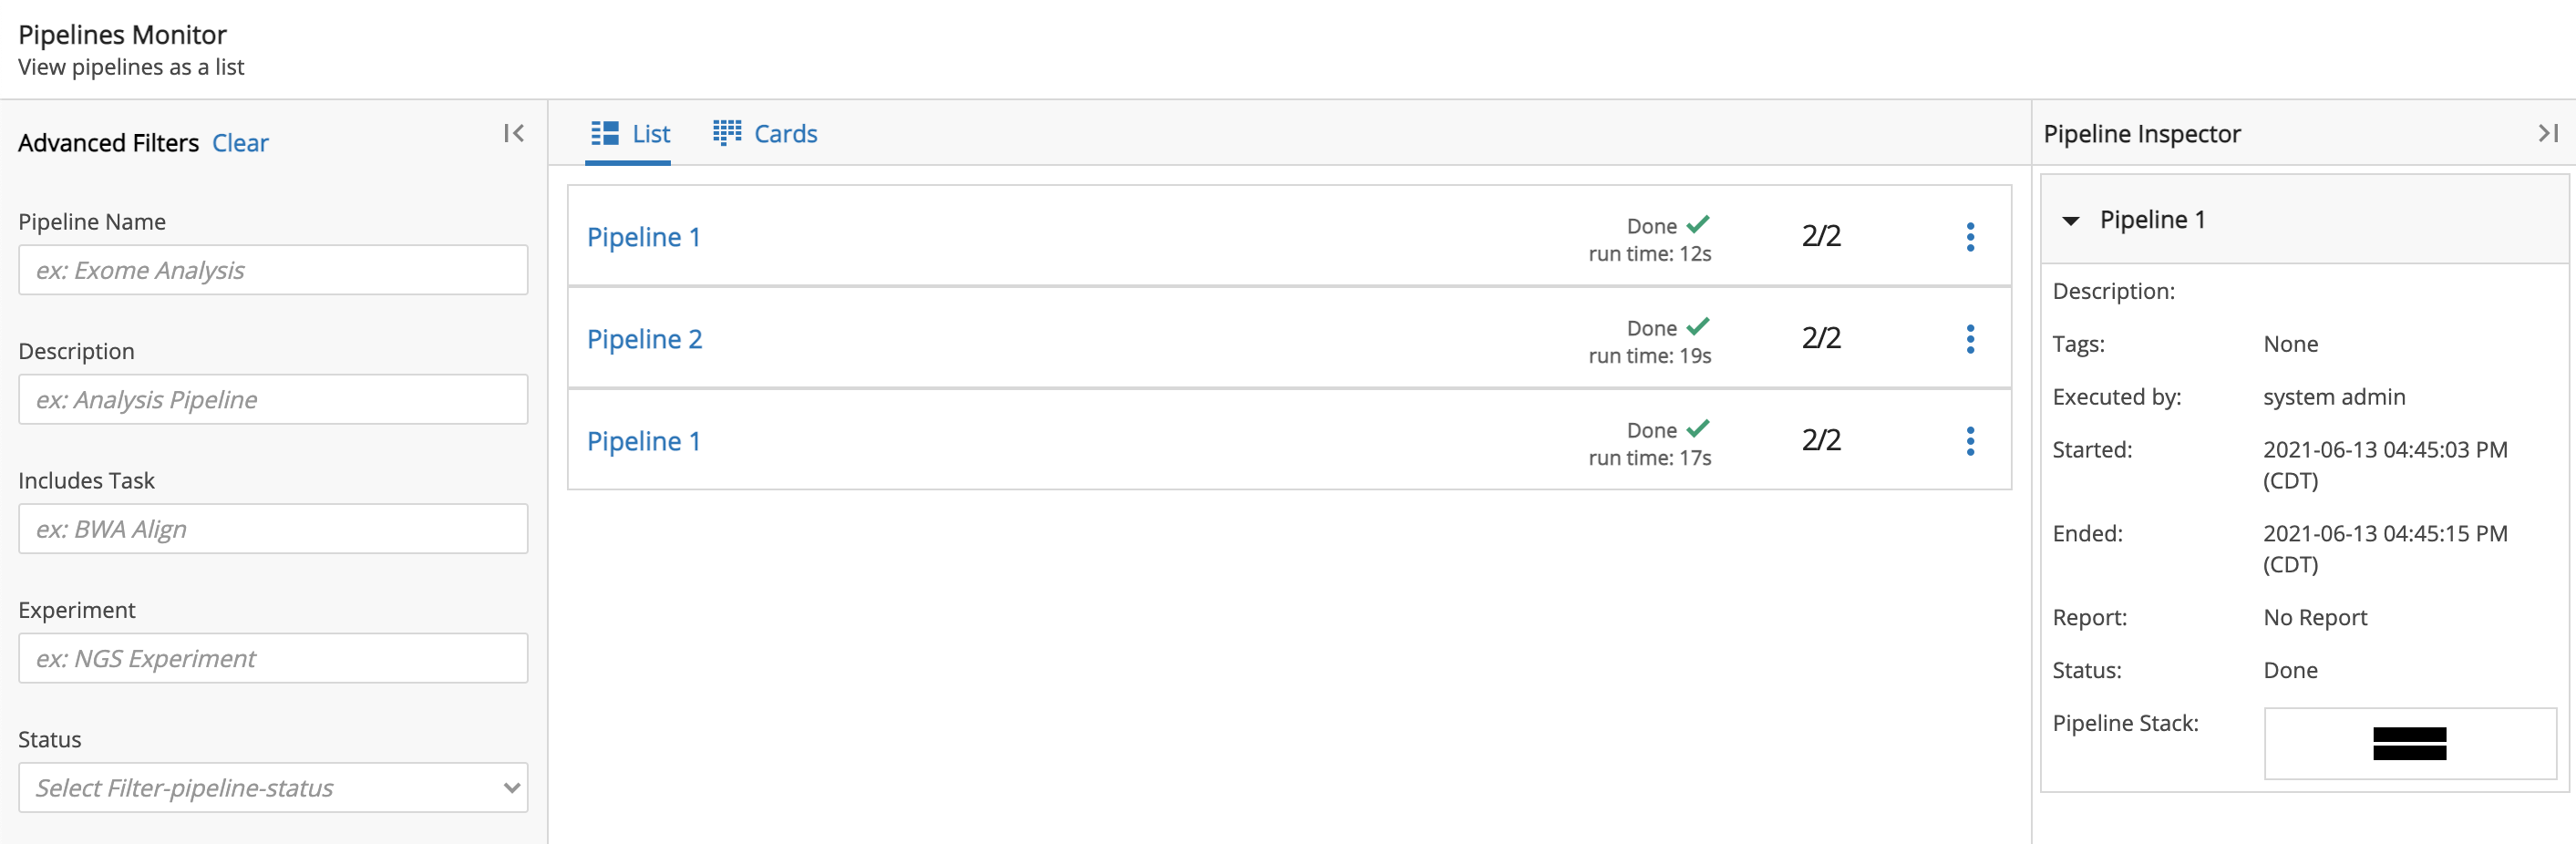
If the selected Pipeline Instance failed, then the Inspector contains a link to STDERR for the specific Task Instance that failed.
3.5.3. Cards View
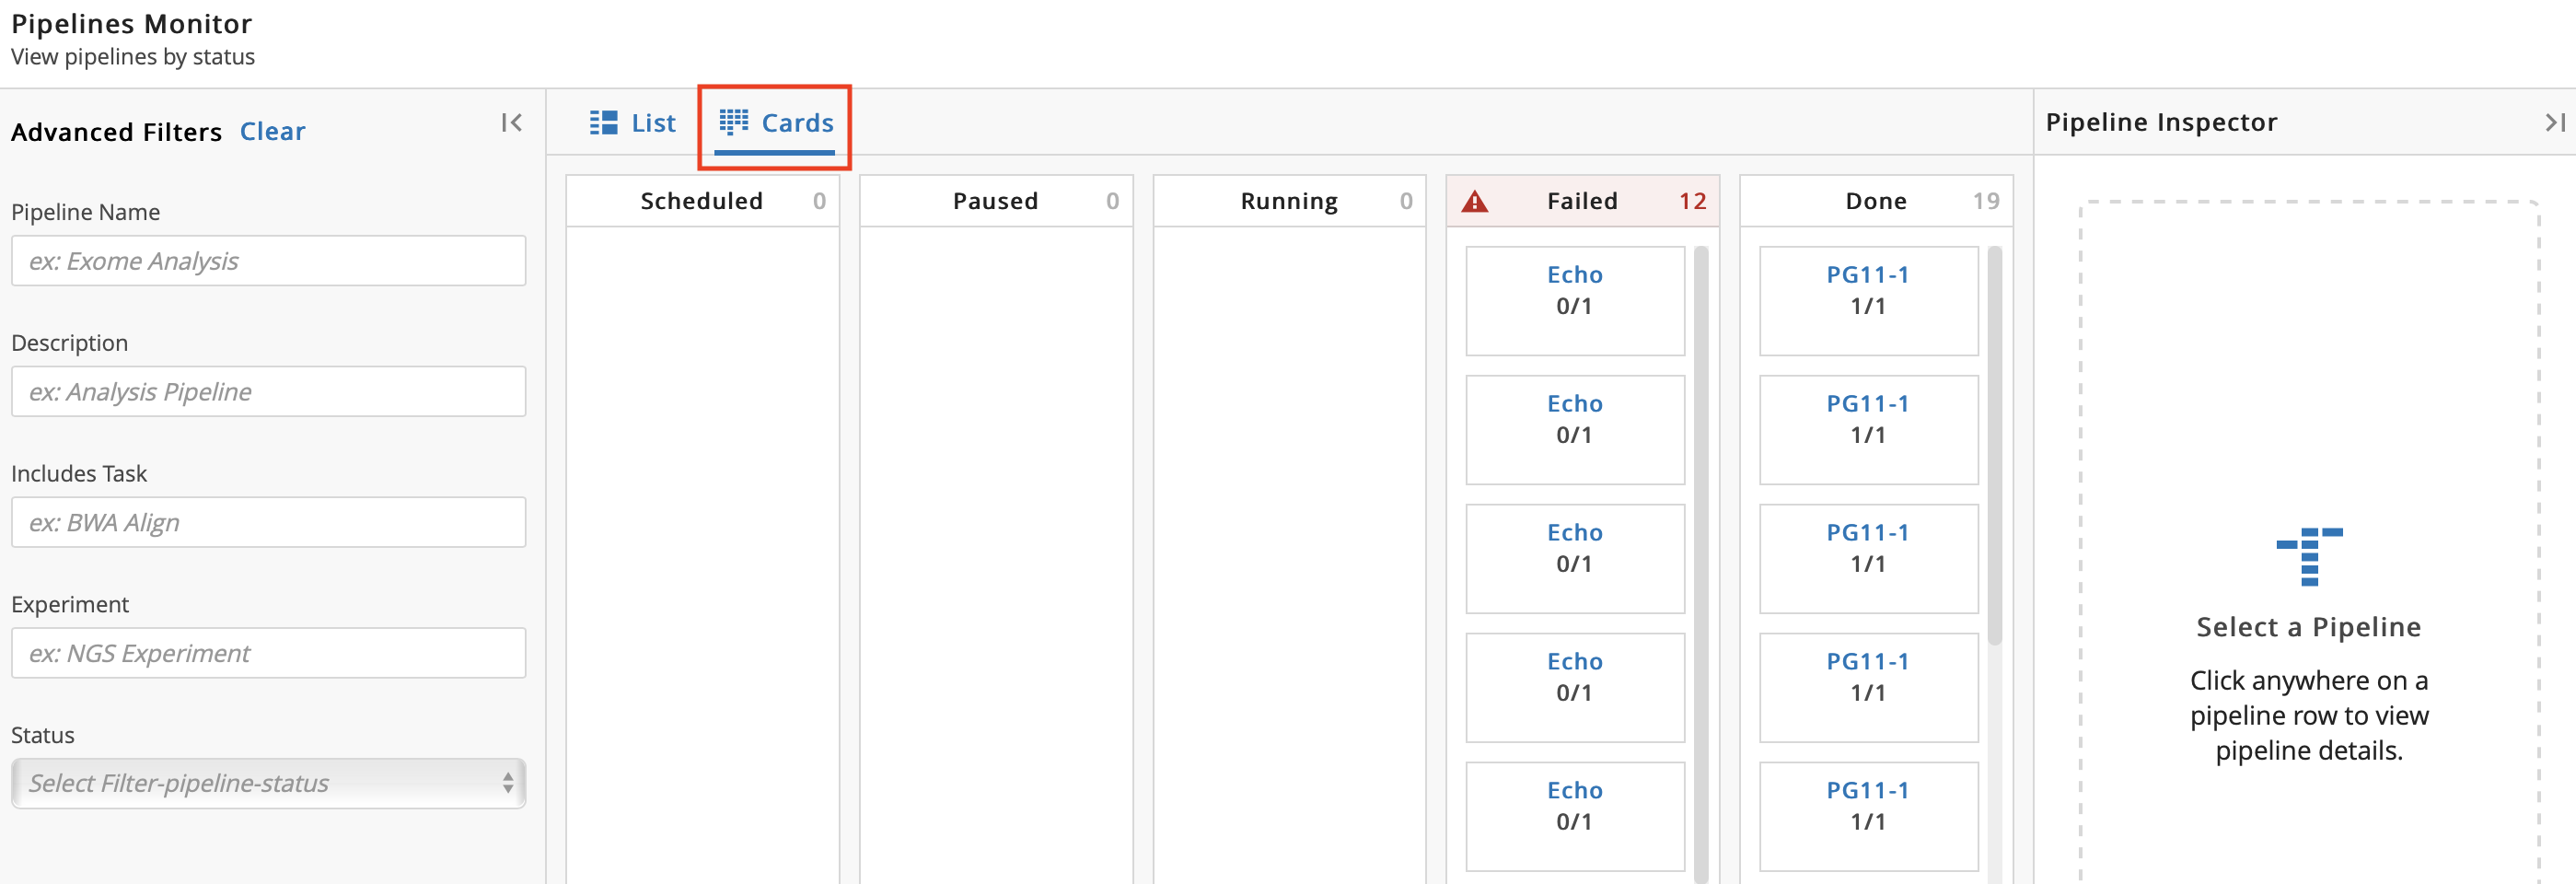
The Cards view displays Pipeline instances organized by their runtime status. As the Pipeline instance status progresses toward completion, the Pipeline Instance cards move through the various states. Clicking on a Pipeline Instance card displays its status and runtime details in the Inspector. Cards view helps provide an overall look at the status of Pipelines and is especially helpful if many Pipeline Instances are running at once.
3.5.4. STDOUT and STDERR
From the Monitor tab, click the Name of a Pipeline.

Click the Pipeline box.

Observe the links to the STDOUT (standard out) and STDERR (standard error) output files associated with the Pipeline.
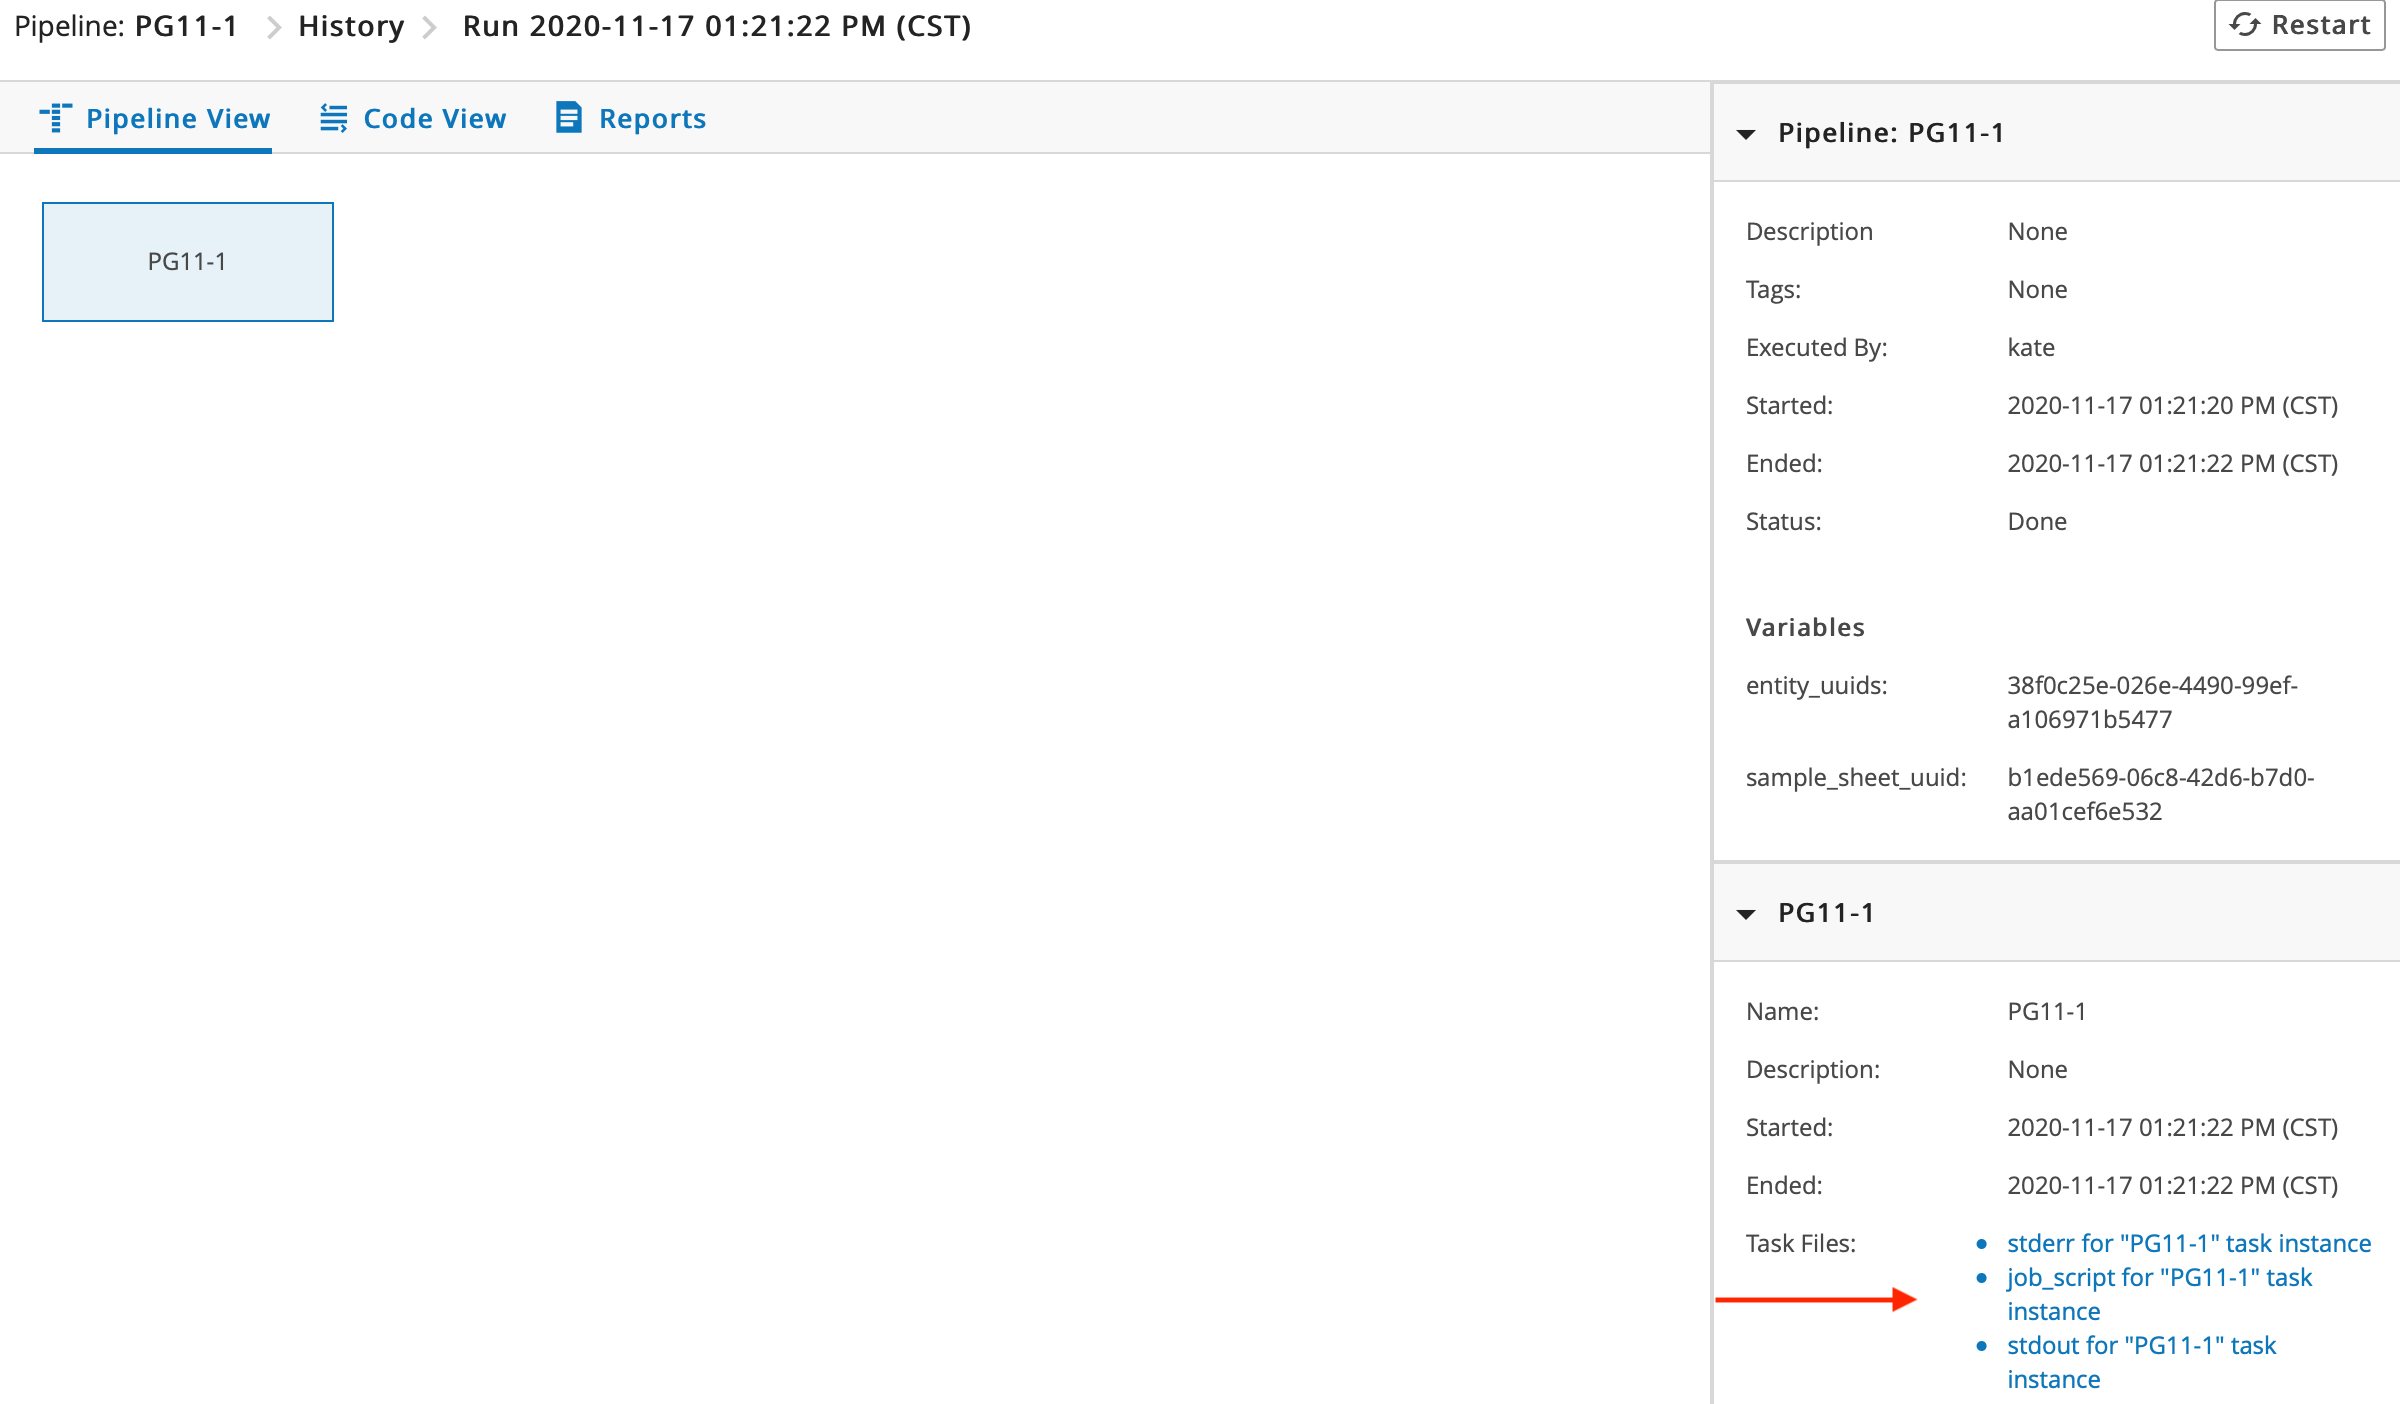
Selecting a Task within the Pipeline will display the Task's runtime status in the sidebar. The status includes the start and stop times of the Task, as well as links to the STDOUT and STDERR Reports for each Task. STDOUT and STDERR information is also displayed in the List View in real-time.
3.5.5. Task Library
Tasks are individual computational steps and are the elements used to build Pipelines. Tasks are any valid shell script that can execute on the target computational resources. Each Task consists of a Bash shell script. Standard Bash shell built-ins or commands are available, as well as any scripts or binaries installed in L7|ESP. An embeddable expression language is provided to help parameterize Tasks. Expressions are evaluated at runtime, and then the resulting bash code is executed.
Create Task
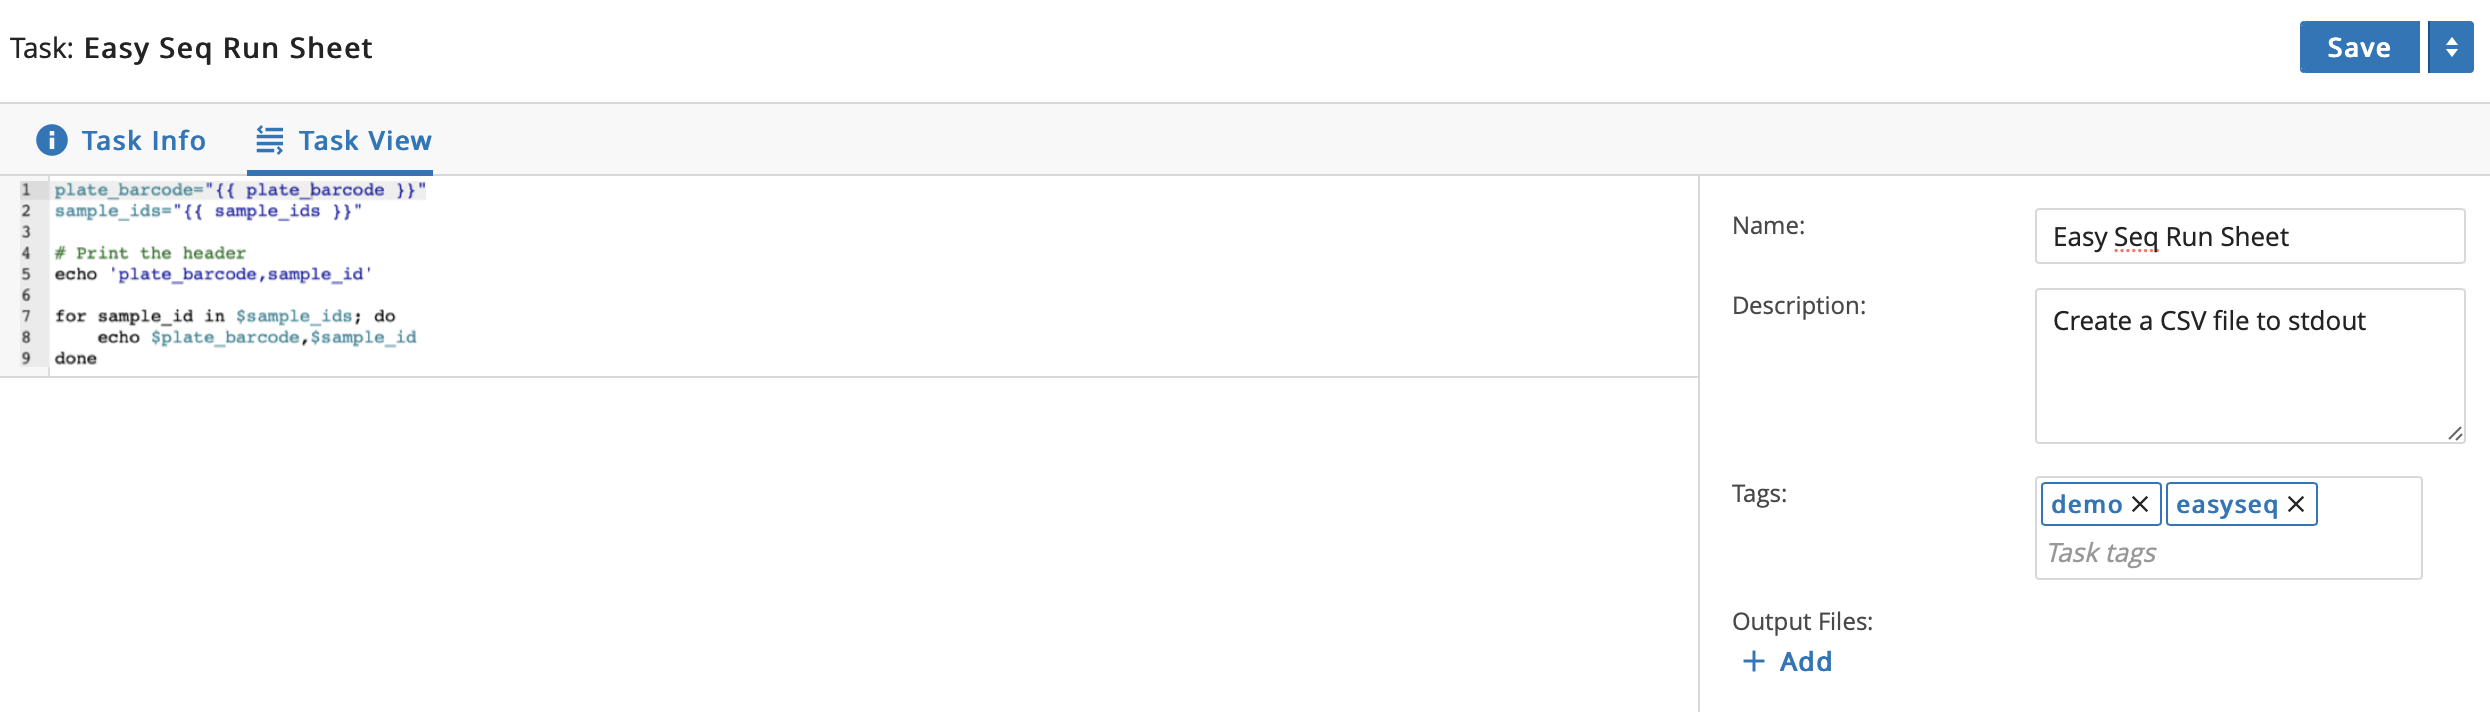
Open the Analysis app and then click the Tasks tab. Click the + New Task button.

Enter a Name for the Task. Optional: Enter a Description and/or Tag(s). Optional: To learn how to add Output Files, refer to the Add Output Files section below.
Enter bash script for the Task.
Click Save.
Edit Task
Open the Analysis app and then click the Tasks tab.
Click Edit on the row of the Task to make changes to that Task.
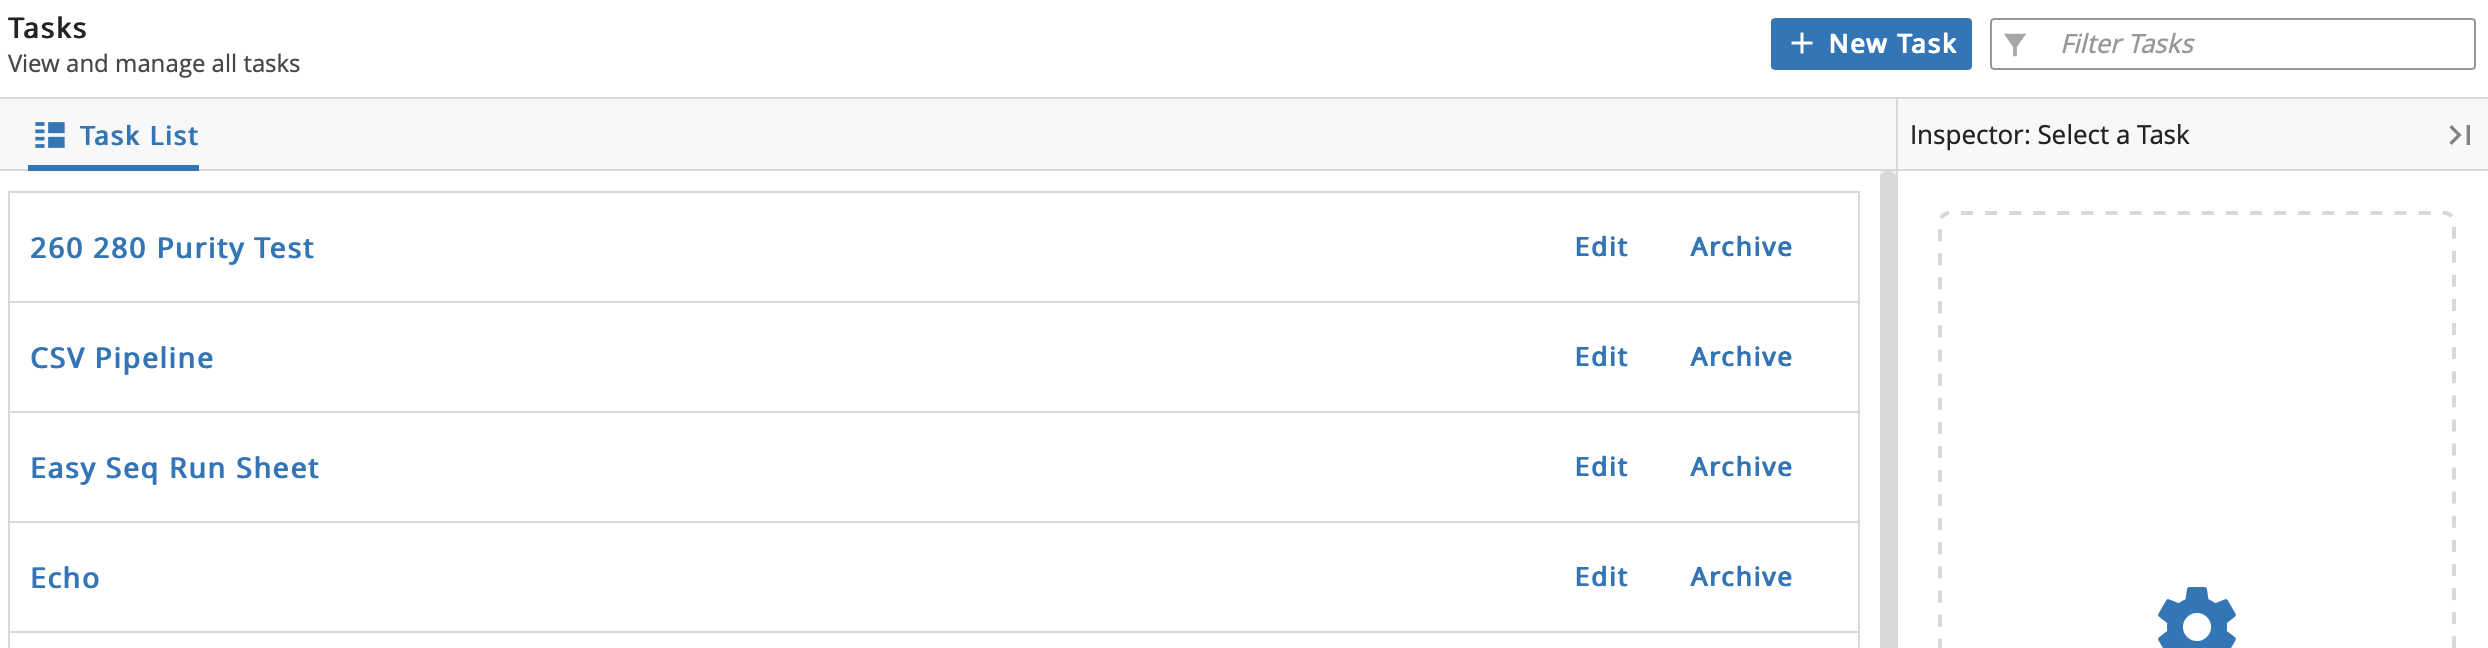
To archive a Task, click Archive on the appropriate Task row. Note: A Task cannot be deleted if it is part of any existing Pipeline(s).
Add Output Files
Tasks can use and generate Files, but they must be Registered in L7|ESP. To Register a File:
Open the Analysis app and then click the Tasks tab. Click Edit on the row of the appropriate Task.
Click + Add below Output Files.
Enter a File Name and File Type for the file. Enter an Expression to generate the File. Click Add.
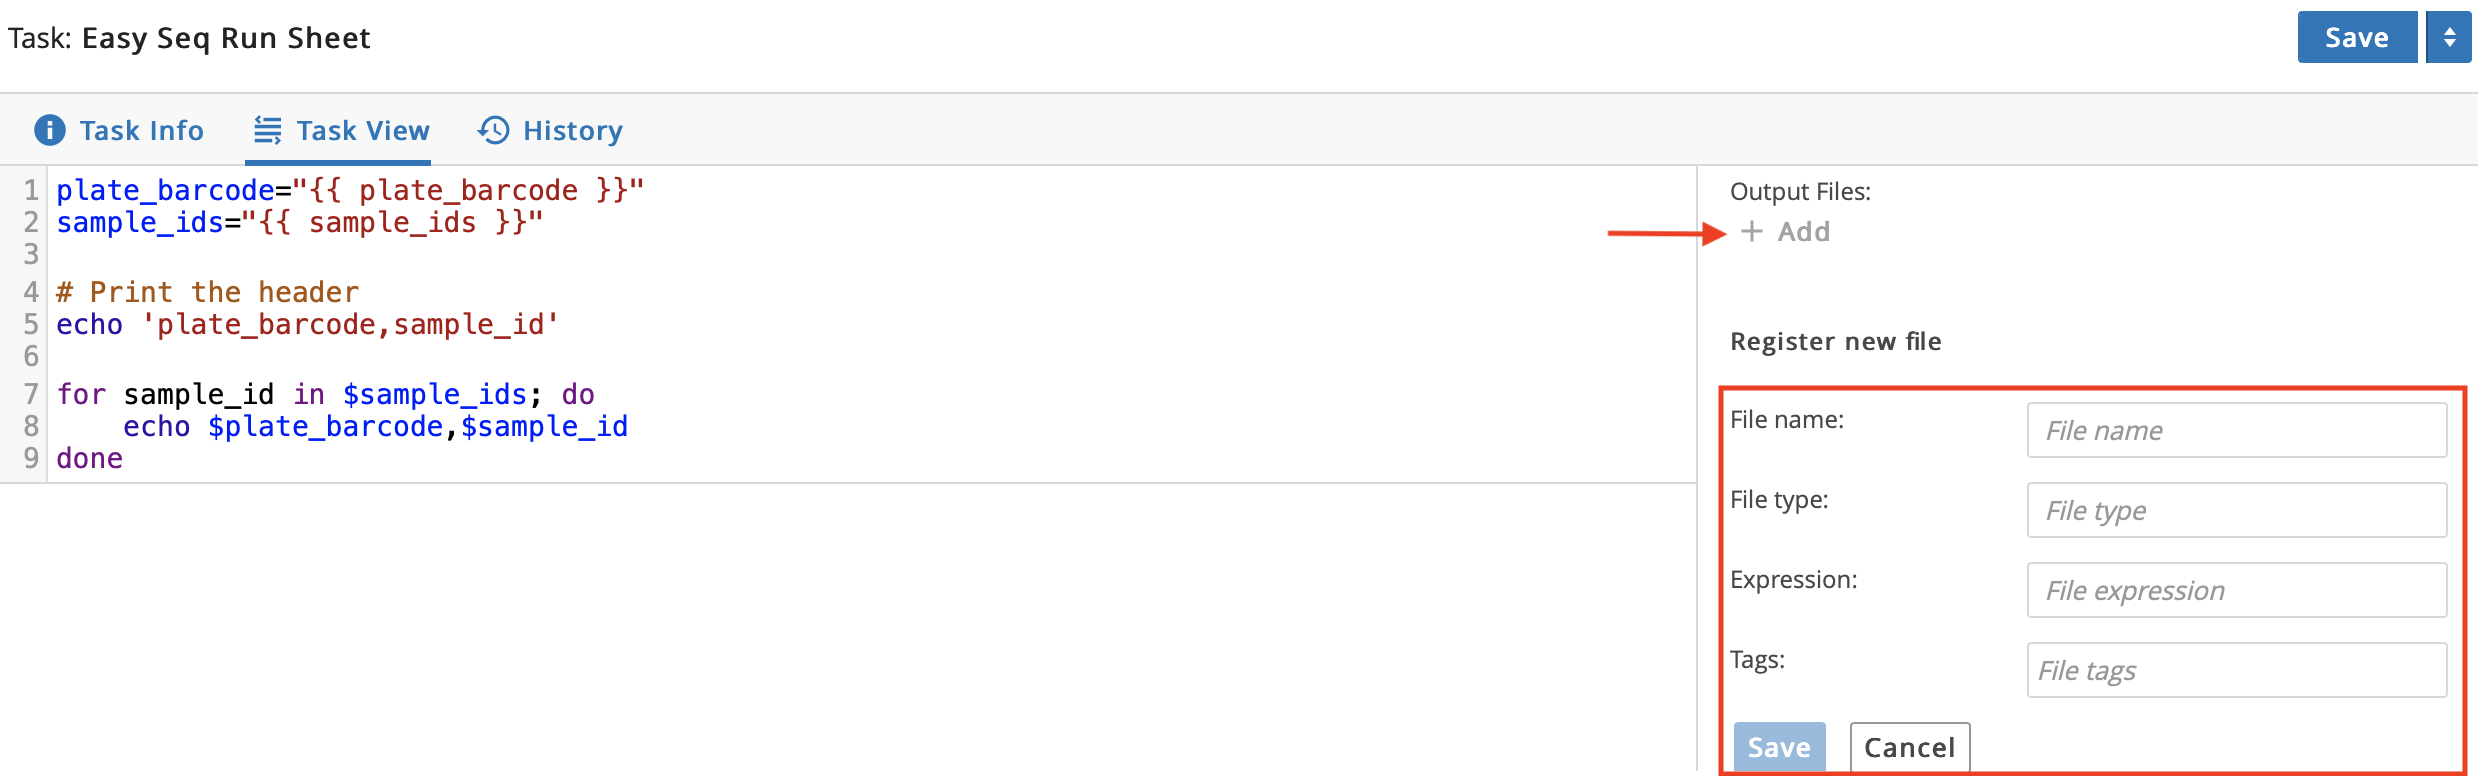
Click Save.
3.5.6. Pipeline Library
A Pipeline is a step of automation written in bash script. Pipelines are used for data analysis or to display data differently. The Pipeline Library displays a list of all Pipelines in L7|ESP. From the Pipeline Library, you can create, run, and edit Pipelines. If you click the row of a Pipeline and click the vertical ellipsis, the following additional options are available: View Reports, View History, and Delete.
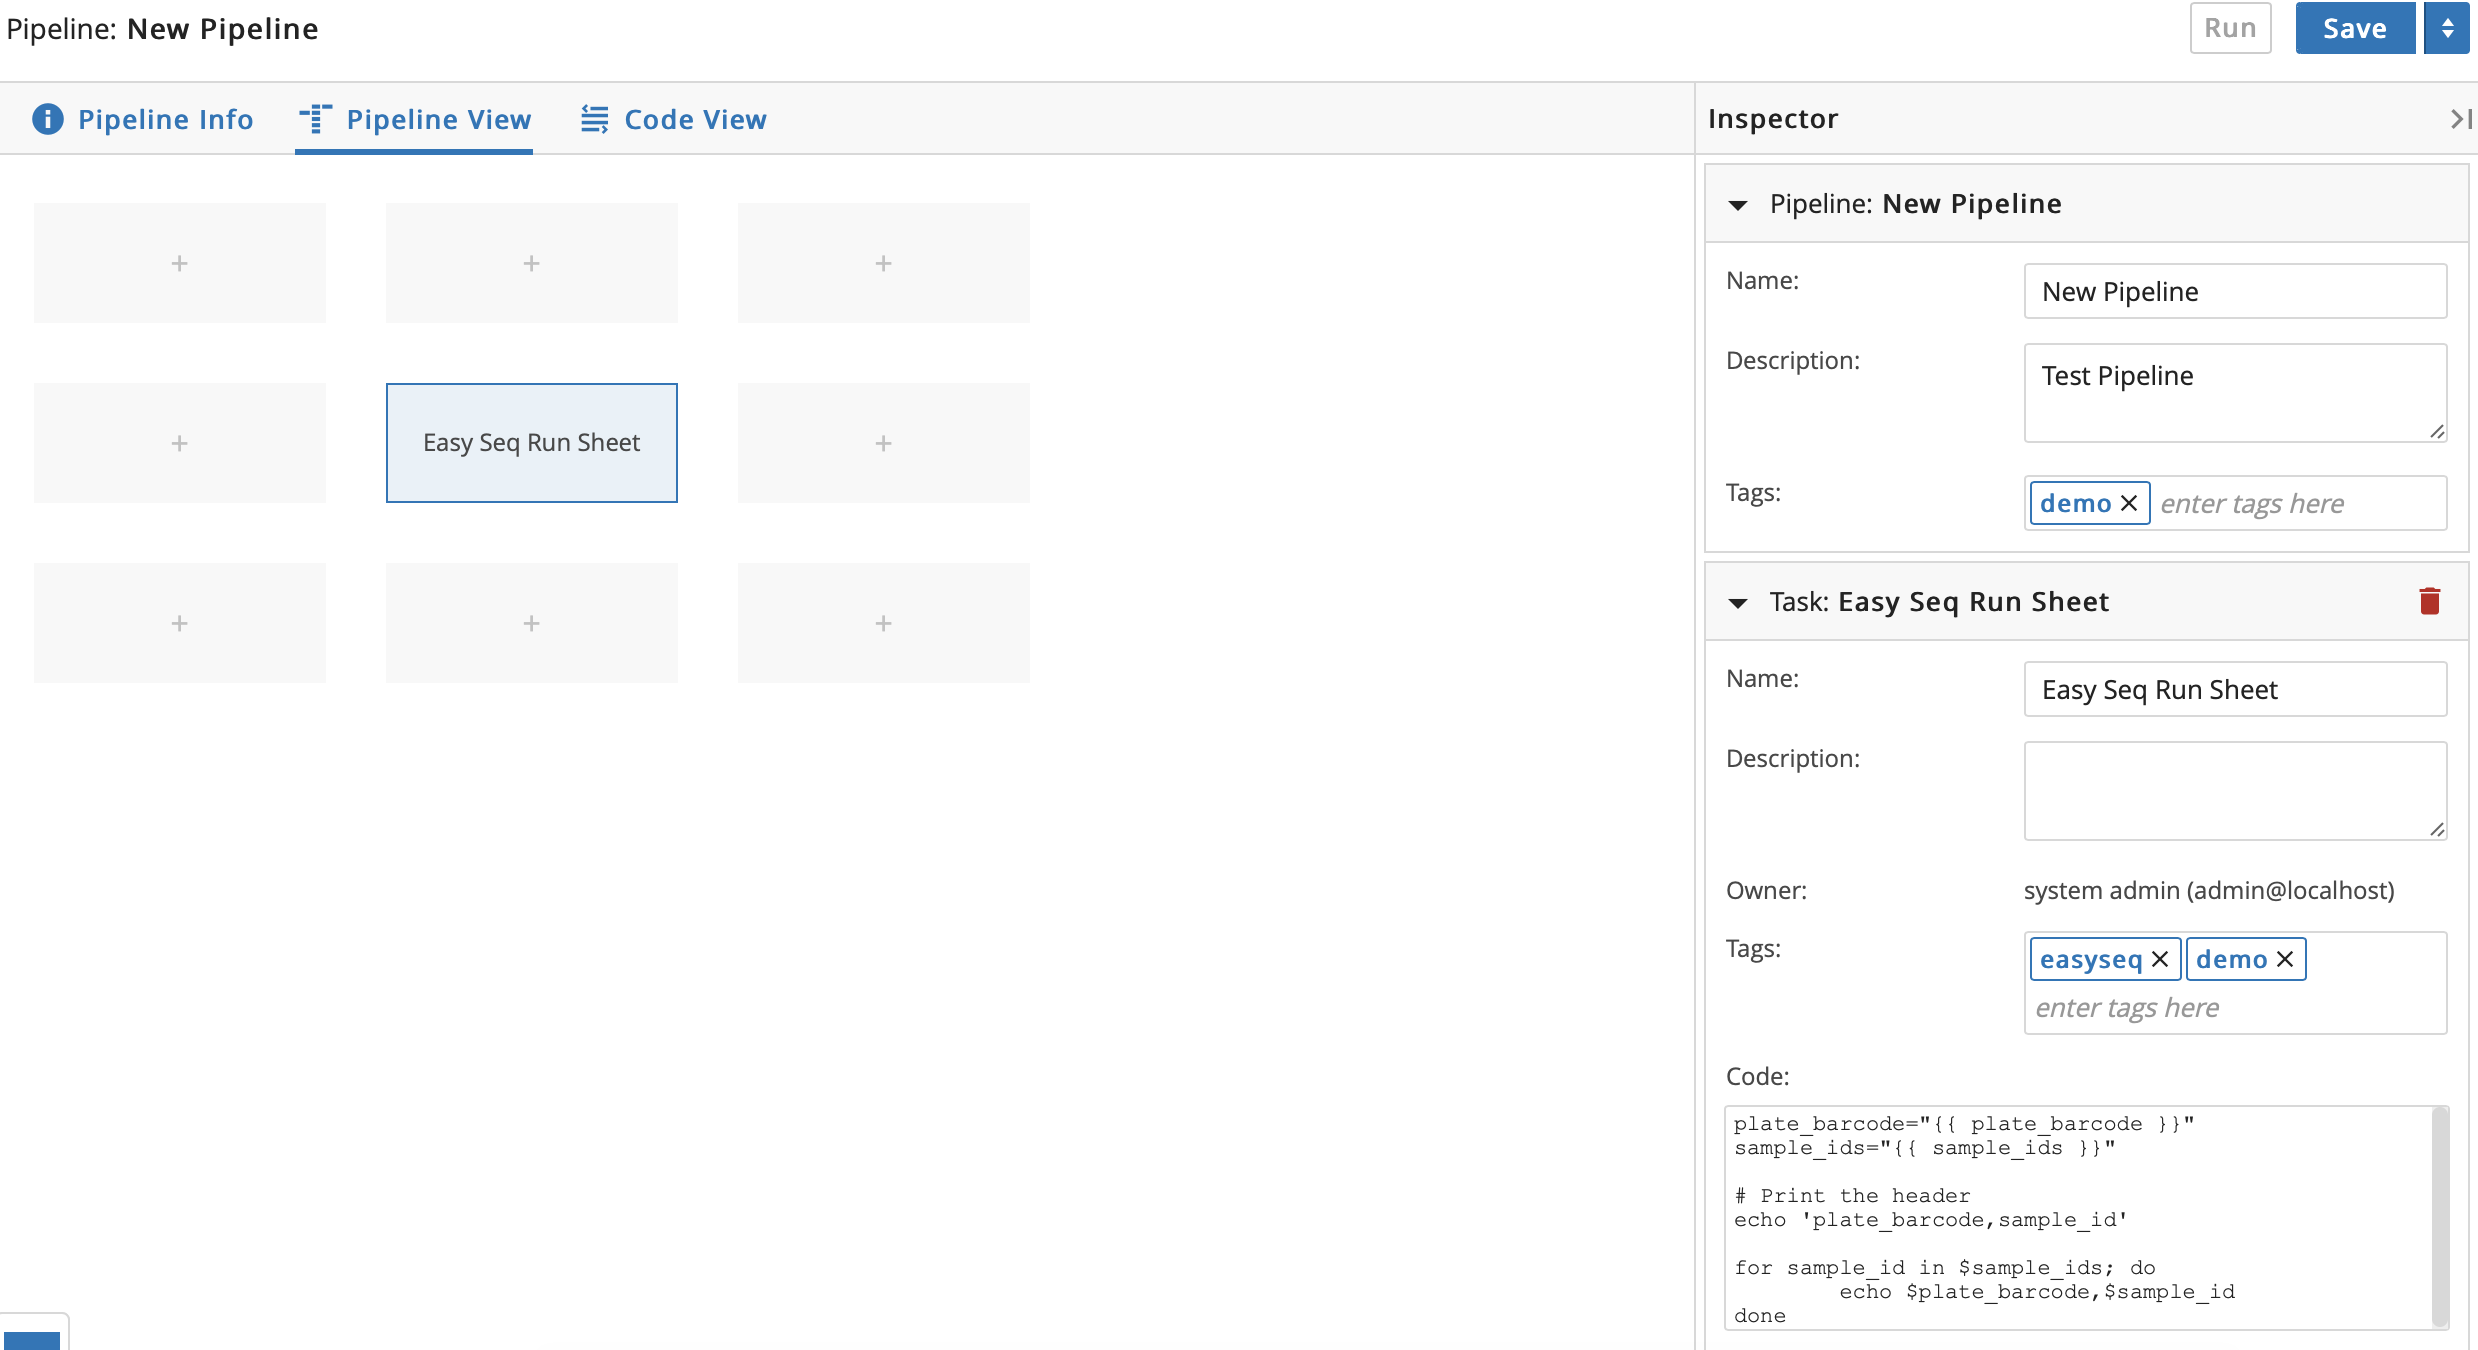
Pipeline Details Page
Click Edit on the row of a Pipeline to access the Pipeline details page. The default view is Pipeline View, which displays the associated Task(s) as a box(es). Code View displays the code that executes the Pipeline.
Create Pipeline
To create a Pipeline:
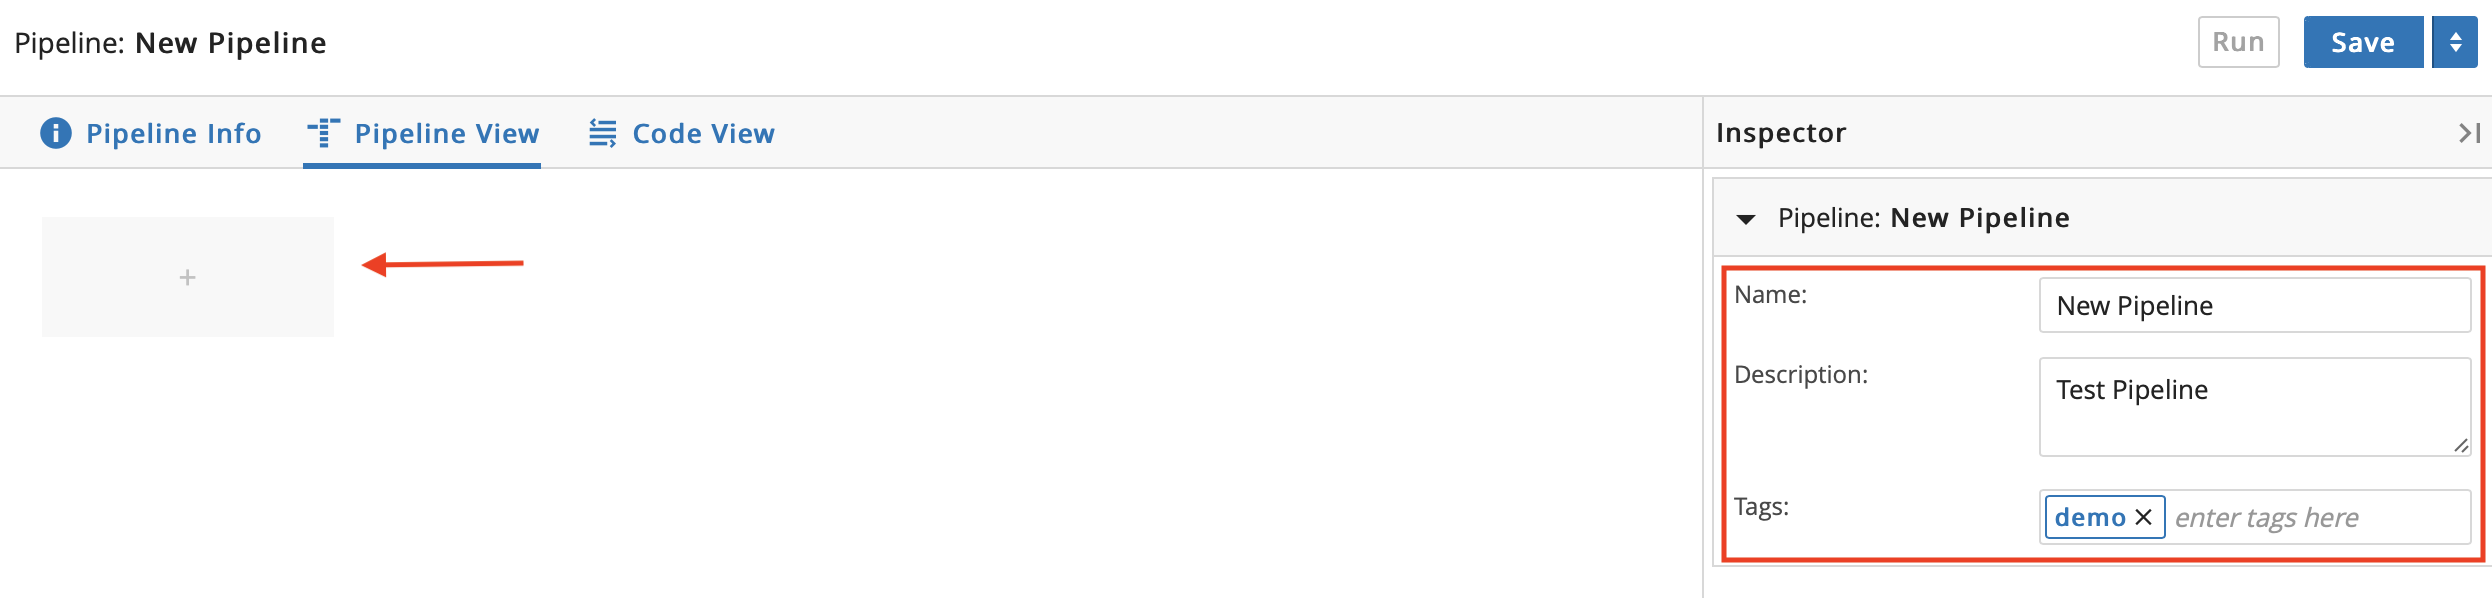
Open the Analysis app and then click the Pipelines tab. Click New Pipeline.

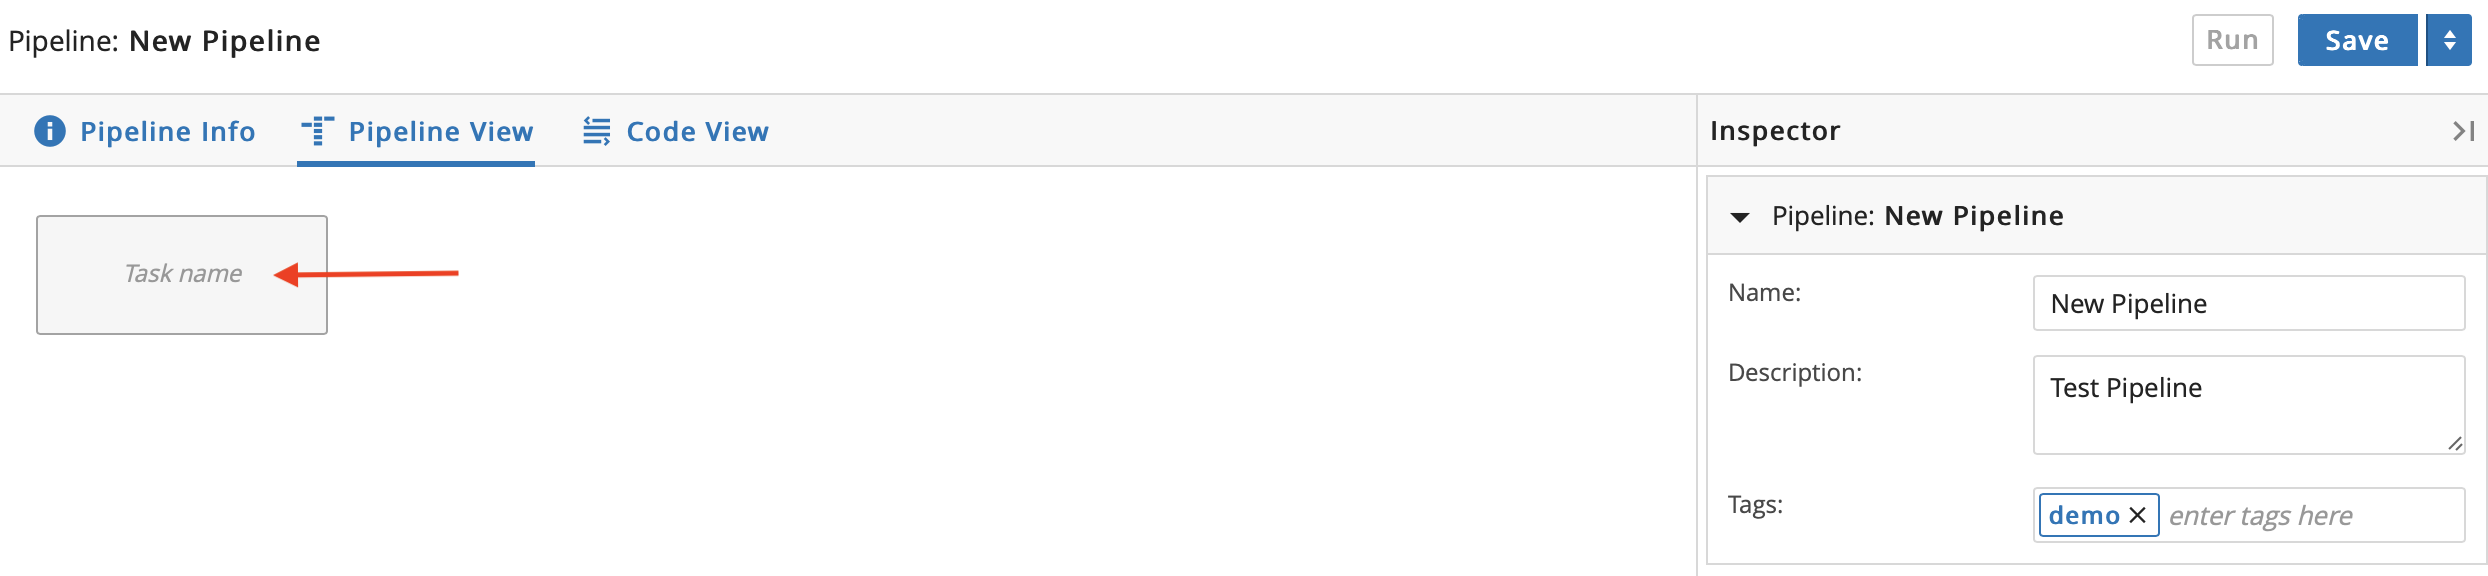
Enter a Name for the Pipeline. Optional: Enter a Description and/or Tag(s). By default, the Pipeline consists of a solitary Task box in the center of the Pipeline view.
Click the + icon in the Task box to insert a Task. Enter a name for a new Task or select an existing Task by typing the name into the Task box.
Select other blank Task boxes to enter additional Tasks.
Connect the Tasks. For information on connecting Tasks, refer to Connect Tasks to Build Pipeline.
Save the Pipeline.
Run Pipeline
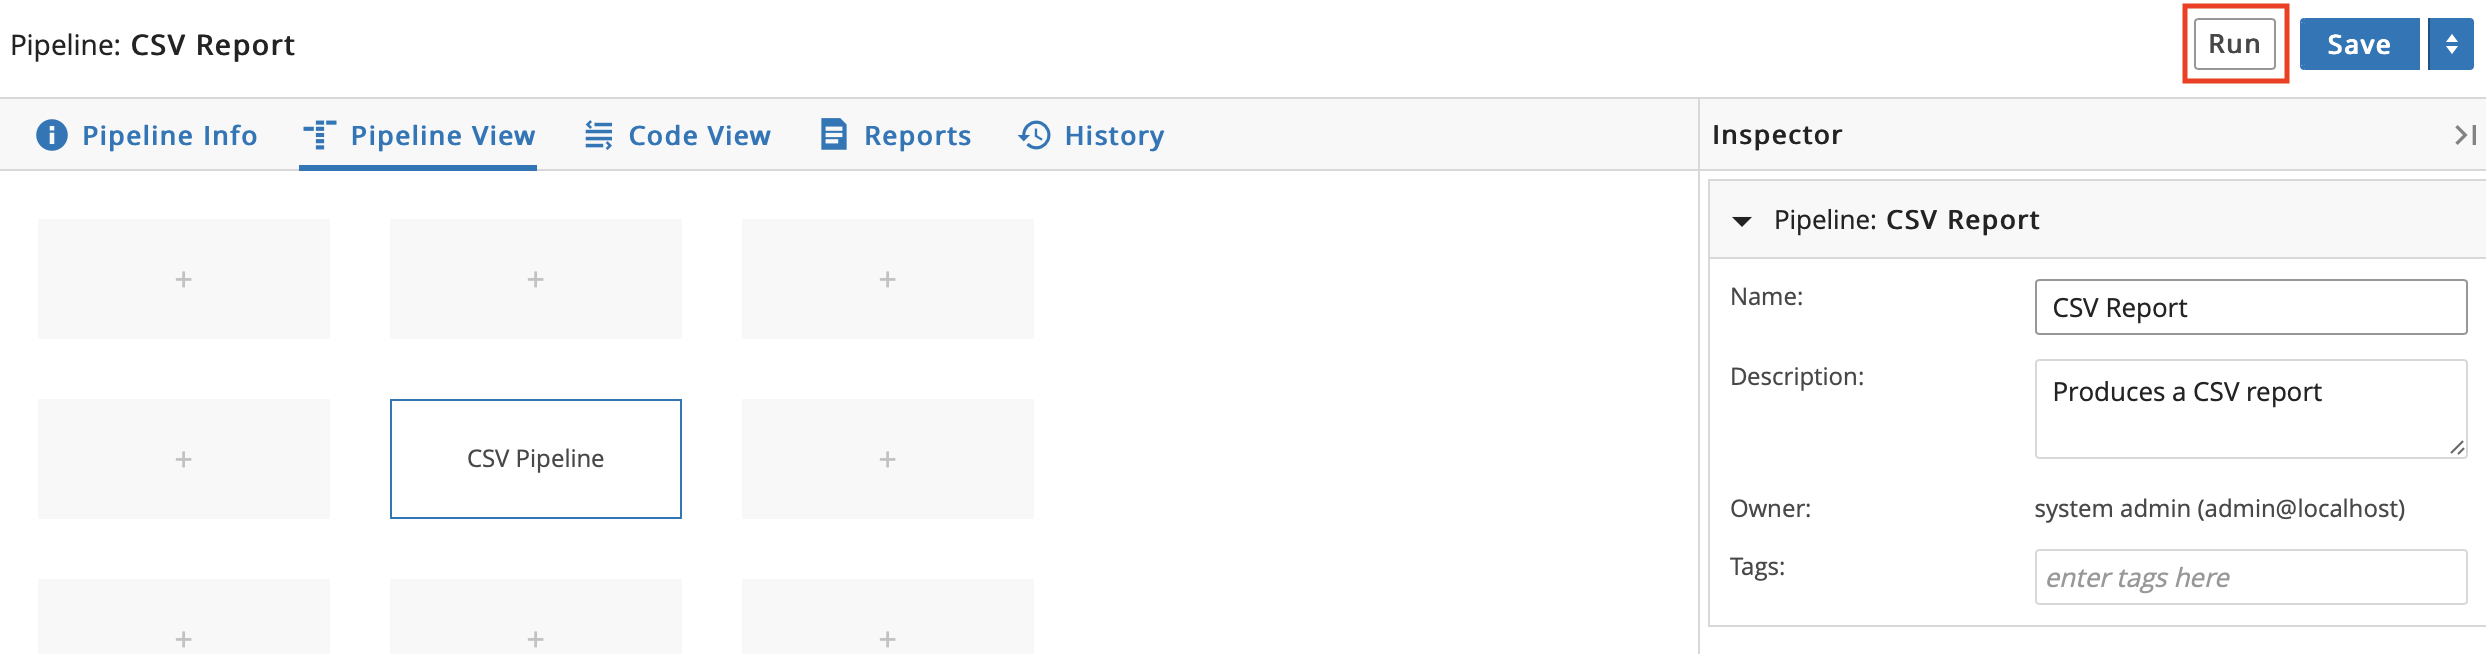
A Pipeline can be executed from the Pipelines tab or from the Pipeline's edit page.
From the Pipelines tab, click Run on the row of the Pipeline that you want to run.

Or, from the Pipeline's edit page, click Run.
Enter any applicable parameters if needed and confirm Run.
Note
If a Pipeline has run successfully, then the Restart, Pause, and Kill options are not available.
Edit Pipeline
From the Pipelines tab, click Edit on the row of the Pipeline you want to edit.
Make any necessary changes to the Pipeline and then click Save.
To archive a Pipeline, click the vertical ellipsis and select Delete. Note: You cannot delete a Pipeline that is associated with a Protocol.
3.5.7. Connect Tasks to Build Pipeline
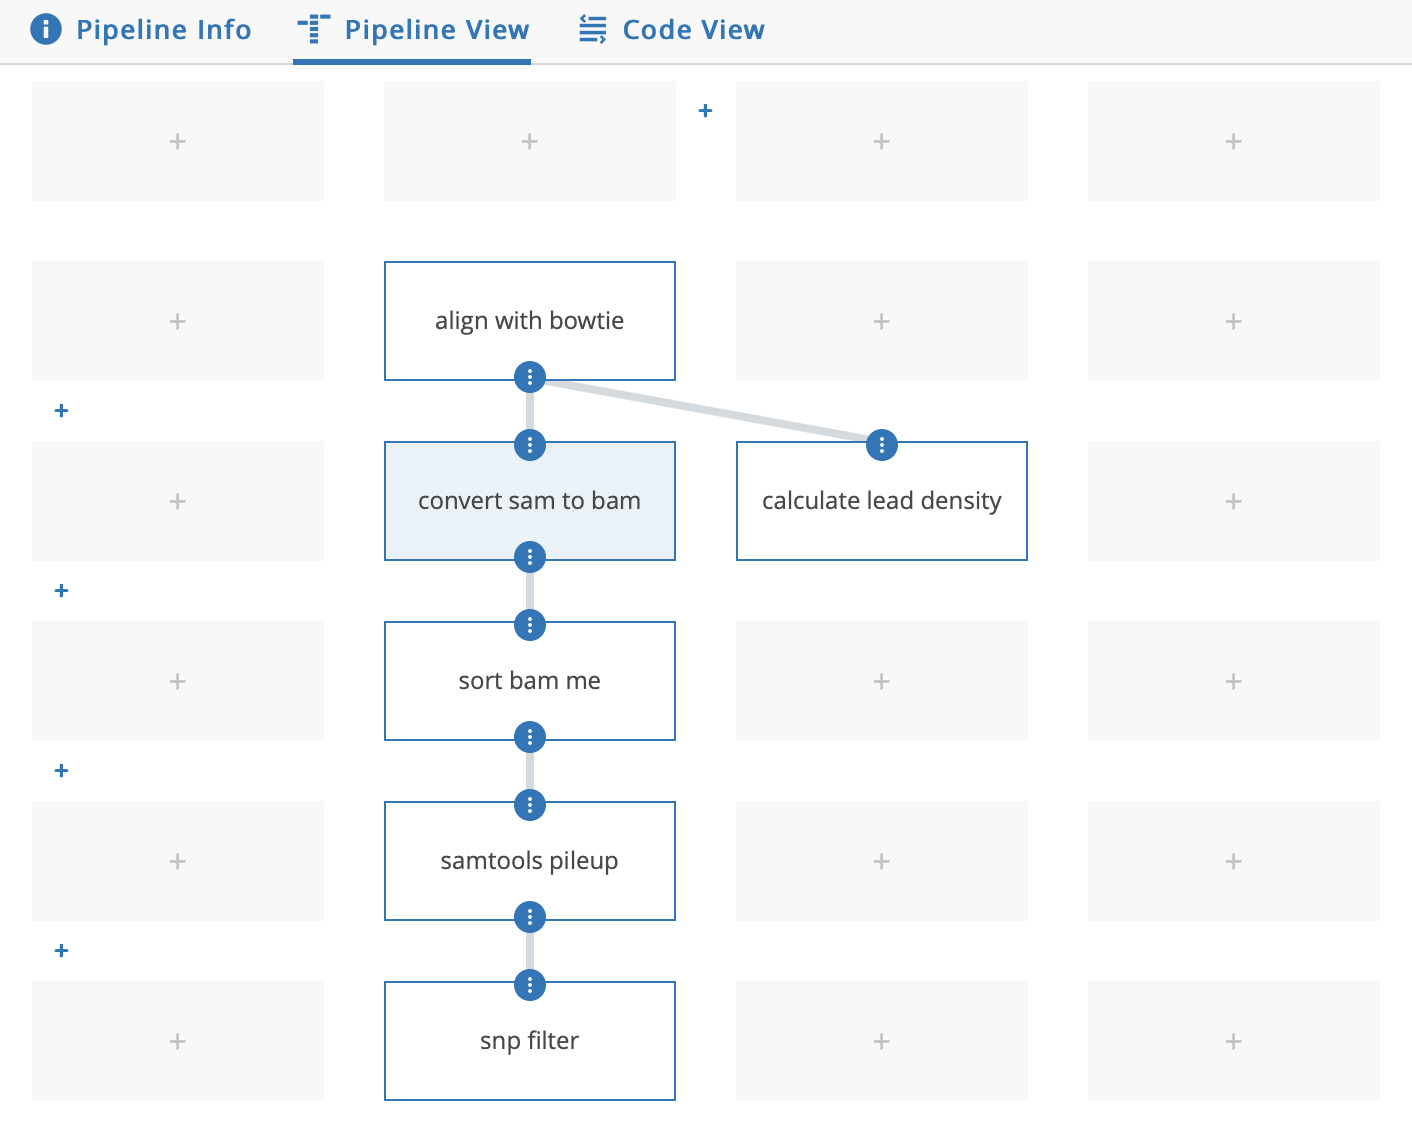
Two types of dependencies can be made between Tasks: temporal dependencies and expression dependencies.
Temporal dependencies appear as gray lines and specify a time ordering between two Tasks. The parent Task must finish executing before the child Task can begin.
Expression dependencies appear as blue lines and bind the result of an expression from the parent Task to an available variable in the child Task. This binding passes information from one Task to another. For example, a parent Task may generate and register an output file that the child Task then uses as input, and an expression dependency can be used to pass the file name from parent to child. As with temporal dependencies, the parent Task must finish before the child Task can begin.
Visually, dependencies flow from higher rows to lower rows in the Pipeline grid. To reflect this flow, manual creation of dependencies is done by selecting a parent and connecting it to the downstream child. Once a dependency is set, the parent cannot be placed lower than the child, and the child cannot be moved to a position above the parent.
Temporal Dependencies
Temporal dependencies are created automatically as Tasks are added to a Pipeline.
To add a temporal dependency between two Tasks, add a child Task directly below a parent Task. The child Task is immediately linked to the parent Task.
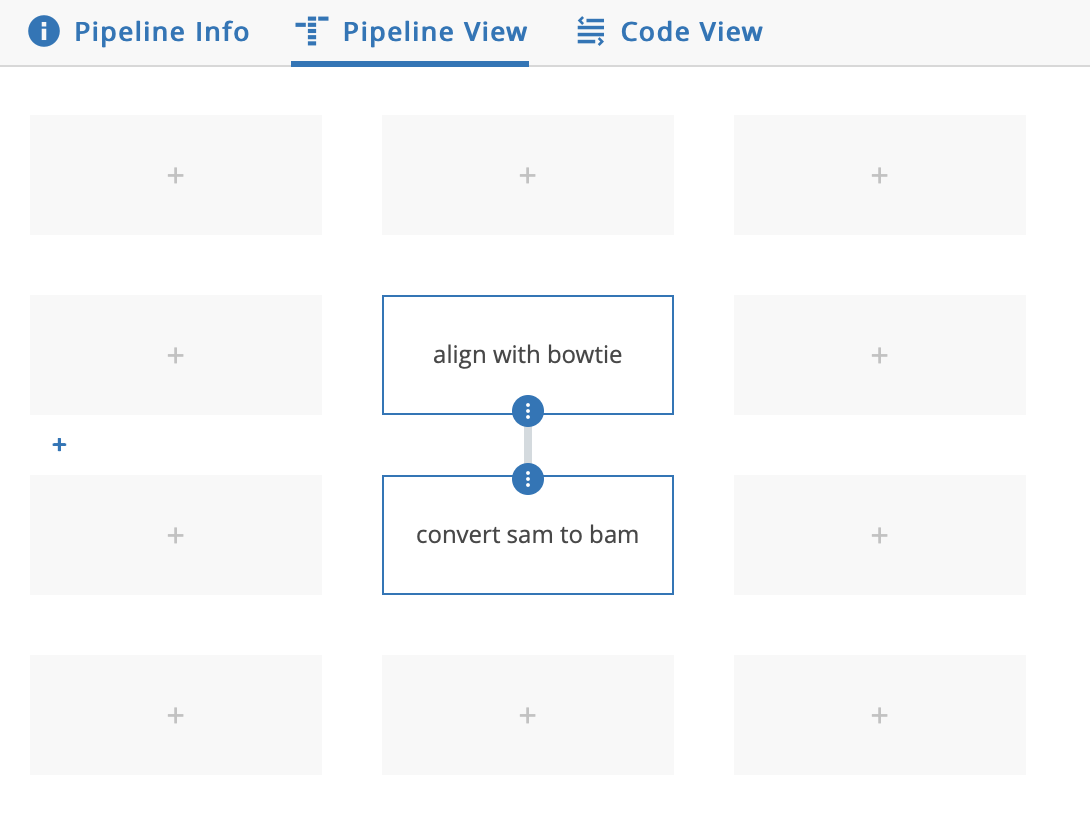
Expression Dependencies
Expression dependencies connect the result of a labeled expression in one Task to the value of a variable in another Task. Labeled expressions are expressions that have been explicitly assigned a label and use the following format:
{{ %label% "this is an" + " " + "expression" }}
The expression above will evaluate to "this is an expression". The value is accessible by other Tasks using label when setting up an Expression Dependency. Note that labels are arbitrary, and carry no meaning beyond that assigned by the developer. It's good practice to use descriptive labels.
sort {{ %in_file% input_file_name }} > {{ %sorted_file% input_file_name + '.sorted' }}
Above, the two expressions are labeled in_file and sorted_file. Note that both expressions use the same variable, input_file_name, but the second expression appends a suffix to it. When bound to variables in other Tasks, sorted_file will be the original file name with the suffix.
To add an expression dependency between two Tasks:
Click the parent Task and then click the blue circle at the bottom of the parent Task's box.
From the pop-up menu, select an expression label from the list.
Click the child Task and then click the blue circle at the top of the child Task's box.
From the pop-up menu, select a variable from the list. This selection binds the parent expression to the child variable. When the Pipeline runs, this expression is evaluated and the resulting value assigned to the selected variable.
Delete Dependency
There are two methods to delete a dependency.
First Method:
Select a Task box from the Pipeline View. Under the Task section in the Inspector, the dependencies for the selected Task appear in the Parents and Children lists.
Click the X next to a dependency to remove it.
Second Method:
Click the blue circle at the top of the child Task's box.
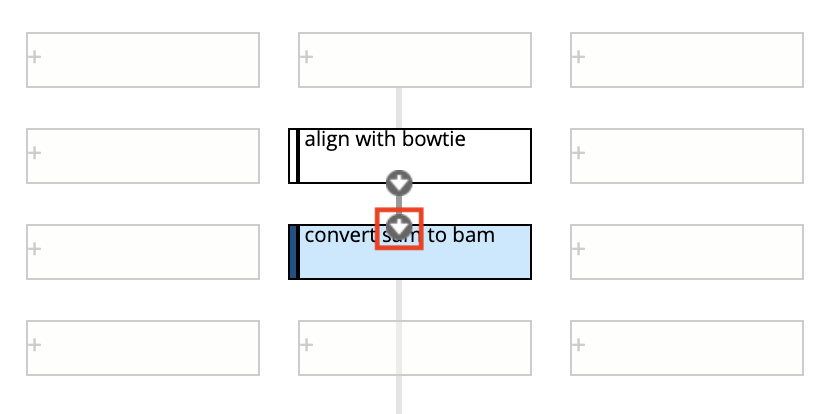
Select the dependency to delete from the pop-up menu that appears.
3.5.8. Reports
Reports allow you to visualize data generated by a Pipeline Instance. Reports can be customized to display results exactly how you want them. HTML and Java elements can be used in generating Reports. Pipelines can be used to generate custom Reports, configurable in the Report Editor for each Pipeline.
Note
To access data files in Reports, you must Register them in L7|ESP.
Create Report
Open the Analysis app and click the Pipelines tab. Click the vertical ellipsis and then select Reports.
A name for the Report is automatically generated as Report for "Pipeline." Rename the report if desired.
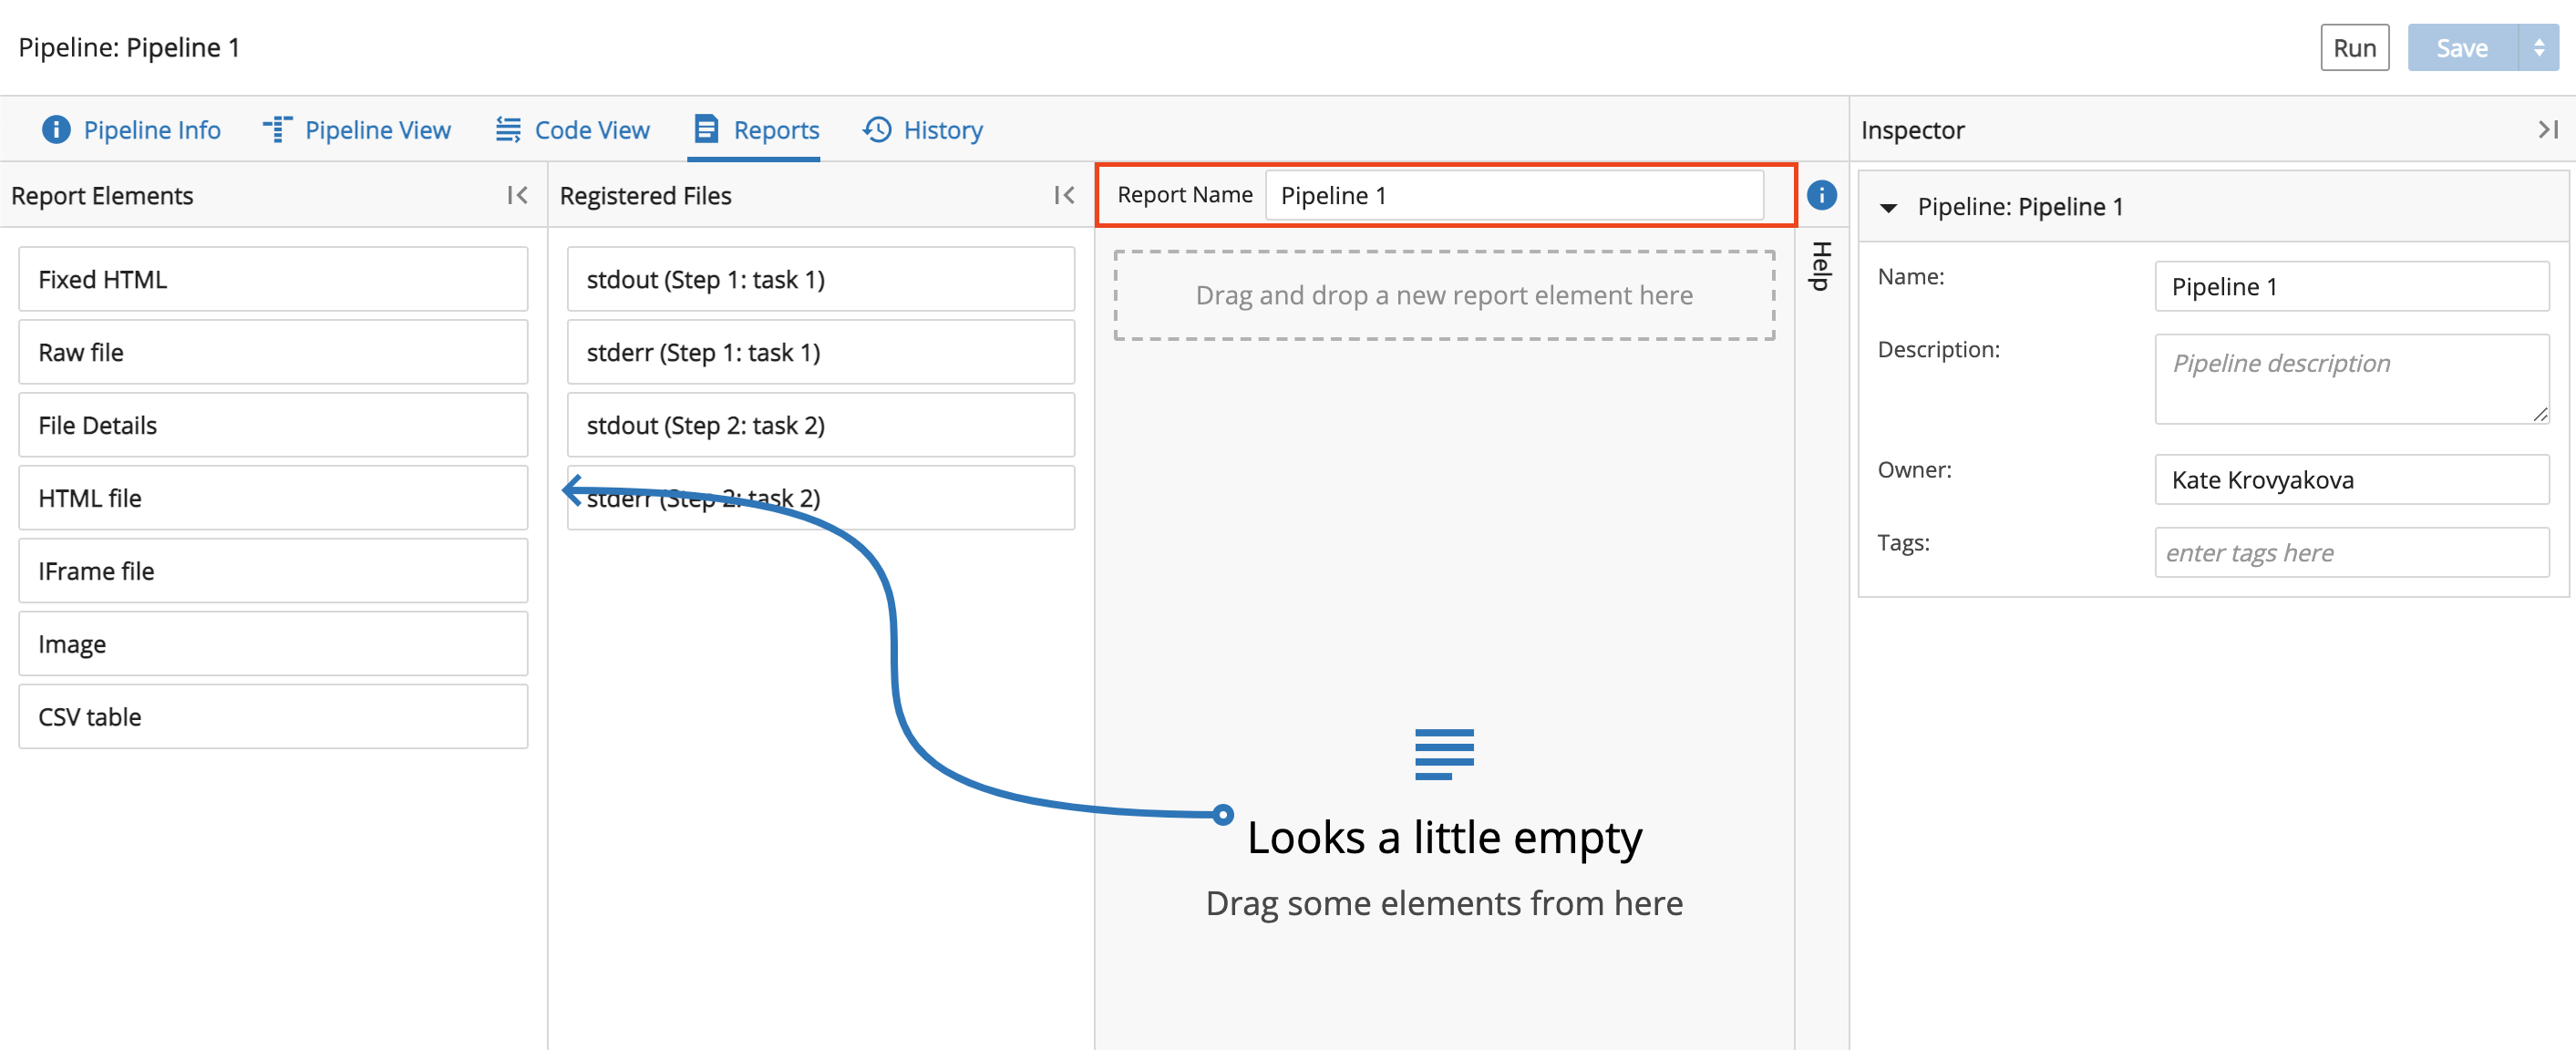
Select elements to include from the Report Elements list on the right. For example, click File Details from the Report Elements list and then drag and drop on the Drag and drop a new report element here... field. Next, click Result Report (Step 1: null) from the Registered Files list and then drag and drop in the field with File Details.
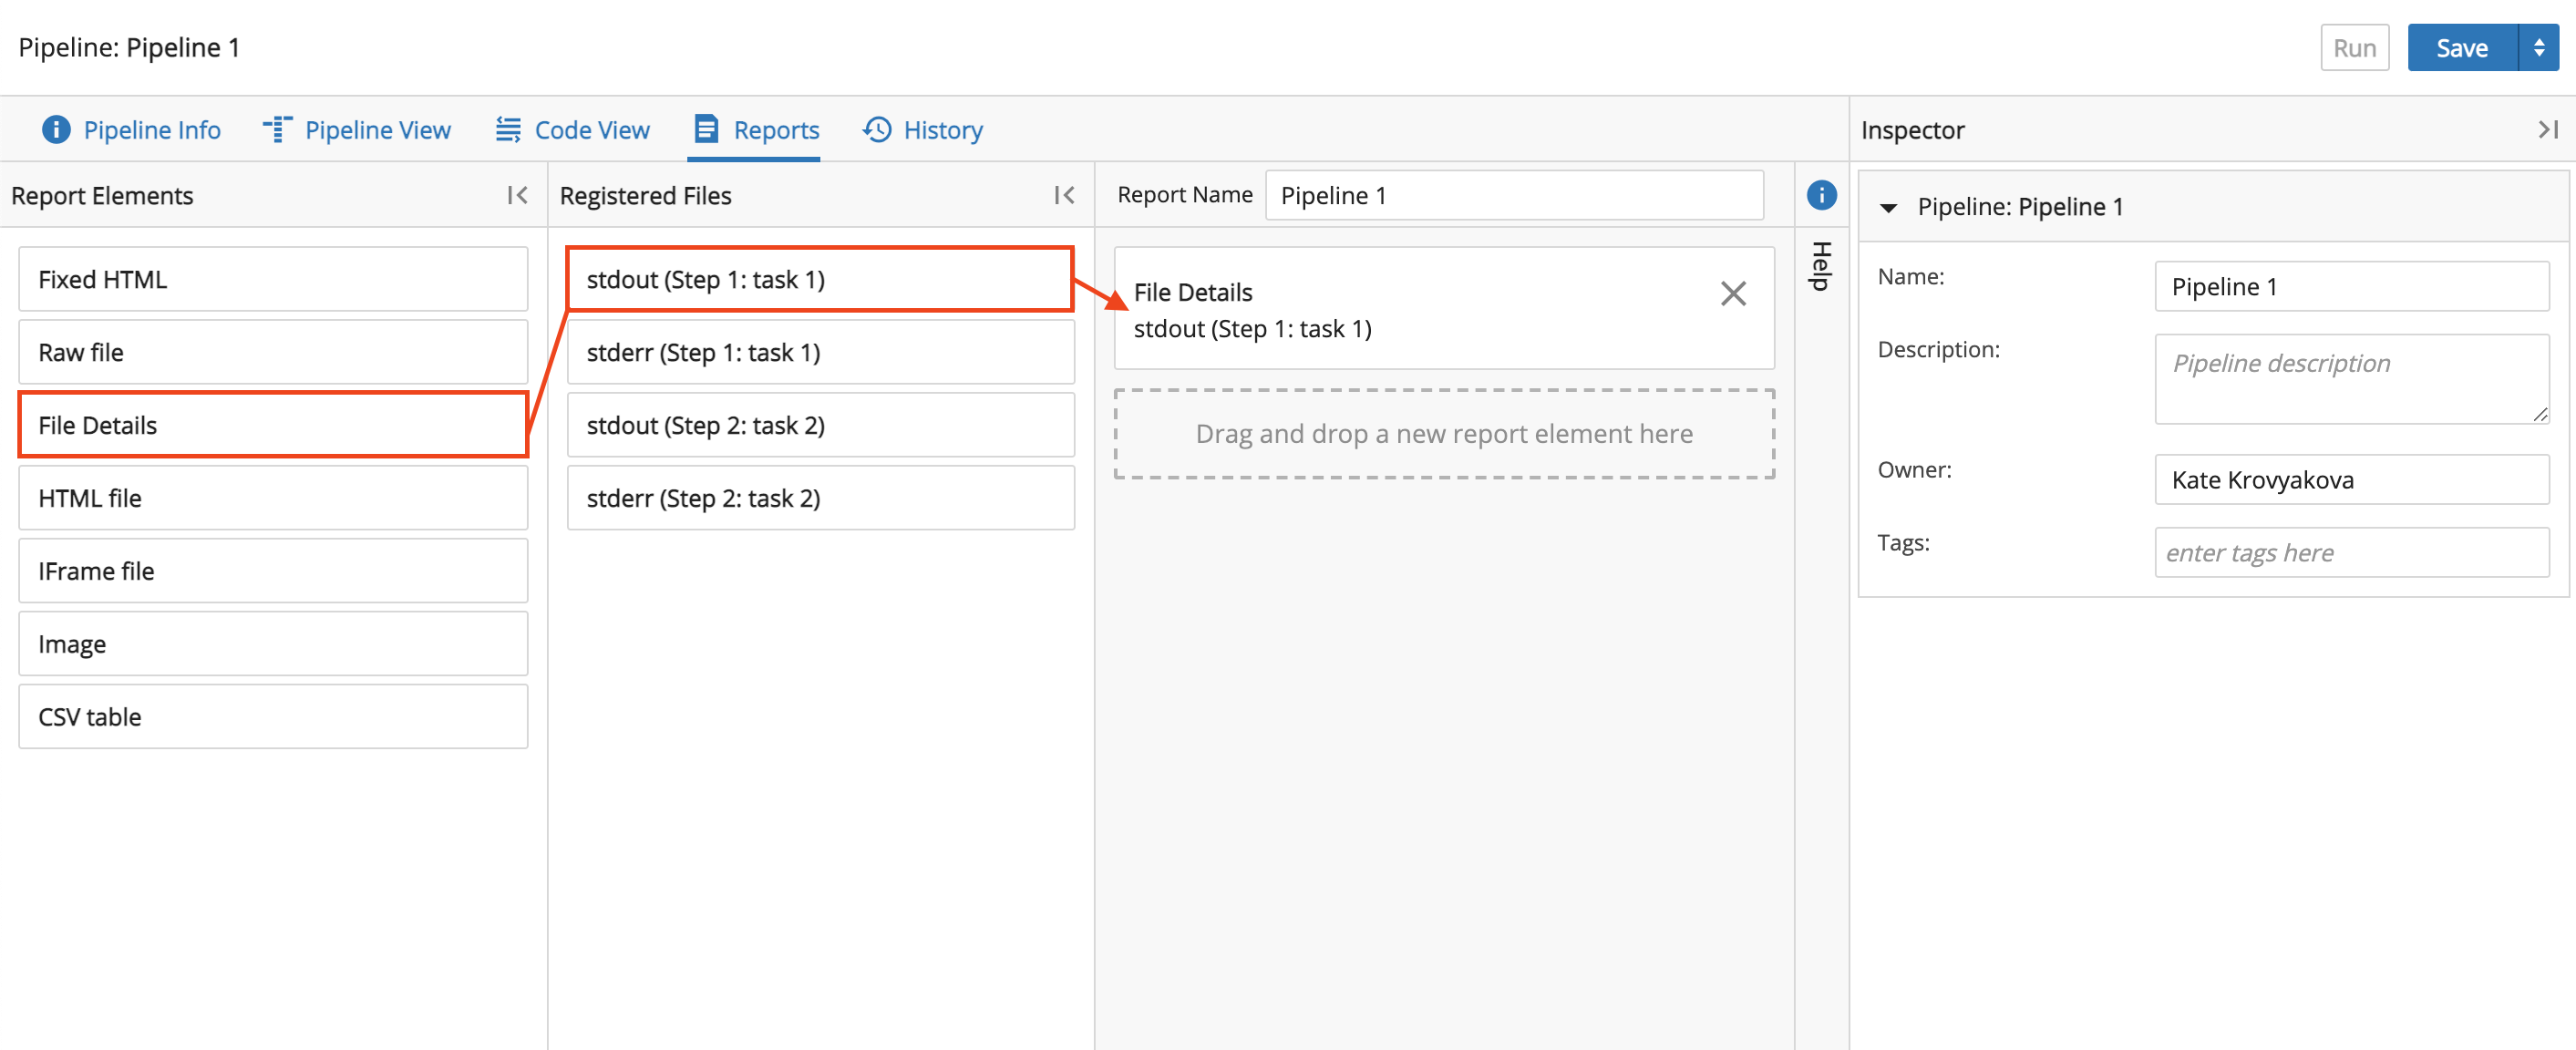
Configure the Report elements and click Save. You must click Save before switching between pages 1 and 2.
After configuring both pages, click Save and Close.
Edit Report
Open the Analysis app and click the Pipelines tab. Click the vertical ellipsis and then select Reports.
Edit the report in the Report builder.

3.5.9. Report Elements
STDOUT and other data sources can be incorporated into Reports:
View Report
Reports can be viewed after a Pipeline Instance has completed execution. From the Monitor tab, click the row of a Pipeline Instance. A link to the Report will display in the panel to the right.

Reports can be printed or saved as PDFs through the web browser's print functionality.
3.5.10. Create Hello World Pipeline
This example demonstrates the process of creating a new Task and a new Pipeline.
Go to the Pipeline Library.
Select New Pipeline
Enter "Hello World" for the Pipeline Name.
Click the Task box.
Enter "World: for the Task name inside the Task box.
In the Code field, enter echo 'Hello World'.
Click Save.
Click Run to execute the Pipeline. Click Run again in the confirmation dialog.
Go to the Monitor tab to see the results of the Hello World Pipeline run.
3.5.11. Edit Hello World Pipeline
This example demonstrates the process of editing an existing Pipeline.
Go to the Pipeline Library.
Double click the Hello World Pipeline or click Edit on the row of the Hello World Pipeline.
Select the Task box below the World Task and enter "Mars."
In the Code field, enter echo 'Hello Mars'.
Click Save.
Click Run. Click Run again in the confirmation dialog.